HP 9500hdn HP Color LaserJet 9500nand 9500hdn - User Guide - Page 201
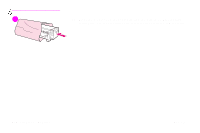
the handles firmly and pull the fuser out until it stops. Then lift the fuser out, of the printer.
 |
UPC - 808736429689
View all HP 9500hdn manuals
Add to My Manuals
Save this manual to your list of manuals |
Page 201 highlights
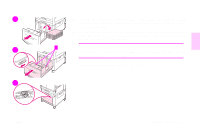
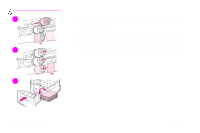
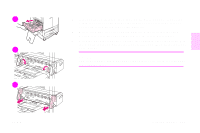
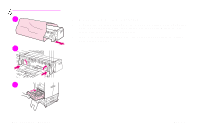
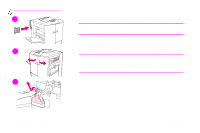
4 5 6 ENWW 4 If the duplexer is installed, push down on the green duplexer-release tab. Grasp the center handle and pull the duplexer out until it stops. It is not necessary to completely remove the duplexer. 5 Rotate each blue fuser lever inward until it is in the horizontal position, making sure not to pinch your fingers when the levers are released. 7 6 Using the black fuser handles, pull the fuser partially out of the printer. Grip the handles firmly and pull the fuser out until it stops. Then lift the fuser out of the printer. WARNING The fuser is heavy and might be hot. Be careful not to injure yourself when removing the fuser. Installing supplies 199
-
 1
1 -
2
-
3
-
4
-
5
-
6
-
7
-
8
-
9
-
10
-
11
-
12
-
13
-
14
-
15
-
16
-
17
-
18
-
19
-
20
-
21
-
22
-
23
-
24
-
25
-
26
-
27
-
28
-
29
-
30
-
31
-
32
-
33
-
34
-
35
-
36
-
37
-
38
-
39
-
40
-
41
-
42
-
43
-
44
-
45
-
46
-
47
-
48
-
49
-
50
-
51
-
52
-
53
-
54
-
55
-
56
-
57
-
58
-
59
-
60
-
61
-
62
-
63
-
64
-
65
-
66
-
67
-
68
-
69
-
70
-
71
-
72
-
73
-
74
-
75
-
76
-
77
-
78
-
79
-
80
-
81
-
82
-
83
-
84
-
85
-
86
-
87
-
88
-
89
-
90
-
91
-
92
-
93
-
94
-
95
-
96
-
97
-
98
-
99
-
100
-
101
-
102
-
103
-
104
-
105
-
106
-
107
-
108
-
109
-
110
-
111
-
112
-
113
-
114
-
115
-
116
-
117
-
118
-
119
-
120
-
121
-
122
-
123
-
124
-
125
-
126
-
127
-
128
-
129
-
130
-
131
-
132
-
133
-
134
-
135
-
136
-
137
-
138
-
139
-
140
-
141
-
142
-
143
-
144
-
145
-
146
-
147
-
148
-
149
-
150
-
151
-
152
-
153
-
154
-
155
-
156
-
157
-
158
-
159
-
160
-
161
-
162
-
163
-
164
-
165
-
166
-
167
-
168
-
169
-
170
-
171
-
172
-
173
-
174
-
175
-
176
-
177
-
178
-
179
-
180
-
181
-
182
-
183
-
184
-
185
-
186
-
187
-
188
-
189
-
190
-
191
-
192
-
193
-
194
-
195
-
 196
196 -
 197
197 -
 198
198 -
 199
199 -
 200
200 -
 201
201 -
 202
202 -
 203
203 -
 204
204 -
 205
205 -
 206
206 -
207
-
208
-
209
-
210
-
211
-
212
-
213
-
214
-
215
-
216
-
217
-
218
-
219
-
220
-
221
-
222
-
223
-
224
-
225
-
226
-
227
-
228
-
229
-
230
-
231
-
232
-
233
-
234
-
235
-
236
-
237
-
238
-
239
-
240
-
241
-
242
-
243
-
244
-
245
-
246
-
247
-
248
-
249
-
250
-
251
-
252
-
253
-
254
 |
 |

ENWW
Installing supplies
199
7
4
If the duplexer is installed, push down on the green duplexer-release tab.
Grasp the center handle and pull the duplexer out until it stops. It is not
necessary to completely remove the duplexer.
5
Rotate each blue fuser lever inward until it is in the horizontal position,
making sure not to pinch your fingers when the levers are released.
6
Using the black fuser handles, pull the fuser partially out of the printer. Grip
the handles firmly and pull the fuser out until it stops. Then lift the fuser out
of the printer.
WARNING
The fuser is heavy and might be hot. Be careful not to injure yourself when
removing the fuser.
4
5
6