HP 9500hdn HP Color LaserJet 9500nand 9500hdn - User Guide - Page 198
roller. Slide the blue cover to the right.
 |
UPC - 808736429689
View all HP 9500hdn manuals
Add to My Manuals
Save this manual to your list of manuals |
Page 198 highlights
http://www.hp.com/support/lj9500 25 26 25 Pinch the release tab on the left roller and pull the roller off of the rod. Remove the roller on the right side. Slide the blue cover to the left, and then remove the bottom roller. 26 Grasp both sides of the new bottom roller and slide it onto the rod until it clicks into place. Install the roller on the right side, and then install the left roller. Slide the blue cover to the right. 27 Align tray 4 with the rails inside the printer. Lift the tray slightly and slide it partially into the printer. Replace the media, making sure that the guides fit snugly against the media. Slide the tray in completely. 27 196 Chapter 7 - Supplies Rev. 1.0
-
 1
1 -
2
-
3
-
4
-
5
-
6
-
7
-
8
-
9
-
10
-
11
-
12
-
13
-
14
-
15
-
16
-
17
-
18
-
19
-
20
-
21
-
22
-
23
-
24
-
25
-
26
-
27
-
28
-
29
-
30
-
31
-
32
-
33
-
34
-
35
-
36
-
37
-
38
-
39
-
40
-
41
-
42
-
43
-
44
-
45
-
46
-
47
-
48
-
49
-
50
-
51
-
52
-
53
-
54
-
55
-
56
-
57
-
58
-
59
-
60
-
61
-
62
-
63
-
64
-
65
-
66
-
67
-
68
-
69
-
70
-
71
-
72
-
73
-
74
-
75
-
76
-
77
-
78
-
79
-
80
-
81
-
82
-
83
-
84
-
85
-
86
-
87
-
88
-
89
-
90
-
91
-
92
-
93
-
94
-
95
-
96
-
97
-
98
-
99
-
100
-
101
-
102
-
103
-
104
-
105
-
106
-
107
-
108
-
109
-
110
-
111
-
112
-
113
-
114
-
115
-
116
-
117
-
118
-
119
-
120
-
121
-
122
-
123
-
124
-
125
-
126
-
127
-
128
-
129
-
130
-
131
-
132
-
133
-
134
-
135
-
136
-
137
-
138
-
139
-
140
-
141
-
142
-
143
-
144
-
145
-
146
-
147
-
148
-
149
-
150
-
151
-
152
-
153
-
154
-
155
-
156
-
157
-
158
-
159
-
160
-
161
-
162
-
163
-
164
-
165
-
166
-
167
-
168
-
169
-
170
-
171
-
172
-
173
-
174
-
175
-
176
-
177
-
178
-
179
-
180
-
181
-
182
-
183
-
184
-
185
-
186
-
187
-
188
-
189
-
190
-
191
-
192
-
 193
193 -
 194
194 -
 195
195 -
 196
196 -
 197
197 -
 198
198 -
 199
199 -
 200
200 -
 201
201 -
 202
202 -
 203
203 -
204
-
205
-
206
-
207
-
208
-
209
-
210
-
211
-
212
-
213
-
214
-
215
-
216
-
217
-
218
-
219
-
220
-
221
-
222
-
223
-
224
-
225
-
226
-
227
-
228
-
229
-
230
-
231
-
232
-
233
-
234
-
235
-
236
-
237
-
238
-
239
-
240
-
241
-
242
-
243
-
244
-
245
-
246
-
247
-
248
-
249
-
250
-
251
-
252
-
253
-
254
 |
 |

196
Chapter 7 – Supplies
Rev. 1.0
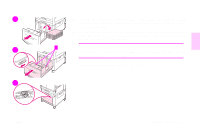
25
Pinch the release tab on the left roller and pull the roller off of the rod.
Remove the roller on the right side. Slide the blue cover to the left, and then
remove the bottom roller.
26
Grasp both sides of the new bottom roller and slide it onto the rod until it
clicks into place. Install the roller on the right side, and then install the left
roller. Slide the blue cover to the right.
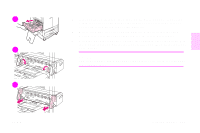
27
Align tray 4 with the rails inside the printer. Lift the tray slightly and slide it
partially into the printer. Replace the media, making sure that the guides fit
snugly against the media. Slide the tray in completely.
25
26
27