HP 9500hdn HP Color LaserJet 9500nand 9500hdn - User Guide - Page 56
Configuring the trays for custom-size media, menu. If you are using tray 2, tray 3, or tray 4,
 |
UPC - 808736429689
View all HP 9500hdn manuals
Add to My Manuals
Save this manual to your list of manuals |
Page 56 highlights
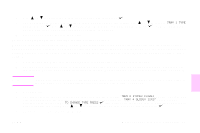
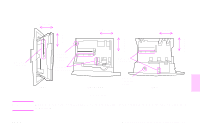
http://www.hp.com/support/lj9500 Configuring the trays for custom-size media Custom media sizes are sizes that do not conform to those marked in the input trays and that are not listed in the control panel menus or in the printer driver. Note For tray 1. When using custom-size media, select CUSTOM from the Tray 1 Size menu. For tray 2, tray 3, and tray 4. When using custom-size media in these trays, make sure that the custom/ standard switch in the tray is set to Custom. Note Printer-driver settings override control panel settings. Software application settings override both printerdriver settings and control panel settings. The dimensions of custom-size media must be typed at the control panel. If you are using tray 1, the Custom menu appears when you select CUSTOM from the Tray 1 Size menu. If you are using tray 2, tray 3, or tray 4, the Custom menu appears when you set the custom/standard switch to Custom and close the tray. Make sure to type the X dimension and Y dimension of the media. The following illustration shows the X and Y dimensions relative to each of the input trays. The X dimension is measured from the front of the tray to the back of the tray. The Y dimension is measured from the left of the tray to the right of the tray. 54 Chapter 4 - Improving print quality Rev. 1.0
-
 1
1 -
2
-
3
-
4
-
5
-
6
-
7
-
8
-
9
-
10
-
11
-
12
-
13
-
14
-
15
-
16
-
17
-
18
-
19
-
20
-
21
-
22
-
23
-
24
-
25
-
26
-
27
-
28
-
29
-
30
-
31
-
32
-
33
-
34
-
35
-
36
-
37
-
38
-
39
-
40
-
41
-
42
-
43
-
44
-
45
-
46
-
47
-
48
-
49
-
50
-
 51
51 -
 52
52 -
 53
53 -
 54
54 -
 55
55 -
 56
56 -
 57
57 -
 58
58 -
 59
59 -
 60
60 -
 61
61 -
62
-
63
-
64
-
65
-
66
-
67
-
68
-
69
-
70
-
71
-
72
-
73
-
74
-
75
-
76
-
77
-
78
-
79
-
80
-
81
-
82
-
83
-
84
-
85
-
86
-
87
-
88
-
89
-
90
-
91
-
92
-
93
-
94
-
95
-
96
-
97
-
98
-
99
-
100
-
101
-
102
-
103
-
104
-
105
-
106
-
107
-
108
-
109
-
110
-
111
-
112
-
113
-
114
-
115
-
116
-
117
-
118
-
119
-
120
-
121
-
122
-
123
-
124
-
125
-
126
-
127
-
128
-
129
-
130
-
131
-
132
-
133
-
134
-
135
-
136
-
137
-
138
-
139
-
140
-
141
-
142
-
143
-
144
-
145
-
146
-
147
-
148
-
149
-
150
-
151
-
152
-
153
-
154
-
155
-
156
-
157
-
158
-
159
-
160
-
161
-
162
-
163
-
164
-
165
-
166
-
167
-
168
-
169
-
170
-
171
-
172
-
173
-
174
-
175
-
176
-
177
-
178
-
179
-
180
-
181
-
182
-
183
-
184
-
185
-
186
-
187
-
188
-
189
-
190
-
191
-
192
-
193
-
194
-
195
-
196
-
197
-
198
-
199
-
200
-
201
-
202
-
203
-
204
-
205
-
206
-
207
-
208
-
209
-
210
-
211
-
212
-
213
-
214
-
215
-
216
-
217
-
218
-
219
-
220
-
221
-
222
-
223
-
224
-
225
-
226
-
227
-
228
-
229
-
230
-
231
-
232
-
233
-
234
-
235
-
236
-
237
-
238
-
239
-
240
-
241
-
242
-
243
-
244
-
245
-
246
-
247
-
248
-
249
-
250
-
251
-
252
-
253
-
254
 |
 |
