HP CP3525x HP Color LaserJet CP3525 Series Printers - Software Technical Refer - Page 235
Booklet layout, Book and Booklet Printing, s per Sheet
 |
UPC - 883585892105
View all HP CP3525x manuals
Add to My Manuals
Save this manual to your list of manuals |
Page 235 highlights
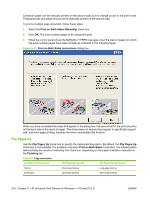
When Print on Both Sides is selected, the document preview image changes to show a spiral binding along either the left edge or the top edge of the page. In addition, a folded-over corner appears in the lower-right portion of the preview image, indicating that printing occurs on the back side. An arrow on the folded-over corner points in the direction that the pages would be flipped if they were bound together. Short-side binding is for print jobs with pages that read by flipping over like the pages of a calendar. Long-side binding is for print jobs with pages that read by turning like the pages of a book. Booklet layout The Booklet Layout drop-down menu, visible when Print on Both Sides is selected, offers choices that are based on the current paper size. The default setting for the Booklet Printing drop-down menu is Off. The other settings have the following format, where [paper size] depends on the paper size that is set on the Paper/Quality tab: ● Left Binding ● Right Binding When you select Left Binding or Right Binding, the document preview image changes to show the location of the binding. If the Pages per Sheet setting is on the default setting of 1, it automatically changes to 2 pages per sheet. If you change the Pages per Sheet setting manually to 4, 6, 9, or 16 pages per sheet, the booklet setting is disabled. See Pages per Sheet on page 157 for more information. Book and Booklet Printing The HP Color LaserJet CP3525 Series supports book and booklet printing. A book is a print job consisting of at least two pages. It can have a different paper type for the front cover, first page, other pages, last page, or back cover. Use the Covers and Print pages on different paper settings on the Paper/Quality tab to select different paper for the front cover, first page, other pages, and back cover. For more information, see Paper/Quality tab features on page 134. A booklet is a print job that places two pages on each side of a sheet that can then be folded into a booklet that is half the size of the paper. Use the Booklet Layout drop-down menu on the Finishing tab to control booklet settings. Print a booklet 1. Open the driver Printing Preferences tab set, and then click the Paper/Quality tab. For information about how to access the Printing Preferences tab set, see Printing Preferences driver tabs on page 118. 2. Select the booklet settings in the Paper Type and Paper Source drop-down menus. 3. Click the Effects tab, and then select the physical paper size to be used in the booklet from the Print document on drop-down menu. NOTE: Typically, you select the size of each page of the booklet in your software program by clicking File, clicking Page, and then clicking Setup. For example, if each page of the finished book is supposed to be Letter-sized in your 2-up booklet, select Letter in your software program, and then select 11x17 from the Print document on drop-down menu (physical size of the page). If your software program does not allow you to set the paper size, use the Paper sizes drop-down menu on the Paper/Quality tab. ENWW Finishing tab features 215
-
 1
1 -
2
-
3
-
4
-
5
-
6
-
7
-
8
-
9
-
10
-
11
-
12
-
13
-
14
-
15
-
16
-
17
-
18
-
19
-
20
-
21
-
22
-
23
-
24
-
25
-
26
-
27
-
28
-
29
-
30
-
31
-
32
-
33
-
34
-
35
-
36
-
37
-
38
-
39
-
40
-
41
-
42
-
43
-
44
-
45
-
46
-
47
-
48
-
49
-
50
-
51
-
52
-
53
-
54
-
55
-
56
-
57
-
58
-
59
-
60
-
61
-
62
-
63
-
64
-
65
-
66
-
67
-
68
-
69
-
70
-
71
-
72
-
73
-
74
-
75
-
76
-
77
-
78
-
79
-
80
-
81
-
82
-
83
-
84
-
85
-
86
-
87
-
88
-
89
-
90
-
91
-
92
-
93
-
94
-
95
-
96
-
97
-
98
-
99
-
100
-
101
-
102
-
103
-
104
-
105
-
106
-
107
-
108
-
109
-
110
-
111
-
112
-
113
-
114
-
115
-
116
-
117
-
118
-
119
-
120
-
121
-
122
-
123
-
124
-
125
-
126
-
127
-
128
-
129
-
130
-
131
-
132
-
133
-
134
-
135
-
136
-
137
-
138
-
139
-
140
-
141
-
142
-
143
-
144
-
145
-
146
-
147
-
148
-
149
-
150
-
151
-
152
-
153
-
154
-
155
-
156
-
157
-
158
-
159
-
160
-
161
-
162
-
163
-
164
-
165
-
166
-
167
-
168
-
169
-
170
-
171
-
172
-
173
-
174
-
175
-
176
-
177
-
178
-
179
-
180
-
181
-
182
-
183
-
184
-
185
-
186
-
187
-
188
-
189
-
190
-
191
-
192
-
193
-
194
-
195
-
196
-
197
-
198
-
199
-
200
-
201
-
202
-
203
-
204
-
205
-
206
-
207
-
208
-
209
-
210
-
211
-
212
-
213
-
214
-
215
-
216
-
217
-
218
-
219
-
220
-
221
-
222
-
223
-
224
-
225
-
226
-
227
-
228
-
229
-
 230
230 -
 231
231 -
 232
232 -
 233
233 -
 234
234 -
 235
235 -
 236
236 -
 237
237 -
 238
238 -
 239
239 -
 240
240 -
241
-
242
-
243
-
244
-
245
-
246
-
247
-
248
-
249
-
250
-
251
-
252
-
253
-
254
-
255
-
256
-
257
-
258
-
259
-
260
-
261
-
262
-
263
-
264
-
265
-
266
-
267
-
268
-
269
-
270
-
271
-
272
-
273
-
274
-
275
-
276
-
277
-
278
-
279
-
280
-
281
-
282
-
283
-
284
-
285
-
286
-
287
-
288
-
289
-
290
-
291
-
292
-
293
-
294
-
295
-
296
-
297
-
298
-
299
-
300
-
301
-
302
-
303
-
304
-
305
-
306
-
307
-
308
-
309
-
310
-
311
-
312
-
313
-
314
-
315
-
316
-
317
-
318
-
319
-
320
-
321
-
322
-
323
-
324
-
325
-
326
-
327
-
328
-
329
-
330
 |
 |
