HP Cisco Nexus 5000 Cisco MDS 9000 Family Fabric Manager Quick Configuration G - Page 28
Installing the Database, Installing Oracle
 |
View all HP Cisco Nexus 5000 manuals
Add to My Manuals
Save this manual to your list of manuals |
Page 28 highlights
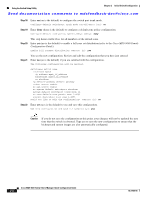
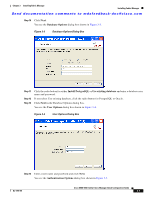
Installing the Database Chapter 3 Installing Fabric Manager Send documentation comments to [email protected] Installing the Database Before you install Fabric Manager, you must install a database. As of Cisco SAN-OS Release 3.1(2b), you can use Oracle Database 10g Express. Your other choice is PostgreSQL. Installing Oracle Note If you want to use Oracle Database 10g Express, you must install the database and create a user name and password before continuing with the Fabric Manager installation. Note We recommend the Oracle Database 10g Express option for all users who are running Performance Manager on large fabrics (1000 or more end devices). To install the Oracle database, follow these steps: Step 1 Click the following link to install Oracle Database 10g Express. http://www.oracle.com/technology/software/products/database/xe/index.html Note If you have another instance of Oracle already installed on a PC, we recommend that you do not install the Oracle database on the same PC. In such cases, Fabric Manager can only use the PostgreSQL database. Step 2 Step 3 Step 4 Run OracleXE.exe to install the Oracle database. Set the password for the system user. The database administrator uses the password to manage and administer Oracle Database 10g Express server, which is installed by the Oracle installer. Finish the installation and verify that both services (OracleServiceXE and OracleXETNSListener) are running from the Services window. Run the following script to change the default Oracle admin port and to create a database account. C:\> cd c:\oraclexe\app\oracle\product\10.2.0\server\bin C:\oraclexe\app\oracle\product\10.2.0\server\bin>sqlplus / as sysdba SQL> exec dbms_xdb.sethttpport(8082); SQL> GRANT CONNECT,RESOURCE,UNLIMITED TABLESPACE TO SCOTT IDENTIFIED BY TIGER; SQL> EXIT; Note The Oracle Database 10g Express option is only supported on Microsoft Windows. It is not supported on UNIX systems. Cisco MDS 9000 Family Fabric Manager Quick Configuration Guide 3-2 OL-7765-06
-
 1
1 -
2
-
3
-
4
-
5
-
6
-
7
-
8
-
9
-
10
-
11
-
12
-
13
-
14
-
15
-
16
-
17
-
18
-
19
-
20
-
21
-
22
-
 23
23 -
 24
24 -
 25
25 -
 26
26 -
 27
27 -
 28
28 -
 29
29 -
 30
30 -
 31
31 -
 32
32 -
 33
33 -
34
-
35
-
36
-
37
-
38
-
39
-
40
-
41
-
42
-
43
-
44
-
45
-
46
-
47
-
48
-
49
-
50
-
51
-
52
-
53
-
54
-
55
-
56
-
57
-
58
-
59
-
60
-
61
-
62
-
63
-
64
-
65
-
66
-
67
-
68
-
69
-
70
-
71
-
72
-
73
-
74
-
75
-
76
-
77
-
78
-
79
-
80
-
81
-
82
-
83
-
84
-
85
-
86
-
87
-
88
 |
 |
