HP Cisco Nexus 5000 Cisco MDS 9000 Family Fabric Manager Quick Configuration G - Page 74
Fabric Manager Client, Options, localhost, Use SNMP Proxy, Step 1
 |
View all HP Cisco Nexus 5000 manuals
Add to My Manuals
Save this manual to your list of manuals |
Page 74 highlights
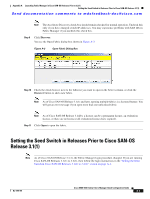
Appendix A Launching Fabric Manager in Cisco SAN-OS Releases Prior to 3.2(1) Setting the Seed Switch in Releases Prior to Cisco SAN-OS Release 3.1(1) Send documentation comments to [email protected] When you run Fabric Manager, you must select a switch for Fabric Manager to use to discover the fabric. For releases earlier than Cisco SAN-OS Release 3.1(1), use the same user name and password on each of the multiple fabrics that you open, then log in directly to the MDS 9000 Family switch that you want Fabric Manager to use. To set the seed switch if you are running a version of Cisco SAN-OS that is earlier than Cisco SAN-OS Release 3.1(1), follow these steps: Step 1 Double-click the Fabric Manager Client icon on your workstation. You see the Fabric Manager Login dialog box shown in Figure A-4. Figure A-4 Open Fabric Dialog Box Step 2 Step 3 Step 4 Step 5 Step 6 Click the Options button if necessary to expand the optional settings in this dialog box. Set FM Server to the IP address where you installed Fabric Manager Server, or set it to localhost if you installed Fabric Manager Server on your local workstation. Set the fabric seed switch to the MDS 9000 Family switch that you want Fabric Manager to use. Enter the user name and password for the switch. Check the Use SNMP Proxy check box if you want Fabric Manager Client to communicate with Fabric Manager Server through a TCP-based proxy server. Note The Accelerate Discovery check box should remain checked for normal operation. Uncheck this only if you have changed switch IP addresses. You may experience problems with out of sync SAN IDs in Fabric Manager if you uncheck this check box. Step 7 Click Open to open the fabric. Cisco MDS 9000 Family Fabric Manager Quick Configuration Guide A-4 OL-7765-05
-
 1
1 -
2
-
3
-
4
-
5
-
6
-
7
-
8
-
9
-
10
-
11
-
12
-
13
-
14
-
15
-
16
-
17
-
18
-
19
-
20
-
21
-
22
-
23
-
24
-
25
-
26
-
27
-
28
-
29
-
30
-
31
-
32
-
33
-
34
-
35
-
36
-
37
-
38
-
39
-
40
-
41
-
42
-
43
-
44
-
45
-
46
-
47
-
48
-
49
-
50
-
51
-
52
-
53
-
54
-
55
-
56
-
57
-
58
-
59
-
60
-
61
-
62
-
63
-
64
-
65
-
66
-
67
-
68
-
 69
69 -
 70
70 -
 71
71 -
 72
72 -
 73
73 -
 74
74 -
 75
75 -
 76
76 -
 77
77 -
 78
78 -
 79
79 -
80
-
81
-
82
-
83
-
84
-
85
-
86
-
87
-
88
 |
 |
