HP D530 HP Compaq Business Desktop d500 Service Reference Guide, 5th Edition - Page 156
Expansion Cards
 |
UPC - 808736649308
View all HP D530 manuals
Add to My Manuals
Save this manual to your list of manuals |
Page 156 highlights
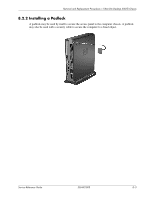
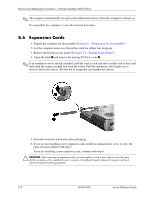
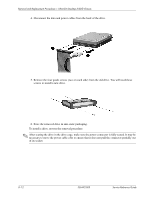
Removal and Replacement Procedures- Ultra-Slim Desktop (USDT) Chassis ✎ The computer automatically recognizes the additional memory when the computer is turned on. To reassemble the computer, reverse the removal procedure. 8.6 Expansion Cards 1. Prepare the computer for disassembly (Section 8.1, "Preparation for Disassembly"). 2. Lay the computer down on a flat surface with the rubber feet facing up. 3. Remove the bottom access panel (Section 8.3.2, "Bottom Access Panel"). 4. .Open the latch 1 and remove the existing PCI slot cover 2. ✎ If an expansion card is already installed, hold the card at each end and carefully rock it back and forth until the connectors pull free from the socket. Pull the expansion card straight out to remove it from the chassis. Be sure not to scrape the card against the chassis. 5. Store the removed card in anti-static packaging. 6. If you are not installing a new expansion card, install an expansion slot cover to close the open slot and continue with step 7. If you are installing a new expansion card, continue with step 6. Ä CAUTION: After removing an expansion card, you must replace it with a new card or cover the open slot (for example, with a metal slot cover or a piece of cardboard taped in place) for proper cooling of internal components during operation. 8-8 336492-005 Service Reference Guide
-
 1
1 -
2
-
3
-
4
-
5
-
6
-
7
-
8
-
9
-
10
-
11
-
12
-
13
-
14
-
15
-
16
-
17
-
18
-
19
-
20
-
21
-
22
-
23
-
24
-
25
-
26
-
27
-
28
-
29
-
30
-
31
-
32
-
33
-
34
-
35
-
36
-
37
-
38
-
39
-
40
-
41
-
42
-
43
-
44
-
45
-
46
-
47
-
48
-
49
-
50
-
51
-
52
-
53
-
54
-
55
-
56
-
57
-
58
-
59
-
60
-
61
-
62
-
63
-
64
-
65
-
66
-
67
-
68
-
69
-
70
-
71
-
72
-
73
-
74
-
75
-
76
-
77
-
78
-
79
-
80
-
81
-
82
-
83
-
84
-
85
-
86
-
87
-
88
-
89
-
90
-
91
-
92
-
93
-
94
-
95
-
96
-
97
-
98
-
99
-
100
-
101
-
102
-
103
-
104
-
105
-
106
-
107
-
108
-
109
-
110
-
111
-
112
-
113
-
114
-
115
-
116
-
117
-
118
-
119
-
120
-
121
-
122
-
123
-
124
-
125
-
126
-
127
-
128
-
129
-
130
-
131
-
132
-
133
-
134
-
135
-
136
-
137
-
138
-
139
-
140
-
141
-
142
-
143
-
144
-
145
-
146
-
147
-
148
-
149
-
150
-
 151
151 -
 152
152 -
 153
153 -
 154
154 -
 155
155 -
 156
156 -
 157
157 -
 158
158 -
 159
159 -
 160
160 -
 161
161 -
162
-
163
-
164
-
165
-
166
-
167
-
168
-
169
-
170
-
171
-
172
-
173
-
174
-
175
-
176
-
177
-
178
-
179
-
180
-
181
-
182
-
183
-
184
-
185
-
186
-
187
-
188
-
189
-
190
-
191
-
192
-
193
-
194
-
195
-
196
-
197
-
198
-
199
-
200
-
201
-
202
-
203
-
204
-
205
-
206
-
207
-
208
-
209
-
210
-
211
-
212
-
213
-
214
-
215
-
216
-
217
-
218
-
219
-
220
-
221
-
222
-
223
-
224
-
225
-
226
-
227
-
228
-
229
-
230
-
231
-
232
-
233
-
234
 |
 |
