HP D530 HP Compaq Business Desktop d500 Service Reference Guide, 5th Edition - Page 92
Optical Drive, An optical drive is a CD-ROM, CD-R/RW, DVD-ROM, or CD-RW/DVD Combo
 |
UPC - 808736649308
View all HP D530 manuals
Add to My Manuals
Save this manual to your list of manuals |
Page 92 highlights
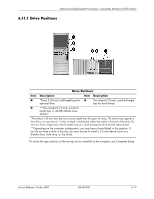
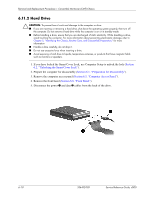
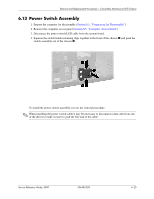
Removal and Replacement Procedures- Convertible Minitower (CMT) Chassis 8. Store the removed drive in anti-static packaging. 9. Install the new drive by sliding it into the appropriate drive bay on the front of the chassis. The drivelock automatically secures the drive in the bay. 6.11.3 Optical Drive ✎ An optical drive is a CD-ROM, CD-R/RW, DVD-ROM, DVD-R/RW, or CD-RW/DVD Combo drive. A removable storage drive is a diskette or Zip drive. 1. If you have locked the Smart Cover Lock, use Computer Setup to unlock the lock (Section 6.2, "Unlocking the Smart Cover Lock"). 2. Prepare the computer for disassembly (Section 6.1, "Preparation for Disassembly"). 3. Remove the computer access panel (Section 6.5, "Computer Access Panel"). 4. Remove the front bezel (Section 6.6, "Front Bezel"). ✎ If you are adding a drive in a bay that was previously empty, you must remove the corresponding bezel blank from the front bezel. 5. Disconnect the audio, power, and data cables on the back of the drive. Install four guide screws in the lower holes on each side of the drive. Ä CAUTION: When removing cables, pull the tab or connector instead of the cable itself to prevent damaging the cable. 6. If the computer is in the desktop mode, continue with step 7. If the computer is in the minitower mode, continue with step 8. 7. In the desktop mode, press down on the yellow drivelock mechanism 1 and slide the drive from the drive bay 2. 6-20 336492-005 Service Reference Guide, d500
-
 1
1 -
2
-
3
-
4
-
5
-
6
-
7
-
8
-
9
-
10
-
11
-
12
-
13
-
14
-
15
-
16
-
17
-
18
-
19
-
20
-
21
-
22
-
23
-
24
-
25
-
26
-
27
-
28
-
29
-
30
-
31
-
32
-
33
-
34
-
35
-
36
-
37
-
38
-
39
-
40
-
41
-
42
-
43
-
44
-
45
-
46
-
47
-
48
-
49
-
50
-
51
-
52
-
53
-
54
-
55
-
56
-
57
-
58
-
59
-
60
-
61
-
62
-
63
-
64
-
65
-
66
-
67
-
68
-
69
-
70
-
71
-
72
-
73
-
74
-
75
-
76
-
77
-
78
-
79
-
80
-
81
-
82
-
83
-
84
-
85
-
86
-
 87
87 -
 88
88 -
 89
89 -
 90
90 -
 91
91 -
 92
92 -
 93
93 -
 94
94 -
 95
95 -
 96
96 -
 97
97 -
98
-
99
-
100
-
101
-
102
-
103
-
104
-
105
-
106
-
107
-
108
-
109
-
110
-
111
-
112
-
113
-
114
-
115
-
116
-
117
-
118
-
119
-
120
-
121
-
122
-
123
-
124
-
125
-
126
-
127
-
128
-
129
-
130
-
131
-
132
-
133
-
134
-
135
-
136
-
137
-
138
-
139
-
140
-
141
-
142
-
143
-
144
-
145
-
146
-
147
-
148
-
149
-
150
-
151
-
152
-
153
-
154
-
155
-
156
-
157
-
158
-
159
-
160
-
161
-
162
-
163
-
164
-
165
-
166
-
167
-
168
-
169
-
170
-
171
-
172
-
173
-
174
-
175
-
176
-
177
-
178
-
179
-
180
-
181
-
182
-
183
-
184
-
185
-
186
-
187
-
188
-
189
-
190
-
191
-
192
-
193
-
194
-
195
-
196
-
197
-
198
-
199
-
200
-
201
-
202
-
203
-
204
-
205
-
206
-
207
-
208
-
209
-
210
-
211
-
212
-
213
-
214
-
215
-
216
-
217
-
218
-
219
-
220
-
221
-
222
-
223
-
224
-
225
-
226
-
227
-
228
-
229
-
230
-
231
-
232
-
233
-
234
 |
 |