HP LaserJet 1010 Service Manual - Page 77
Left side cover, Print cartridge access door, fuser cover, and rear panel,
 |
View all HP LaserJet 1010 manuals
Add to My Manuals
Save this manual to your list of manuals |
Page 77 highlights
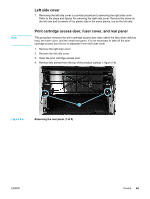
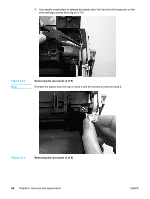
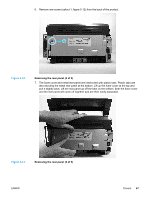
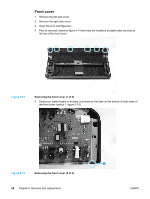
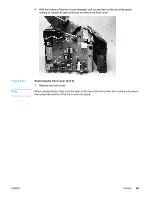
Note Left side cover 1. Removing the left side cover is a similar procedure to removing the right side cover. Refer to the steps and figures for removing the right side cover. Remove the screw on the left side and be aware of the plastic tabs in the same places, but on the left side. Print cartridge access door, fuser cover, and rear panel This procedure removes the print cartridge access door (also called the face-down delivery tray), the fuser cover, and the metal rear panel. It is not necessary to take off the print cartridge access door first or to separate if from the fuser cover. 1. Remove the right side cover 2. Remove the left side cover. 3. Open the print cartridge access door. 4. Remove two screws from the top of the product (callout 1, figure 5-9). 1 Figure 5-9. Removing the rear panel (1 of 5) ENWW Covers 65
-
 1
1 -
2
-
3
-
4
-
5
-
6
-
7
-
8
-
9
-
10
-
11
-
12
-
13
-
14
-
15
-
16
-
17
-
18
-
19
-
20
-
21
-
22
-
23
-
24
-
25
-
26
-
27
-
28
-
29
-
30
-
31
-
32
-
33
-
34
-
35
-
36
-
37
-
38
-
39
-
40
-
41
-
42
-
43
-
44
-
45
-
46
-
47
-
48
-
49
-
50
-
51
-
52
-
53
-
54
-
55
-
56
-
57
-
58
-
59
-
60
-
61
-
62
-
63
-
64
-
65
-
66
-
67
-
68
-
69
-
70
-
71
-
 72
72 -
 73
73 -
 74
74 -
 75
75 -
 76
76 -
 77
77 -
 78
78 -
 79
79 -
 80
80 -
 81
81 -
 82
82 -
83
-
84
-
85
-
86
-
87
-
88
-
89
-
90
-
91
-
92
-
93
-
94
-
95
-
96
-
97
-
98
-
99
-
100
-
101
-
102
-
103
-
104
-
105
-
106
-
107
-
108
-
109
-
110
-
111
-
112
-
113
-
114
-
115
-
116
-
117
-
118
-
119
-
120
-
121
-
122
-
123
-
124
-
125
-
126
-
127
-
128
-
129
-
130
-
131
-
132
-
133
-
134
-
135
-
136
-
137
-
138
-
139
-
140
-
141
-
142
-
143
-
144
-
145
-
146
-
147
-
148
 |
 |
