HP LaserJet 1010 Service Manual - Page 79
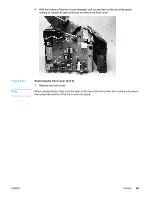
Removing the rear panel 4 of 5
 |
View all HP LaserJet 1010 manuals
Add to My Manuals
Save this manual to your list of manuals |
Page 79 highlights
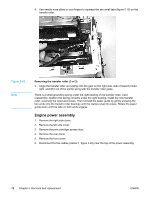
6. Remove one screw (callout 1, figure 5-12) from the back of the product. 1 Figure 5-12. Removing the rear panel (4 of 5) 7. The fuser cover and metal rear panel are interlocked with plastic tabs. Plastic tabs are also securing the metal rear panel at the bottom. Lift up the fuser cover at the top and pull it slightly back. Lift the rear panel up off the tabs on the bottom. Both the fuser cover and the rear panel will come off together and are then easily separable. Figure 5-13. Removing the rear panel (5 of 5) ENWW Covers 67
-
 1
1 -
2
-
3
-
4
-
5
-
6
-
7
-
8
-
9
-
10
-
11
-
12
-
13
-
14
-
15
-
16
-
17
-
18
-
19
-
20
-
21
-
22
-
23
-
24
-
25
-
26
-
27
-
28
-
29
-
30
-
31
-
32
-
33
-
34
-
35
-
36
-
37
-
38
-
39
-
40
-
41
-
42
-
43
-
44
-
45
-
46
-
47
-
48
-
49
-
50
-
51
-
52
-
53
-
54
-
55
-
56
-
57
-
58
-
59
-
60
-
61
-
62
-
63
-
64
-
65
-
66
-
67
-
68
-
69
-
70
-
71
-
72
-
73
-
 74
74 -
 75
75 -
 76
76 -
 77
77 -
 78
78 -
 79
79 -
 80
80 -
 81
81 -
 82
82 -
 83
83 -
 84
84 -
85
-
86
-
87
-
88
-
89
-
90
-
91
-
92
-
93
-
94
-
95
-
96
-
97
-
98
-
99
-
100
-
101
-
102
-
103
-
104
-
105
-
106
-
107
-
108
-
109
-
110
-
111
-
112
-
113
-
114
-
115
-
116
-
117
-
118
-
119
-
120
-
121
-
122
-
123
-
124
-
125
-
126
-
127
-
128
-
129
-
130
-
131
-
132
-
133
-
134
-
135
-
136
-
137
-
138
-
139
-
140
-
141
-
142
-
143
-
144
-
145
-
146
-
147
-
148
 |
 |

6.
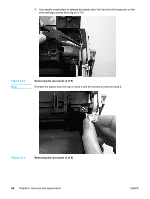
Remove one screw (callout 1, figure 5-12) from the back of the product.
1
Figure 5-12.
Removing the rear panel (4 of 5)
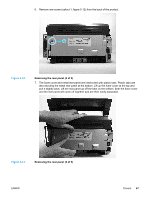
7.
The fuser cover and metal rear panel are interlocked with plastic tabs. Plastic tabs are
also securing the metal rear panel at the bottom. Lift up the fuser cover at the top and
pull it slightly back. Lift the rear panel up off the tabs on the bottom. Both the fuser cover
and the rear panel will come off together and are then easily separable.
Figure 5-13.
Removing the rear panel (5 of 5)
ENWW
Covers
67