HP LaserJet 1010 Service Manual - Page 96
Control panel power-on functions, Power-on Functions: Time Ranges
 |
View all HP LaserJet 1010 manuals
Add to My Manuals
Save this manual to your list of manuals |
Page 96 highlights
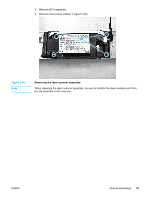
Control panel power-on functions Note Powering on the printer while pressing the Go button for varying amounts of time accesses important printer functionality for resetting the printer, resetting NVRAM, and performing selftests. The general procedure for initiating a power-on function is as follows (refer to the table for specific time ranges for the desired function): 1. Power off the device. 2. Press and hold the Go button. 3. Power the device back on while holding the Go button for the amount of time specified in the table below for the desired function. 4. Release the Go button. Be sure that the light status is indicating the desired power-on function when the Go button is released. If the light status is different than desired when the Go button is released, start the procedure at step 1. Power-on Functions: Time Ranges Power-on Function Cold reset Time-Range (seconds) Release Go 10 to 20 seconds after powerup. Light Status Attention: ON Continuous self-test Release Go 20 to 30 seconds after powerup. Attention: ON Ready: ON NVMEM initialization Release Go 30 to 40 seconds after powerup. Attention: ON Ready: ON Go: ON Error report Release Go 40 to 50 seconds after powerup. Ready: ON Go: ON Results and Notes The lights begin cycling from front to back. The cold-reset process will run until completion and the printer will go to the Ready state. The Ready light blinks indicating that the device is in the continuous self-test mode. To terminate the continuous self-test, press Go. The lights begin cycling from front to back. The NVMEM initialization process will run until completion and the printer will go to the Ready state. The printer produces an error report showing the most recent error. 84 Chapter 6 Troubleshooting ENWW
-
 1
1 -
2
-
3
-
4
-
5
-
6
-
7
-
8
-
9
-
10
-
11
-
12
-
13
-
14
-
15
-
16
-
17
-
18
-
19
-
20
-
21
-
22
-
23
-
24
-
25
-
26
-
27
-
28
-
29
-
30
-
31
-
32
-
33
-
34
-
35
-
36
-
37
-
38
-
39
-
40
-
41
-
42
-
43
-
44
-
45
-
46
-
47
-
48
-
49
-
50
-
51
-
52
-
53
-
54
-
55
-
56
-
57
-
58
-
59
-
60
-
61
-
62
-
63
-
64
-
65
-
66
-
67
-
68
-
69
-
70
-
71
-
72
-
73
-
74
-
75
-
76
-
77
-
78
-
79
-
80
-
81
-
82
-
83
-
84
-
85
-
86
-
87
-
88
-
89
-
90
-
 91
91 -
 92
92 -
 93
93 -
 94
94 -
 95
95 -
 96
96 -
 97
97 -
 98
98 -
 99
99 -
 100
100 -
 101
101 -
102
-
103
-
104
-
105
-
106
-
107
-
108
-
109
-
110
-
111
-
112
-
113
-
114
-
115
-
116
-
117
-
118
-
119
-
120
-
121
-
122
-
123
-
124
-
125
-
126
-
127
-
128
-
129
-
130
-
131
-
132
-
133
-
134
-
135
-
136
-
137
-
138
-
139
-
140
-
141
-
142
-
143
-
144
-
145
-
146
-
147
-
148
 |
 |
