HP LaserJet M9040/M9050 HP LaserJet M9040/M9050 MFP - Software Technical Refer - Page 220
Sheet Input Tray Tray 4, Socket/HP Jet Direct
 |
View all HP LaserJet M9040/M9050 manuals
Add to My Manuals
Save this manual to your list of manuals |
Page 220 highlights
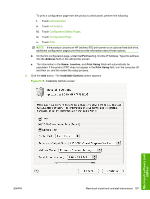
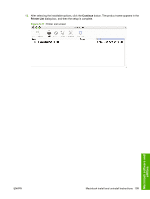
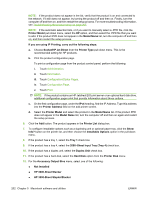
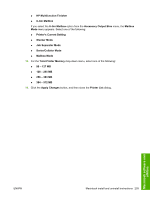
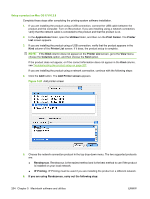
NOTE: If the product does not appear in the list, verify that the product is on and connected to the network. If it still does not appear, try turning the product off and then on. Finally, turn the computer off and then on, and then restart the setup process. For more troubleshooting information, see Troubleshooting the product setup on page 207. NOTE: If the automatic selection fails, or if you want to manually select a .PPD file, click the Printer Model pull-down menu, select the HP option, and then select the .PPD file that you want to add. If the product PPD does not appear in the Model Name list, turn the computer off and then on, and then restart the setup process. If you are using IP Printing, carry out the following steps: a. Choose Socket/HP Jet Direct from the Printer Type pull-down menu. This is the recommended setting for HP products. b. Print the product configuration page. To print a configuration page from the product control panel, perform the following: i. Touch Administration. ii. Touch Information. iii. Touch Configuration/Status Pages. iv. Touch Configuration Page. v. Touch Print. NOTE: If the product contains an HP Jetdirect EIO print server or an optional hard disk drive, additional configuration pages print that provide information about those options. c. On the first configuration page, under the IPv4 heading, find the IP Address. Type this address into the Printer Address field on the add printer screen. d. Select the Printer Model and select the product in the Model Name list. If the product PPD does not appear in the Model Name list, turn the computer off and then on again and restart the setup process. 6. Click the Add button. The product appears in the Printer List dialog box. 7. To configure installable options such as a duplexing unit or optional paper tray, click the Show Info? button on the printer list, and then choose the Installable Options option in the pull-down menu. 8. If the product has a tray 1, select the Tray 1 check box. 9. If the product has a tray 4, select the 2000-Sheet Input Tray (Tray 4) check box. 10. If the product has a duplex unit, select the Duplex Unit check box. 11. If the product has a hard disk, select the Hard Disk option from the Printer Disk menu. 12. For the Accessory Output Bins menu, select one of the following: ● Not Installed ● HP 3000-Sheet Stacker ● HP 3000-Sheet Stapler/Stacker 202 Chapter 5 Macintosh software and utilities ENWW
-
 1
1 -
2
-
3
-
4
-
5
-
6
-
7
-
8
-
9
-
10
-
11
-
12
-
13
-
14
-
15
-
16
-
17
-
18
-
19
-
20
-
21
-
22
-
23
-
24
-
25
-
26
-
27
-
28
-
29
-
30
-
31
-
32
-
33
-
34
-
35
-
36
-
37
-
38
-
39
-
40
-
41
-
42
-
43
-
44
-
45
-
46
-
47
-
48
-
49
-
50
-
51
-
52
-
53
-
54
-
55
-
56
-
57
-
58
-
59
-
60
-
61
-
62
-
63
-
64
-
65
-
66
-
67
-
68
-
69
-
70
-
71
-
72
-
73
-
74
-
75
-
76
-
77
-
78
-
79
-
80
-
81
-
82
-
83
-
84
-
85
-
86
-
87
-
88
-
89
-
90
-
91
-
92
-
93
-
94
-
95
-
96
-
97
-
98
-
99
-
100
-
101
-
102
-
103
-
104
-
105
-
106
-
107
-
108
-
109
-
110
-
111
-
112
-
113
-
114
-
115
-
116
-
117
-
118
-
119
-
120
-
121
-
122
-
123
-
124
-
125
-
126
-
127
-
128
-
129
-
130
-
131
-
132
-
133
-
134
-
135
-
136
-
137
-
138
-
139
-
140
-
141
-
142
-
143
-
144
-
145
-
146
-
147
-
148
-
149
-
150
-
151
-
152
-
153
-
154
-
155
-
156
-
157
-
158
-
159
-
160
-
161
-
162
-
163
-
164
-
165
-
166
-
167
-
168
-
169
-
170
-
171
-
172
-
173
-
174
-
175
-
176
-
177
-
178
-
179
-
180
-
181
-
182
-
183
-
184
-
185
-
186
-
187
-
188
-
189
-
190
-
191
-
192
-
193
-
194
-
195
-
196
-
197
-
198
-
199
-
200
-
201
-
202
-
203
-
204
-
205
-
206
-
207
-
208
-
209
-
210
-
211
-
212
-
213
-
214
-
 215
215 -
 216
216 -
 217
217 -
 218
218 -
 219
219 -
 220
220 -
 221
221 -
 222
222 -
 223
223 -
 224
224 -
 225
225 -
226
-
227
-
228
-
229
-
230
-
231
-
232
-
233
-
234
-
235
-
236
-
237
-
238
-
239
-
240
-
241
-
242
-
243
-
244
-
245
-
246
-
247
-
248
-
249
-
250
-
251
-
252
-
253
-
254
-
255
-
256
-
257
-
258
-
259
-
260
-
261
-
262
-
263
-
264
-
265
-
266
-
267
-
268
-
269
-
270
-
271
-
272
-
273
-
274
-
275
-
276
-
277
-
278
-
279
-
280
-
281
-
282
-
283
-
284
-
285
-
286
-
287
-
288
-
289
-
290
-
291
-
292
-
293
-
294
-
295
-
296
-
297
-
298
-
299
-
300
-
301
-
302
-
303
-
304
-
305
-
306
-
307
-
308
-
309
-
310
 |
 |