HP LaserJet M9040/M9050 HP LaserJet M9040/M9050 MFP - Software Technical Refer - Page 267
Device, Information, Tools, Internet Options, Advanced, Browsing
 |
View all HP LaserJet M9040/M9050 manuals
Add to My Manuals
Save this manual to your list of manuals |
Page 267 highlights
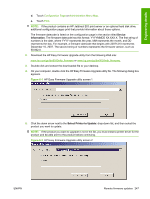
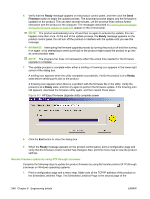
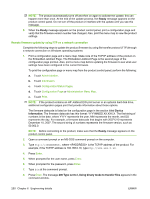
Engineering details configuration page printout. Also, print a menu map before updating the firmware to see what user settings have been configured in the current firmware. To print the configuration page or menu map from the product control panel, perform the following: a. Touch Administration. b. Touch Information. c. Touch Configuration/Status Pages. d. Touch Configuration Page or Administration Menu Map. e. Touch Print. NOTE: If the product contains an HP Jetdirect EIO print server or an optional hard disk drive, additional configuration pages print that provide information about those options. The firmware datecode is listed on the configuration page in the section titled Device Information. The firmware datecode has this format: YYYYMMDD XX.XXX.X. The first string of numbers is the date, where YYYY represents the year, MM represents the month, and DD represents the day. For example, a firmware datecode that begins with 20071210 represents December 10, 2007. The second string of numbers represents the firmware version, such as 50.002.0. 2. Open a Web browser window. 3. In the address line of the Web browser, type ftp://, where is the TCP/IP address of the product. For example, if the TCP/IP address is 192.168.0.10, type ftp:// 192.168.0.10. 4. Press Enter. 5. Locate the downloaded .RFU file for the product. 6. Drag and drop the .RFU file onto the PORT icon or onto any open space in the Web browser window. NOTE: If the PORT icon does not appear as a folder name, you might have to enable folder viewing for FTP sites in the Web browser. In Microsoft Internet Explorer, use the following procedure to enable the folder view: a. Select the Tools menu, then select the Internet Options option, and then select the Advanced tab. b. Under the Browsing menu, select the Enable folder view for FTP sites (outside of Internet Explorer) check box. c. Click the OK button to save the setting. 7. The download process begins and the firmware is updated on the product. This can take several minutes. Let the process finish without further interaction with the device or the computer. The messages described in Control panel messages during the firmware update on page 257 appear on the control panel. ENWW Remote firmware updates 249
-
 1
1 -
2
-
3
-
4
-
5
-
6
-
7
-
8
-
9
-
10
-
11
-
12
-
13
-
14
-
15
-
16
-
17
-
18
-
19
-
20
-
21
-
22
-
23
-
24
-
25
-
26
-
27
-
28
-
29
-
30
-
31
-
32
-
33
-
34
-
35
-
36
-
37
-
38
-
39
-
40
-
41
-
42
-
43
-
44
-
45
-
46
-
47
-
48
-
49
-
50
-
51
-
52
-
53
-
54
-
55
-
56
-
57
-
58
-
59
-
60
-
61
-
62
-
63
-
64
-
65
-
66
-
67
-
68
-
69
-
70
-
71
-
72
-
73
-
74
-
75
-
76
-
77
-
78
-
79
-
80
-
81
-
82
-
83
-
84
-
85
-
86
-
87
-
88
-
89
-
90
-
91
-
92
-
93
-
94
-
95
-
96
-
97
-
98
-
99
-
100
-
101
-
102
-
103
-
104
-
105
-
106
-
107
-
108
-
109
-
110
-
111
-
112
-
113
-
114
-
115
-
116
-
117
-
118
-
119
-
120
-
121
-
122
-
123
-
124
-
125
-
126
-
127
-
128
-
129
-
130
-
131
-
132
-
133
-
134
-
135
-
136
-
137
-
138
-
139
-
140
-
141
-
142
-
143
-
144
-
145
-
146
-
147
-
148
-
149
-
150
-
151
-
152
-
153
-
154
-
155
-
156
-
157
-
158
-
159
-
160
-
161
-
162
-
163
-
164
-
165
-
166
-
167
-
168
-
169
-
170
-
171
-
172
-
173
-
174
-
175
-
176
-
177
-
178
-
179
-
180
-
181
-
182
-
183
-
184
-
185
-
186
-
187
-
188
-
189
-
190
-
191
-
192
-
193
-
194
-
195
-
196
-
197
-
198
-
199
-
200
-
201
-
202
-
203
-
204
-
205
-
206
-
207
-
208
-
209
-
210
-
211
-
212
-
213
-
214
-
215
-
216
-
217
-
218
-
219
-
220
-
221
-
222
-
223
-
224
-
225
-
226
-
227
-
228
-
229
-
230
-
231
-
232
-
233
-
234
-
235
-
236
-
237
-
238
-
239
-
240
-
241
-
242
-
243
-
244
-
245
-
246
-
247
-
248
-
249
-
250
-
251
-
252
-
253
-
254
-
255
-
256
-
257
-
258
-
259
-
260
-
261
-
 262
262 -
 263
263 -
 264
264 -
 265
265 -
 266
266 -
 267
267 -
 268
268 -
 269
269 -
 270
270 -
 271
271 -
 272
272 -
273
-
274
-
275
-
276
-
277
-
278
-
279
-
280
-
281
-
282
-
283
-
284
-
285
-
286
-
287
-
288
-
289
-
290
-
291
-
292
-
293
-
294
-
295
-
296
-
297
-
298
-
299
-
300
-
301
-
302
-
303
-
304
-
305
-
306
-
307
-
308
-
309
-
310
 |
 |
