HP LaserJet M9040/M9050 HP LaserJet M9040/M9050 MFP - Software Technical Refer - Page 278
Print print-ready documents for Windows, Print-ready file printing by using FTP through a browser
 |
View all HP LaserJet M9040/M9050 manuals
Add to My Manuals
Save this manual to your list of manuals |
Page 278 highlights
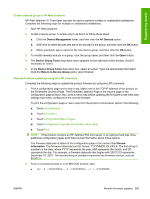
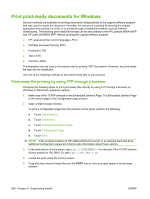
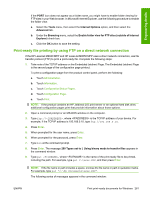
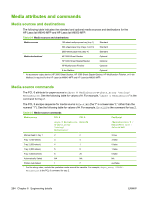
Print print-ready documents for Windows Several methods are available for printing documents independently of the original software program that was used to create the document. Normally, the document is printed by opening the original application and printing it to a file, or is printed through a distribution method such as Internet downloading. The following print-ready file formats can be sent directly to the HP LaserJet M9040 MFP and HP LaserJet M9050 MFP without opening the original software program: ● HP LaserJet printer control language (.PCL) ● Portable document format (.PDF) ● Postscript (.PS) ● Text (.TXT) ● Print file (.PRN) The examples that are used in this section are for printing .PDF documents. However, any print-ready file type can be substituted. Use one of the following methods to send print-ready files to your product. Print-ready file printing by using FTP through a browser Complete the following steps to print print-ready files directly by using FTP through a browser on Windows or Macintosh operating systems. 1. Make note of the TCP/IP address on the Embedded Jetdirect Page. The Embedded Jetdirect Page is the second page of the configuration page printout. 2. Open a Web browser window. To print a configuration page from the product control panel, perform the following: a. Touch Administration. b. Touch Information. c. Touch Configuration/Status Pages. d. Touch Configuration Page. e. Touch Print. NOTE: If the product contains an HP Jetdirect EIO print server or an optional hard disk drive, additional configuration pages print that provide information about those options. 3. In the address line of the browser, type ftp://. For example, if the TCP/IP address of your product is 192.168.0.10, type ftp://192.168.0.10. 4. Locate the print-ready file for the product. 5. Drag and drop the print-ready file onto the PORT icon or onto any open space in the browser window. 260 Chapter 6 Engineering details ENWW
-
 1
1 -
2
-
3
-
4
-
5
-
6
-
7
-
8
-
9
-
10
-
11
-
12
-
13
-
14
-
15
-
16
-
17
-
18
-
19
-
20
-
21
-
22
-
23
-
24
-
25
-
26
-
27
-
28
-
29
-
30
-
31
-
32
-
33
-
34
-
35
-
36
-
37
-
38
-
39
-
40
-
41
-
42
-
43
-
44
-
45
-
46
-
47
-
48
-
49
-
50
-
51
-
52
-
53
-
54
-
55
-
56
-
57
-
58
-
59
-
60
-
61
-
62
-
63
-
64
-
65
-
66
-
67
-
68
-
69
-
70
-
71
-
72
-
73
-
74
-
75
-
76
-
77
-
78
-
79
-
80
-
81
-
82
-
83
-
84
-
85
-
86
-
87
-
88
-
89
-
90
-
91
-
92
-
93
-
94
-
95
-
96
-
97
-
98
-
99
-
100
-
101
-
102
-
103
-
104
-
105
-
106
-
107
-
108
-
109
-
110
-
111
-
112
-
113
-
114
-
115
-
116
-
117
-
118
-
119
-
120
-
121
-
122
-
123
-
124
-
125
-
126
-
127
-
128
-
129
-
130
-
131
-
132
-
133
-
134
-
135
-
136
-
137
-
138
-
139
-
140
-
141
-
142
-
143
-
144
-
145
-
146
-
147
-
148
-
149
-
150
-
151
-
152
-
153
-
154
-
155
-
156
-
157
-
158
-
159
-
160
-
161
-
162
-
163
-
164
-
165
-
166
-
167
-
168
-
169
-
170
-
171
-
172
-
173
-
174
-
175
-
176
-
177
-
178
-
179
-
180
-
181
-
182
-
183
-
184
-
185
-
186
-
187
-
188
-
189
-
190
-
191
-
192
-
193
-
194
-
195
-
196
-
197
-
198
-
199
-
200
-
201
-
202
-
203
-
204
-
205
-
206
-
207
-
208
-
209
-
210
-
211
-
212
-
213
-
214
-
215
-
216
-
217
-
218
-
219
-
220
-
221
-
222
-
223
-
224
-
225
-
226
-
227
-
228
-
229
-
230
-
231
-
232
-
233
-
234
-
235
-
236
-
237
-
238
-
239
-
240
-
241
-
242
-
243
-
244
-
245
-
246
-
247
-
248
-
249
-
250
-
251
-
252
-
253
-
254
-
255
-
256
-
257
-
258
-
259
-
260
-
261
-
262
-
263
-
264
-
265
-
266
-
267
-
268
-
269
-
270
-
271
-
272
-
 273
273 -
 274
274 -
 275
275 -
 276
276 -
 277
277 -
 278
278 -
 279
279 -
 280
280 -
 281
281 -
 282
282 -
 283
283 -
284
-
285
-
286
-
287
-
288
-
289
-
290
-
291
-
292
-
293
-
294
-
295
-
296
-
297
-
298
-
299
-
300
-
301
-
302
-
303
-
304
-
305
-
306
-
307
-
308
-
309
-
310
 |
 |
