HP LaserJet Pro 300 HP LaserJet Pro 300 and 400 Color M351 and M451 - Software - Page 44
Booklet Printing, Snapshot Photos, Glossy/Presentation, Create a custom printing shortcut
 |
View all HP LaserJet Pro 300 manuals
Add to My Manuals
Save this manual to your list of manuals |
Page 44 highlights
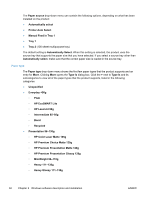
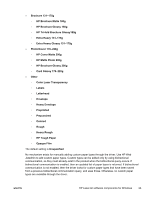
● Paper type: Unspecified ● Print on both sides: Yes, flip over ● Pages per sheet: 1 page per sheet ● Color options: Color Booklet Printing These settings are automatically selected: ● Paper sizes: Letter (This setting changes according to country/region.) ● Paper source: Automatically Select ● Paper type: Unspecified ● Booklet Layout: Left binding Snapshot Photos These settings are automatically selected: ● Paper sizes: 4x6 (This setting changes according to country/region.) ● Paper source: Automatically Select ● Paper type: HP Brochure Glossy 200g ● Color theme: Photo (sRGB) Glossy/Presentation ● Paper sizes: Letter (This setting changes according to country/region.) ● Paper source: Automatically Select ● Paper type: HP Brochure Glossy 200g ● Print on both sides: No ● Color theme: Photo (sRGB) Create a custom printing shortcut 1. Select General Everyday Printing as a base. 2. Select the appropriate print settings on the Printing Shortcuts tab or use the settings on any of the Printing Preferences tabs. 3. On the Printing Shortcuts tab, click Save As.... The Printing Shortcuts dialog box appears. 4. Type a name for the custom printing shortcut, and then click the OK button. The custom printing shortcut appears in the Printing Shortcuts list. 5. To delete a custom printing shortcut, click the custom shortcut, and then click the Delete button. 28 Chapter 2 Windows software description and installation ENWW
-
 1
1 -
2
-
3
-
4
-
5
-
6
-
7
-
8
-
9
-
10
-
11
-
12
-
13
-
14
-
15
-
16
-
17
-
18
-
19
-
20
-
21
-
22
-
23
-
24
-
25
-
26
-
27
-
28
-
29
-
30
-
31
-
32
-
33
-
34
-
35
-
36
-
37
-
38
-
 39
39 -
 40
40 -
 41
41 -
 42
42 -
 43
43 -
 44
44 -
 45
45 -
 46
46 -
 47
47 -
 48
48 -
 49
49 -
50
-
51
-
52
-
53
-
54
-
55
-
56
-
57
-
58
-
59
-
60
-
61
-
62
-
63
-
64
-
65
-
66
-
67
-
68
-
69
-
70
-
71
-
72
-
73
-
74
-
75
-
76
-
77
-
78
-
79
-
80
-
81
-
82
-
83
-
84
-
85
-
86
-
87
-
88
-
89
-
90
-
91
-
92
-
93
-
94
-
95
-
96
-
97
-
98
-
99
-
100
-
101
-
102
-
103
-
104
-
105
-
106
-
107
-
108
-
109
-
110
-
111
-
112
-
113
-
114
-
115
-
116
-
117
-
118
-
119
-
120
-
121
-
122
-
123
-
124
-
125
-
126
-
127
-
128
-
129
-
130
-
131
-
132
-
133
-
134
-
135
-
136
-
137
-
138
-
139
-
140
-
141
-
142
-
143
-
144
-
145
-
146
-
147
-
148
-
149
-
150
-
151
-
152
-
153
-
154
-
155
-
156
-
157
-
158
-
159
-
160
-
161
-
162
-
163
-
164
-
165
-
166
-
167
-
168
-
169
-
170
-
171
-
172
-
173
-
174
-
175
-
176
-
177
-
178
-
179
-
180
-
181
-
182
-
183
-
184
-
185
-
186
-
187
-
188
-
189
-
190
-
191
-
192
-
193
-
194
-
195
-
196
 |
 |
