HP Photosmart 635 hp photosmart 630 series digital camera with hp instant shar - Page 15
Attaching the lens cap, Installing the batteries, memory card door and skip - accessories
 |
View all HP Photosmart 635 manuals
Add to My Manuals
Save this manual to your list of manuals |
Page 15 highlights
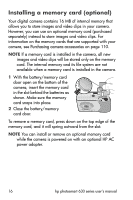
Attaching the lens cap 1 Pinch the grips on the sides of the lens cap with your thumb and finger as shown. 2 Fit the lens cap into the lens ring on the front of the camera and release the grips on the lens cap. Make sure the lens cap snaps into place. To remove the lens cap, pinch the grips on the sides of the lens cap with your thumb and finger, and pull the lens cap off the lens ring. Installing the batteries 1 Open the battery/memory card door on the bottom of the camera. 2 Insert the batteries as indicated inside the door. 3 If you do not have an optional memory card to install in the camera, close the battery/ memory card door and skip to Turning on power on page 17. If you want to install an optional memory card, leave the battery/memory card door open and proceed to the next section, Installing a memory card (optional). NOTE For more information, see Managing batteries on page 106. You can also use an optional HP AC power adapter to power the camera, and you can recharge batteries in the camera using an optional HP AC power adapter or HP 8886 camera dock. For more information, see Purchasing camera accessories on page 110. Chapter 1: Getting started 15
-
 1
1 -
2
-
3
-
4
-
5
-
6
-
7
-
8
-
9
-
 10
10 -
 11
11 -
 12
12 -
 13
13 -
 14
14 -
 15
15 -
 16
16 -
 17
17 -
 18
18 -
 19
19 -
 20
20 -
21
-
22
-
23
-
24
-
25
-
26
-
27
-
28
-
29
-
30
-
31
-
32
-
33
-
34
-
35
-
36
-
37
-
38
-
39
-
40
-
41
-
42
-
43
-
44
-
45
-
46
-
47
-
48
-
49
-
50
-
51
-
52
-
53
-
54
-
55
-
56
-
57
-
58
-
59
-
60
-
61
-
62
-
63
-
64
-
65
-
66
-
67
-
68
-
69
-
70
-
71
-
72
-
73
-
74
-
75
-
76
-
77
-
78
-
79
-
80
-
81
-
82
-
83
-
84
-
85
-
86
-
87
-
88
-
89
-
90
-
91
-
92
-
93
-
94
-
95
-
96
-
97
-
98
-
99
-
100
-
101
-
102
-
103
-
104
-
105
-
106
-
107
-
108
-
109
-
110
-
111
-
112
-
113
-
114
-
115
-
116
-
117
-
118
-
119
-
120
-
121
-
122
-
123
-
124
 |
 |
