HP Photosmart 635 hp photosmart 630 series digital camera with hp instant shar - Page 19
Setting the date and time, Installing the software, also allows you to con
 |
View all HP Photosmart 635 manuals
Add to My Manuals
Save this manual to your list of manuals |
Page 19 highlights
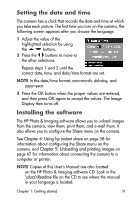
Setting the date and time The camera has a clock that records the date and time at which you take each picture. The first time you turn on the camera, the following screen appears after you choose the language. 1 Adjust the value of the highlighted selection by using the buttons. 2 Press the buttons to move to the other selections. Repeat steps 1 and 2 until the correct date, time, and date/time format are set. NOTE In the date/time format, mm=month, dd=day, and yyyy=year. 3 Press the OK button when the proper values are entered, and then press OK again to accept the values. The Image Display then turns off. Installing the software The HP Photo & Imaging software allows you to unload images from the camera, view them, print them, and e-mail them. It also allows you to configure the Share menu on the camera. See Chapter 4: Using hp instant share on page 58 for information about configuring the Share menu on the camera, and Chapter 5: Unloading and printing images on page 67 for information about connecting the camera to a computer or printer. NOTE Copies of this User's Manual are also located on the HP Photo & Imaging software CD. Look in the \docs\Readme file on the CD to see where the manual in your language is located. Chapter 1: Getting started 19
-
 1
1 -
2
-
3
-
4
-
5
-
6
-
7
-
8
-
9
-
10
-
11
-
12
-
13
-
 14
14 -
 15
15 -
 16
16 -
 17
17 -
 18
18 -
 19
19 -
 20
20 -
 21
21 -
 22
22 -
 23
23 -
 24
24 -
25
-
26
-
27
-
28
-
29
-
30
-
31
-
32
-
33
-
34
-
35
-
36
-
37
-
38
-
39
-
40
-
41
-
42
-
43
-
44
-
45
-
46
-
47
-
48
-
49
-
50
-
51
-
52
-
53
-
54
-
55
-
56
-
57
-
58
-
59
-
60
-
61
-
62
-
63
-
64
-
65
-
66
-
67
-
68
-
69
-
70
-
71
-
72
-
73
-
74
-
75
-
76
-
77
-
78
-
79
-
80
-
81
-
82
-
83
-
84
-
85
-
86
-
87
-
88
-
89
-
90
-
91
-
92
-
93
-
94
-
95
-
96
-
97
-
98
-
99
-
100
-
101
-
102
-
103
-
104
-
105
-
106
-
107
-
108
-
109
-
110
-
111
-
112
-
113
-
114
-
115
-
116
-
117
-
118
-
119
-
120
-
121
-
122
-
123
-
124
 |
 |
