HP Photosmart 635 hp photosmart 630 series digital camera with hp instant shar - Page 60
HP Instant Share E-mail, Share, Modify Share, HP Instant Share, E-mail, HP Instant, Finish - instruction manual
 |
View all HP Photosmart 635 manuals
Add to My Manuals
Save this manual to your list of manuals |
Page 60 highlights
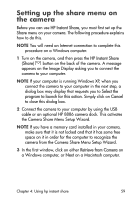
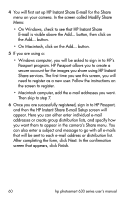
4 You will first set up HP Instant Share E-mail for the Share menu on your camera. In the screen called Modify Share Menu: • On Windows, check to see that HP Instant Share E-mail is visible above the Add... button, then click on the Add... button. • On Macintosh, click on the Add... button. 5 If you are using a: • Windows computer, you will be asked to sign in to HP's Passport program. HP Passport allows you to create a secure account for the images you share using HP Instant Share services. The first time you see this screen, you will need to register as a new user. Follow the instructions on the screen to register. • Macintosh computer, add the e-mail addresses you want. Then skip to step 7. 6 Once you are successfully registered, sign in to HP Passport, and then the HP Instant Share E-mail Setup screen will appear. Here you can either enter individual e-mail addresses or create group distribution lists, and specify how you want them to appear in the camera's Share menu. You can also enter a subject and message to go with all e-mails that will be sent to each e-mail address or distribution list. After completing the form, click Next. In the confirmation screen that appears, click Finish. 60 hp photosmart 630 series user's manual
-
 1
1 -
2
-
3
-
4
-
5
-
6
-
7
-
8
-
9
-
10
-
11
-
12
-
13
-
14
-
15
-
16
-
17
-
18
-
19
-
20
-
21
-
22
-
23
-
24
-
25
-
26
-
27
-
28
-
29
-
30
-
31
-
32
-
33
-
34
-
35
-
36
-
37
-
38
-
39
-
40
-
41
-
42
-
43
-
44
-
45
-
46
-
47
-
48
-
49
-
50
-
51
-
52
-
53
-
54
-
 55
55 -
 56
56 -
 57
57 -
 58
58 -
 59
59 -
 60
60 -
 61
61 -
 62
62 -
 63
63 -
 64
64 -
 65
65 -
66
-
67
-
68
-
69
-
70
-
71
-
72
-
73
-
74
-
75
-
76
-
77
-
78
-
79
-
80
-
81
-
82
-
83
-
84
-
85
-
86
-
87
-
88
-
89
-
90
-
91
-
92
-
93
-
94
-
95
-
96
-
97
-
98
-
99
-
100
-
101
-
102
-
103
-
104
-
105
-
106
-
107
-
108
-
109
-
110
-
111
-
112
-
113
-
114
-
115
-
116
-
117
-
118
-
119
-
120
-
121
-
122
-
123
-
124
 |
 |