Konica Minolta bizhub 181 NC-503 User Manual - Page 40
PORT9100 printing, For Windows XP/Server 2003: On the Start menu, click Control Pan
 |
View all Konica Minolta bizhub 181 manuals
Add to My Manuals
Save this manual to your list of manuals |
Page 40 highlights
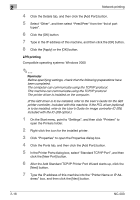
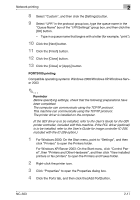
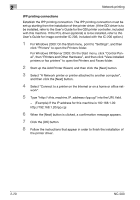
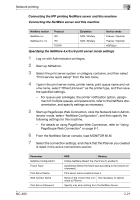
Network printing 2 8 Select "Custom", and then click the [Settings] button. 9 Select "LPR" in the protocol group box, type the queue name in the "Queue Name" box of the "LPR Settings" group box, and then click the [OK] button. - Type in a queue name that begins with a letter (for example, "print"). 10 Click the [Next] button. 11 Click the [Finish] button. 12 Click the [Close] button. 13 Click the [Close] or [Apply] button. PORT9100 printing Compatible operating systems: Windows 2000/Windows XP/Windows Server 2003 2 Reminder Before specifying settings, check that the following preparations have been completed. The computer can communicate using the TCP/IP protocol. This machine can communicate using the TCP/IP protocol. The printer driver is installed on the computer. (If the GDI driver is to be installed, refer to the User's Guide for the GDI printer controller, included with this machine. If the PCL driver (optional) is to be installed, refer to the User's Guide for image controller IC-206, included with the IC-206 option.) 1 For Windows 2000: On the Start menu, point to "Settings", and then click "Printers" to open the Printers folder. For Windows XP/Server 2003: On the Start menu, click "Control Panel", then "Printers and Other Hardware", and then click "View installed printers or fax printers" to open the Printers and Faxes folder. 2 Right-click the printer icon. 3 Click "Properties" to open the Properties dialog box. 4 Click the Ports tab, and then click the [Add Port]button. NC-503 2-17
-
 1
1 -
2
-
3
-
4
-
5
-
6
-
7
-
8
-
9
-
10
-
11
-
12
-
13
-
14
-
15
-
16
-
17
-
18
-
19
-
20
-
21
-
22
-
23
-
24
-
25
-
26
-
27
-
28
-
29
-
30
-
31
-
32
-
33
-
34
-
 35
35 -
 36
36 -
 37
37 -
 38
38 -
 39
39 -
 40
40 -
 41
41 -
 42
42 -
 43
43 -
 44
44 -
 45
45 -
46
-
47
-
48
-
49
-
50
-
51
-
52
-
53
-
54
-
55
-
56
-
57
-
58
-
59
-
60
-
61
-
62
-
63
-
64
-
65
-
66
-
67
-
68
-
69
-
70
-
71
-
72
-
73
-
74
-
75
-
76
-
77
-
78
-
79
-
80
-
81
-
82
-
83
-
84
-
85
-
86
-
87
-
88
-
89
-
90
-
91
-
92
-
93
-
94
-
95
-
96
-
97
-
98
-
99
-
100
-
101
-
102
-
103
-
104
-
105
-
106
-
107
-
108
-
109
-
110
-
111
-
112
-
113
-
114
-
115
-
116
-
117
-
118
-
119
-
120
-
121
-
122
-
123
-
124
-
125
-
126
-
127
-
128
-
129
-
130
-
131
-
132
-
133
-
134
-
135
-
136
-
137
-
138
-
139
-
140
-
141
-
142
-
143
-
144
-
145
-
146
-
147
-
148
-
149
-
150
-
151
-
152
-
153
-
154
-
155
-
156
-
157
-
158
-
159
-
160
-
161
-
162
-
163
-
164
-
165
-
166
-
167
-
168
-
169
-
170
-
171
-
172
-
173
-
174
-
175
-
176
-
177
-
178
-
179
-
180
-
181
-
182
-
183
-
184
-
185
-
186
-
187
-
188
-
189
-
190
-
191
-
192
-
193
-
194
-
195
-
196
-
197
-
198
-
199
-
200
-
201
-
202
-
203
-
204
-
205
-
206
-
207
-
208
-
209
-
210
-
211
-
212
-
213
-
214
-
215
-
216
-
217
-
218
-
219
-
220
-
221
-
222
-
223
-
224
-
225
-
226
-
227
-
228
-
229
-
230
-
231
-
232
-
233
-
234
-
235
-
236
-
237
-
238
-
239
-
240
-
241
-
242
-
243
-
244
 |
 |