Konica Minolta bizhub C550 bizhub C451/C550/C650 Fax Driver Operations User Ma - Page 25
For Windows 2000/XP/Server 2003, click the File menu, and then click Server Properties.
 |
View all Konica Minolta bizhub C550 manuals
Add to My Manuals
Save this manual to your list of manuals |
Page 25 highlights
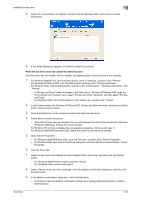
Installing the fax driver 2 2 Select the components to be deleted, and then click the [Delete] button. Follow the on-screen instructions. 3 If the restart dialog box appears, click [OK] to restart the computer. When the fax driver does not contain the delete function If the fax driver was not installed with an installer, the delete function of the fax driver is not included. 1 For Windows 2000/NT 4.0, click the [Start] button, point to "Settings", and then click "Printers". For Windows XP/Server 2003, click the [Start] button, and then click "Printers and Faxes". For Windows Vista, click the [Start] button, and then click "Control panel", "Hardware and Sound", and "Printers". - If "Printers and Faxes" does not appear in the Start menu in Windows XP/Server 2003, open the Control Panel from the Start menu, select "Printers and Other Hardware", and then select "Printers and Faxes". - For Windows Vista, if the control panel is in the classic view, double-click "Printers". 2 In the Printers window (for Windows XP/Server 2003, Printers and Faxes window), select the icon of the printer that you want to delete. 3 Press the [Delete] key on the computer keyboard to delete the fax driver. 4 Follow the on-screen instructions. - When the fax driver has been deleted, the icon will disappear from the Printers window (for Windows XP/Server 2003/Vista, Printers and Faxes window). For Windows NT 4.0, this completes the uninstallation procedure. Continue with step 11. For Windows 2000/XP/Vista/Sever 2003, delete the driver from the server properties. 5 Open "Server Properties". - For Windows 2000/XP/Server 2003, click the File menu, and then click "Server Properties". - For Windows Vista, right-click on the Printer dialog box, and then click Run as administrator - Server Properties. 6 Click the Driver tab. 7 Select the fax driver to be deleted from the Installed Printer Drivers list, and then click the [Delete] button. - For Windows 2000/XP/Server 2003, proceed to step 9. - For Windows Vista, continue with step 8. 8 Select "Remove driver and driver package" from the deletion confirmation dialog box, and then click the [OK] button. 9 In the deletion confirmation dialog box, click the [Yes] button. - In Windows Vista, the deletion confirmation dialog box is already displayed, therefore, click the [Delete] button. Fax Driver 2-10
-
 1
1 -
2
-
3
-
4
-
5
-
6
-
7
-
8
-
9
-
10
-
11
-
12
-
13
-
14
-
15
-
16
-
17
-
18
-
19
-
 20
20 -
 21
21 -
 22
22 -
 23
23 -
 24
24 -
 25
25 -
 26
26 -
 27
27 -
 28
28 -
 29
29 -
 30
30 -
31
-
32
-
33
-
34
-
35
-
36
-
37
-
38
-
39
-
40
-
41
-
42
-
43
-
44
-
45
-
46
-
47
-
48
-
49
-
50
-
51
-
52
-
53
-
54
-
55
-
56
-
57
-
58
-
59
 |
 |
