Kyocera KM-6030 Scan System Operation Guide (Functions Edition) Rev-9 - Page 112
(2) Designating a New Destination Folder for Receiving Scanned Data,
 |
View all Kyocera KM-6030 manuals
Add to My Manuals
Save this manual to your list of manuals |
Page 112 highlights
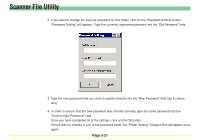
Scanner File Utility (2) Designating a New Destination Folder for Receiving Scanned Data When you want to designate a new destination folder for receiving scanned data, click on the New button in the Setup Dialogue Box. The Folder Setting Dialogue Box for making the corresponding settings will appear. 1. Enter an unregistered number (type in a number between 1 and 100) into the No. field. * The number that you enter here will be used as the designated number for that destination folder. It is this number that you will have to register as the "save number" in the WebPage Functions interface and then select in the scanner in order to have data sent to that folder. Page 3-16
-
 1
1 -
2
-
3
-
4
-
5
-
6
-
7
-
8
-
9
-
10
-
11
-
12
-
13
-
14
-
15
-
16
-
17
-
18
-
19
-
20
-
21
-
22
-
23
-
24
-
25
-
26
-
27
-
28
-
29
-
30
-
31
-
32
-
33
-
34
-
35
-
36
-
37
-
38
-
39
-
40
-
41
-
42
-
43
-
44
-
45
-
46
-
47
-
48
-
49
-
50
-
51
-
52
-
53
-
54
-
55
-
56
-
57
-
58
-
59
-
60
-
61
-
62
-
63
-
64
-
65
-
66
-
67
-
68
-
69
-
70
-
71
-
72
-
73
-
74
-
75
-
76
-
77
-
78
-
79
-
80
-
81
-
82
-
83
-
84
-
85
-
86
-
87
-
88
-
89
-
90
-
91
-
92
-
93
-
94
-
95
-
96
-
97
-
98
-
99
-
100
-
101
-
102
-
103
-
104
-
105
-
106
-
 107
107 -
 108
108 -
 109
109 -
 110
110 -
 111
111 -
 112
112 -
 113
113 -
 114
114 -
 115
115 -
 116
116 -
 117
117 -
118
-
119
-
120
-
121
-
122
-
123
-
124
-
125
-
126
-
127
-
128
-
129
-
130
-
131
-
132
-
133
-
134
-
135
-
136
-
137
-
138
-
139
-
140
-
141
-
142
-
143
-
144
-
145
-
146
-
147
-
148
-
149
-
150
-
151
-
152
-
153
-
154
-
155
-
156
-
157
-
158
-
159
-
160
-
161
-
162
-
163
-
164
-
165
-
166
-
167
-
168
-
169
-
170
-
171
-
172
-
173
-
174
-
175
-
176
-
177
-
178
-
179
-
180
-
181
-
182
-
183
-
184
-
185
-
186
-
187
-
188
-
189
-
190
-
191
-
192
-
193
-
194
-
195
-
196
-
197
-
198
-
199
-
200
-
201
-
202
-
203
-
204
-
205
-
206
-
207
-
208
-
209
-
210
-
211
-
212
-
213
-
214
-
215
-
216
-
217
-
218
-
219
-
220
-
221
-
222
-
223
-
224
-
225
-
226
-
227
-
228
-
229
-
230
-
231
-
232
-
233
-
234
-
235
-
236
-
237
-
238
-
239
-
240
-
241
-
242
-
243
-
244
-
245
-
246
-
247
-
248
-
249
-
250
-
251
-
252
-
253
-
254
-
255
-
256
-
257
-
258
-
259
-
260
 |
 |

Page 3-16
Scanner File Utility
(2) Designating a New Destination Folder for Receiving Scanned Data
When you want to designate a new destination folder for receiving scanned data, click on the
New
button in
the
Setup
Dialogue Box. The
Folder Setting
Dialogue Box for making the corresponding settings will
appear.
1. Enter an unregistered number (type in a number between 1 and 100) into the
No.
field.
*
The number that you enter here will be used as the designated number for that destination folder. It is
this number that you will have to register as the
“
save number
”
in the WebPage Functions interface
and then select in the scanner in order to have data sent to that folder.