Kyocera KM-6030 Scan System Operation Guide (Functions Edition) Rev-9 - Page 45
“Continuous sending” setting,
 |
View all Kyocera KM-6030 manuals
Add to My Manuals
Save this manual to your list of manuals |
Page 45 highlights
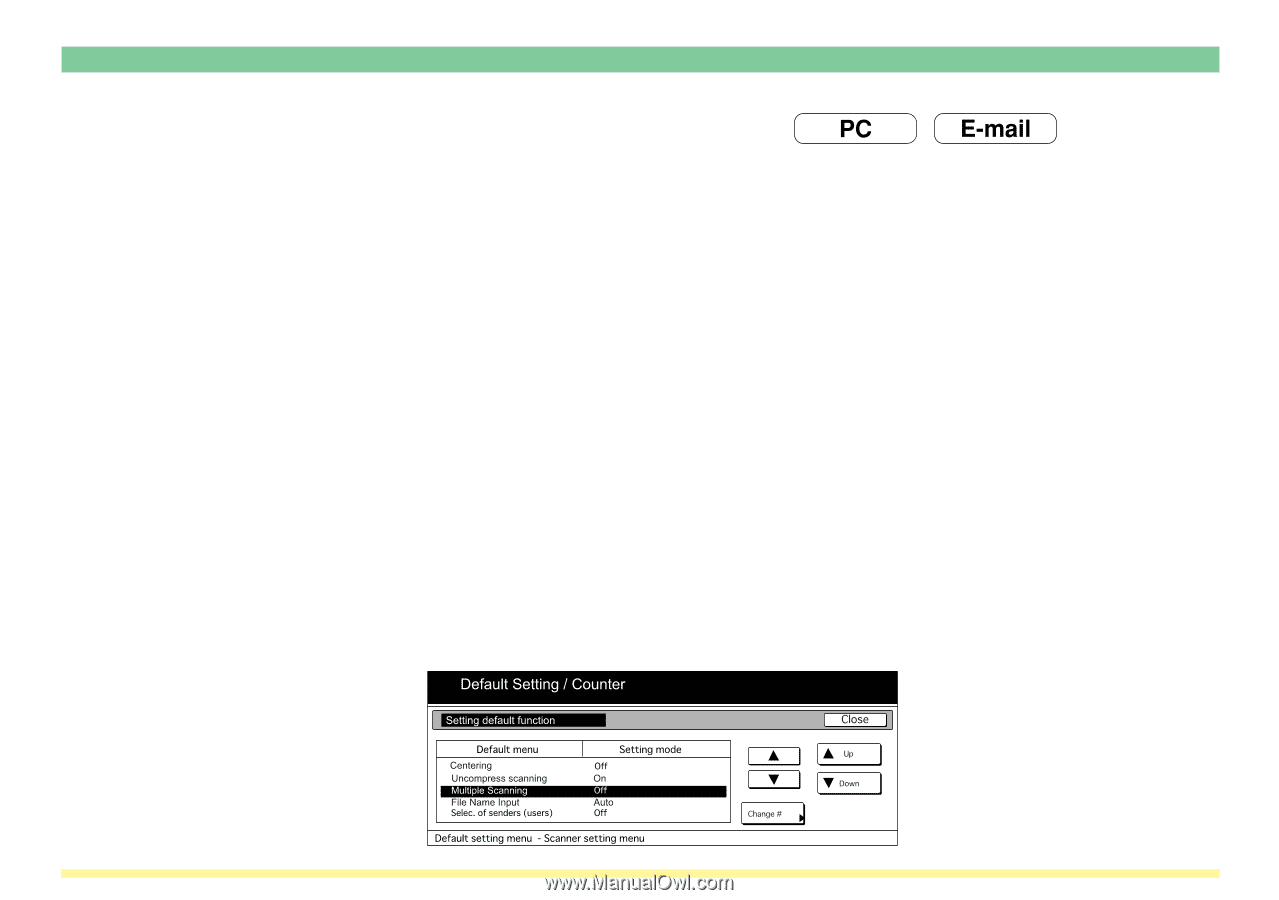
Using the Scanner Function "Multiple Scanning (Continuous Sending)" setting If the "Multiple Scanning (Continuous Sending)" setting is turned On when you use the Send to PC or Send E-mail functions to send scanned image files, the touch panel will return to the initial screen for that function ("Ready to scan." is displayed) with the same transmission settings that were used for the previous operation (user, destination, etc.). In this case, it is not necessary to make any changes in order to send other image files using the same settings. * When the "Multiple Scanning (Continuous Sending)" setting is turned On, be sure to touch the "Cancel" key in the Scan to PC or Send E-mail screen that appears once you finish the scanning procedure. If you do not touch the "Cancel" key, that screen will not go out and it will not be possible to use the Copier, Printer and Fax functions of this machine. Since others may need to use the machine besides yourself, please be sure to touch the "Cancel" key when you are finished. * If "Permit file overwrite" is selected in the computer's Scanner File Utility when you are using the Scan to PC function, previous files saved to that computer may be overwritten if a duplicate file name is use. Be aware of this fact when designating file names for transmission, especially when the "Multiple Scanning (Continuous Sending)" setting is turned On. (In this case of scanners that possess a touch panel.) 1 . Press the Default Setting / Counter (*) key on the scanner's operation panel and then access the Func. Def. setting screen on the touch panel. Refer to "(3) Making settings from the touch panel" on page 2-2 of the Set-Up Edition of your Operation Guide for the procedure on accessing the Func. Def. setting screen. 2 . Use the "L" and "M" cursor keys to select "Multiple Scanning (Continuous Sending)" and then touch the "Change #" key. The Change Settings screen will appear. Page 1-26
-
 1
1 -
2
-
3
-
4
-
5
-
6
-
7
-
8
-
9
-
10
-
11
-
12
-
13
-
14
-
15
-
16
-
17
-
18
-
19
-
20
-
21
-
22
-
23
-
24
-
25
-
26
-
27
-
28
-
29
-
30
-
31
-
32
-
33
-
34
-
35
-
36
-
37
-
38
-
39
-
 40
40 -
 41
41 -
 42
42 -
 43
43 -
 44
44 -
 45
45 -
 46
46 -
 47
47 -
 48
48 -
 49
49 -
 50
50 -
51
-
52
-
53
-
54
-
55
-
56
-
57
-
58
-
59
-
60
-
61
-
62
-
63
-
64
-
65
-
66
-
67
-
68
-
69
-
70
-
71
-
72
-
73
-
74
-
75
-
76
-
77
-
78
-
79
-
80
-
81
-
82
-
83
-
84
-
85
-
86
-
87
-
88
-
89
-
90
-
91
-
92
-
93
-
94
-
95
-
96
-
97
-
98
-
99
-
100
-
101
-
102
-
103
-
104
-
105
-
106
-
107
-
108
-
109
-
110
-
111
-
112
-
113
-
114
-
115
-
116
-
117
-
118
-
119
-
120
-
121
-
122
-
123
-
124
-
125
-
126
-
127
-
128
-
129
-
130
-
131
-
132
-
133
-
134
-
135
-
136
-
137
-
138
-
139
-
140
-
141
-
142
-
143
-
144
-
145
-
146
-
147
-
148
-
149
-
150
-
151
-
152
-
153
-
154
-
155
-
156
-
157
-
158
-
159
-
160
-
161
-
162
-
163
-
164
-
165
-
166
-
167
-
168
-
169
-
170
-
171
-
172
-
173
-
174
-
175
-
176
-
177
-
178
-
179
-
180
-
181
-
182
-
183
-
184
-
185
-
186
-
187
-
188
-
189
-
190
-
191
-
192
-
193
-
194
-
195
-
196
-
197
-
198
-
199
-
200
-
201
-
202
-
203
-
204
-
205
-
206
-
207
-
208
-
209
-
210
-
211
-
212
-
213
-
214
-
215
-
216
-
217
-
218
-
219
-
220
-
221
-
222
-
223
-
224
-
225
-
226
-
227
-
228
-
229
-
230
-
231
-
232
-
233
-
234
-
235
-
236
-
237
-
238
-
239
-
240
-
241
-
242
-
243
-
244
-
245
-
246
-
247
-
248
-
249
-
250
-
251
-
252
-
253
-
254
-
255
-
256
-
257
-
258
-
259
-
260
 |
 |