Kyocera KM-6030 Scan System Operation Guide (Functions Edition) Rev-9 - Page 120
Saving Scanned Data as a File, (1) Outline of the Procedure,
 |
View all Kyocera KM-6030 manuals
Add to My Manuals
Save this manual to your list of manuals |
Page 120 highlights
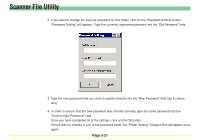
Scanner File Utility Saving Scanned Data as a File (1) Outline of the Procedure The following procedure explains in general how to use the Scanner File Utility to receive graphic image data from the scanner. 1. Make sure that the Scanner File Utility is running in the computer in which you want to receive the data. * If the Scanner File Utility is NOT running, refer to "(1) Accessing the Initial Dialogue Box for the Scanner File Utility" on page 3-10 and start up the utility. 2. Set the original that you want to scan into the scanner. 3. On the scanner's operation panel, select the destination computer that you want to save the scanned data into. 4. If a security password has been registered for that folder, enter that password. * If no password has been registered, this step is not necessary. * If the entered password does not match the registered one, an error will occur and you will be unable to continue the procedure. 5. Press the Start key on the scanner's operation panel. The original that was set in the scanner will be scanned and the resulting data will be sent to the designated computer. The received image data will be compressed and then saved into the designated folder. * The saved file can then be used as desired. It can, for example, be sent to other parties via email, or displayed and edited using any application that is commercially available for that purpose, etc. Page 3-24
-
 1
1 -
2
-
3
-
4
-
5
-
6
-
7
-
8
-
9
-
10
-
11
-
12
-
13
-
14
-
15
-
16
-
17
-
18
-
19
-
20
-
21
-
22
-
23
-
24
-
25
-
26
-
27
-
28
-
29
-
30
-
31
-
32
-
33
-
34
-
35
-
36
-
37
-
38
-
39
-
40
-
41
-
42
-
43
-
44
-
45
-
46
-
47
-
48
-
49
-
50
-
51
-
52
-
53
-
54
-
55
-
56
-
57
-
58
-
59
-
60
-
61
-
62
-
63
-
64
-
65
-
66
-
67
-
68
-
69
-
70
-
71
-
72
-
73
-
74
-
75
-
76
-
77
-
78
-
79
-
80
-
81
-
82
-
83
-
84
-
85
-
86
-
87
-
88
-
89
-
90
-
91
-
92
-
93
-
94
-
95
-
96
-
97
-
98
-
99
-
100
-
101
-
102
-
103
-
104
-
105
-
106
-
107
-
108
-
109
-
110
-
111
-
112
-
113
-
114
-
 115
115 -
 116
116 -
 117
117 -
 118
118 -
 119
119 -
 120
120 -
 121
121 -
 122
122 -
 123
123 -
 124
124 -
 125
125 -
126
-
127
-
128
-
129
-
130
-
131
-
132
-
133
-
134
-
135
-
136
-
137
-
138
-
139
-
140
-
141
-
142
-
143
-
144
-
145
-
146
-
147
-
148
-
149
-
150
-
151
-
152
-
153
-
154
-
155
-
156
-
157
-
158
-
159
-
160
-
161
-
162
-
163
-
164
-
165
-
166
-
167
-
168
-
169
-
170
-
171
-
172
-
173
-
174
-
175
-
176
-
177
-
178
-
179
-
180
-
181
-
182
-
183
-
184
-
185
-
186
-
187
-
188
-
189
-
190
-
191
-
192
-
193
-
194
-
195
-
196
-
197
-
198
-
199
-
200
-
201
-
202
-
203
-
204
-
205
-
206
-
207
-
208
-
209
-
210
-
211
-
212
-
213
-
214
-
215
-
216
-
217
-
218
-
219
-
220
-
221
-
222
-
223
-
224
-
225
-
226
-
227
-
228
-
229
-
230
-
231
-
232
-
233
-
234
-
235
-
236
-
237
-
238
-
239
-
240
-
241
-
242
-
243
-
244
-
245
-
246
-
247
-
248
-
249
-
250
-
251
-
252
-
253
-
254
-
255
-
256
-
257
-
258
-
259
-
260
 |
 |
