LG 42CQ610H Setup Guide - Page 16
Custom Master TV Setup Cont.
 |
View all LG 42CQ610H manuals
Add to My Manuals
Save this manual to your list of manuals |
Page 16 highlights
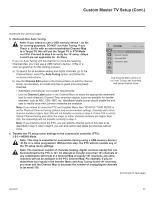
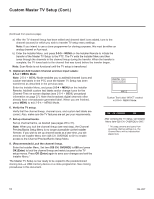
Custom Master TV Setup (Cont.) Custom Master TV Setup Procedure 1. Set Installer Menu items. This step provides specific instruction only on the Installer Menu items that should be set on a Master TV. Refer to pages 19 to 26 for detailed information on all Installer Menu items. a) Make sure the TV is ON. Then, use the Installer Remote to enter the PTC Installer Menu: Press MENU repeatedly until the on-screen display of the TV setup menus no longer toggles, and then press 9-8-7-6 + OK (Enter). b) Set Installer Menu item 117 FACT DEFAULT to 001 and press OK (Enter) on the Installer Remote. This clears all Installer Menu custom settings, channel lineup, etc. and reloads the factory default settings. The value will change back to 0 after the PTC has been restored to factory default condition. This step ensures that the TV Channel Memory will be the active channel lineup. c) Set Installer Menu item 003 BAND/AFC, as appropriate. • Broadcast: Set to 000. • HRC: Set to 002. • CATV: Set to 001 (default). • IRC: Set to 003. d) Set Installer Menu item 027 HOSPITAL MODE, as appropriate, to select the speaker configuration. e) Set any other Installer Menu items that affect your TV programming network to the required configuration. For example, enable/disable Aux inputs, set a Start Channel, etc. f) After you have adjusted all Installer Menu item settings as required, press OK (Enter) once on the Installer Remote to save your changes; then, press OK (Enter) again to exit the menu. 2. Set up TV features. On-screen setup menus control the features of the TV. Press MENU on the Installer Remote to access the TV setup menus, and then set Channel, Picture, Audio, Lock, Time, etc. options to the desired configurations. See also Clonable TV Setup Menu Features list on previous page. Note: If you intend to clone the PTC, remember that only one TV source's clonable setup menu settings will be cloned. Thus, for a clone programmer, the TV setup menu settings should be applicable to either an analog channel or Aux input, while for a USB device / .tll file, the TV setup menu settings should be applicable to the analog or digital channel or Aux input to which the Target TV will be set during the Teaching process. Note: If desired and if appropriate depending on the cloning method you intend to use (see "Cloning Methods" on previous page), you can run Auto Tuning (see step 3) prior to completing this step. 16 xxLQ630H PTC INSTALLER MENU CPU-CTV 000 INSTALLER SEQ 000 UPN 000-000-000-000 ASIC D279 PTC V1.00.013 CPU V3.07.00 Typical Installer Menu Note: The Installer Menu header will vary depending on the TV you are setting up. 117 FACT DEFAULT 000 003 BAND/AFC 001 027 HOSPITAL MODE 254 Adjust the values for these Installer Menu items. CHANNEL PICTURE AUDIO TIME LOCK OPTION INPUT MY MEDIA Set the TV features to the desired configuration for the end user. Audio Menu Note: Audio Menu options are inaccessible (grayed out) if TV Speaker is not selected (i.e., Pillow Only is selected). Lock Menu Note: Press 0-3-2-5 to access the Lock Menu if the Lock System is active and the password is not available. (Continued on next page) 206-4207
-
 1
1 -
2
-
3
-
4
-
5
-
6
-
7
-
8
-
9
-
10
-
 11
11 -
 12
12 -
 13
13 -
 14
14 -
 15
15 -
 16
16 -
 17
17 -
 18
18 -
 19
19 -
 20
20 -
 21
21 -
22
-
23
-
24
-
25
-
26
-
27
-
28
-
29
-
30
-
31
-
32
-
33
-
34
-
35
-
36
-
37
-
38
-
39
-
40
-
41
-
42
-
43
-
44
-
45
-
46
-
47
-
48
-
49
-
50
-
51
-
52
-
53
-
54
-
55
-
56
-
57
-
58
-
59
-
60
-
61
-
62
-
63
-
64
-
65
-
66
-
67
-
68
-
69
-
70
-
71
-
72
-
73
-
74
-
75
 |
 |
