LG 42CQ610H Setup Guide - Page 28
Channel Banks Setup
 |
View all LG 42CQ610H manuals
Add to My Manuals
Save this manual to your list of manuals |
Page 28 highlights
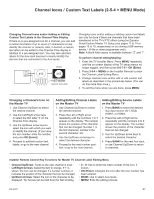
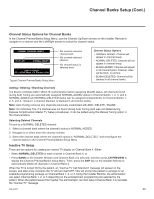
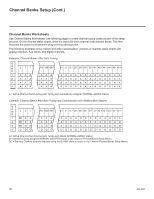
Channel Banks Setup Channel Banks Overview Channel Banks enable institution administrators to create tiered channel programming on patient in-room TVs. Each channel bank may offer a custom channel lineup for a pre-determined fee. LQ630H and CQ610H TVs are configured with four channel banks, i.e., Channel Banks 1, 2, 3, and 4. The top tier generally contains the most programming (premium, etc.), 2nd tier = lesser programming, 3rd tier = basic programming, etc. It is also possible to create an Inactive TV display with Channel Bank 4, so that an "Inactive TV Call Attendant" message appears when the TV is turned ON. In this case, an administrator can then select another channel bank on the patient's in-room TV depending on the programming tier requested by the patient. All channels found during Auto Tuning automatically will be "ADDED" to all four channel banks, and the default is for all channels to be active (NORMAL) in Channel Banks 1, 2, 3, and 4. Note: Channel banks are not supported on TVs that are configured for FTG Mode operation. Before You Begin • Run the Express Script Installer Menu Wizard or complete the Custom Master TV Setup procedure (see pages 11 to 14 or pages 15 to 18, respectively). Note: Channel banks can be defined as part of the Express Script Installer Menu Wizard, if desired. However, if you are setting up channel banks after completing the Express Script or if you are creating a customized Master TV Setup, use the Channel Preview/Banks Setup Menu as described below. • Installer Menu item 028 CH. OVERIDE must be set to 001 to allow access for channel banks setup. Accessing the Channel Preview/Banks Setup Menu 1. To select a channel bank, press BANK on the Installer Remote. The first time you press the BANK key, the TV display will show the currently active channel bank. Press BANK repeatedly until the desired channel bank is selected. 2. After the desired channel bank is selected, press CH PREVIEW on the Installer Remote to display the Channel Preview/Banks Setup Menu (see below). CHANNEL PREVIEW - BANK 1 CH 011-001 NORMAL-ADDED Typical Channel Preview/Banks Setup Menu Enter -> Change CC -> VCHIP Menu, Ch. Preview -> Exit Note: In the Installer Menu, all available Aux inputs are enabled by default. The Aux inputs will appear between the highest analog and lowest digital channel number in the channel lineup when Channel Up/Down is used on the Installer Remote. If an Aux input will not be used, it is advisable to disable it. If using the Express Script, customize the Aux inputs as appropriate in the Aux Input screen (step 2) of the Installer Menu Wizard before completing the Express Script. If performing the Custom Master TV Setup procedure, refer to Installer Menu items 035, 039, 087, and 091 before performing the 2-5-5 + MENU operation (step 4). After the TV setup is transferred to the PTC, the only way to remove Aux inputs from the channel lineup, is to go to the Channel Preview/Banks Setup Menu and select NORMAL-DELETED. 28 206-4207
-
 1
1 -
2
-
3
-
4
-
5
-
6
-
7
-
8
-
9
-
10
-
11
-
12
-
13
-
14
-
15
-
16
-
17
-
18
-
19
-
20
-
21
-
22
-
 23
23 -
 24
24 -
 25
25 -
 26
26 -
 27
27 -
 28
28 -
 29
29 -
 30
30 -
 31
31 -
 32
32 -
 33
33 -
34
-
35
-
36
-
37
-
38
-
39
-
40
-
41
-
42
-
43
-
44
-
45
-
46
-
47
-
48
-
49
-
50
-
51
-
52
-
53
-
54
-
55
-
56
-
57
-
58
-
59
-
60
-
61
-
62
-
63
-
64
-
65
-
66
-
67
-
68
-
69
-
70
-
71
-
72
-
73
-
74
-
75
 |
 |
