Lenovo ThinkCentre M50 Hardware Maintenance Manual (HMM) - Page 66
installing
 |
View all Lenovo ThinkCentre M50 manuals
Add to My Manuals
Save this manual to your list of manuals |
Page 66 highlights
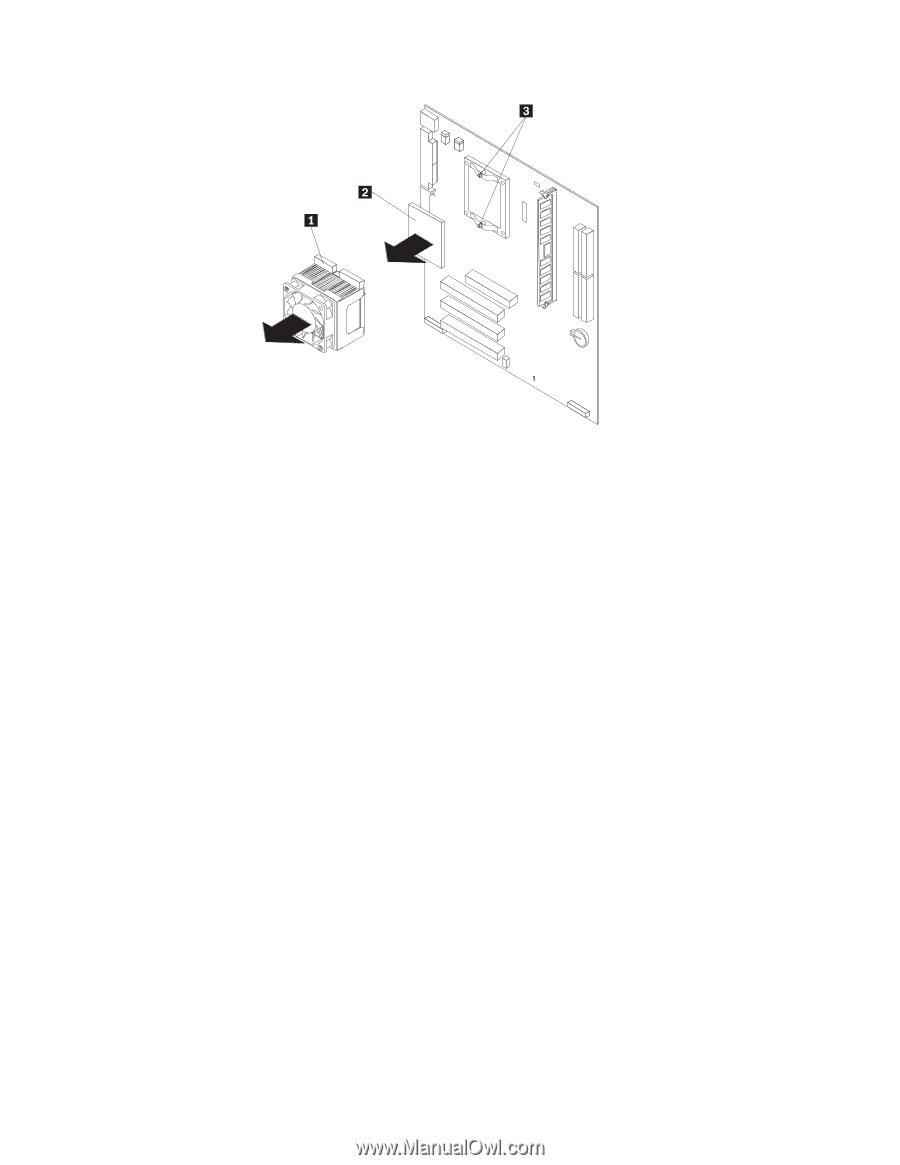
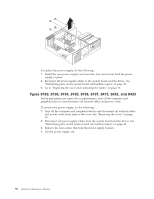
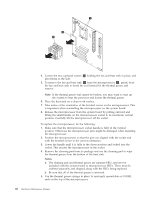
4. Loosen the two captured screws 3 holding the fan and heat sink in place, and pivot them to the side. 5. To remove the fan and heat sink 1 from the microprocessor 2 , gently twist the fan and heat sink to break the seal formed by the thermal grease and remove. Note: If the thermal grease seal cannot be broken, you may want to start up the system to heat the processor and loosen the thermal grease. 6. Place the heat sink on a clean work surface. 7. Take notice of the orientation of the beveled corner on the microprocessor. This is important when reinstalling the microprocessor on the system board. 8. Release the microprocessor from the system board by pulling outward and lifting the small handle on the microprocessor socket to its maximum vertical position. Carefully lift the microprocessor off the socket. To replace the microprocessor, do the following: 1. Make sure that the microprocessor socket handle is fully in the vertical position. Otherwise the microprocessor pins might be damaged when installing the microprocessor. 2. Position the microprocessor so that the pins are aligned with the socket and with the beveled corner in the correct orientation. 3. Lower the handle until it is fully in the down position and locked into the socket. This secures the microprocessor in the socket. 4. Remove the cleaning pad from its package and use the cleaning pad to wipe the thermal grease from the bottom of the heat sink. Notes: a. The cleaning pad and thermal grease are separate FRUs and are not included with the system board or microprocessor FRUs. These must be ordered separately and shipped along with the FRUs being replaced. b. Be sure that all of the thermal grease is removed. 5. Use the thermal grease syringe to place 16 uniformly spaced dots of 0.01ML each on the top of the microprocessor. 60 Hardware Maintenance Manual
-
 1
1 -
2
-
3
-
4
-
5
-
6
-
7
-
8
-
9
-
10
-
11
-
12
-
13
-
14
-
15
-
16
-
17
-
18
-
19
-
20
-
21
-
22
-
23
-
24
-
25
-
26
-
27
-
28
-
29
-
30
-
31
-
32
-
33
-
34
-
35
-
36
-
37
-
38
-
39
-
40
-
41
-
42
-
43
-
44
-
45
-
46
-
47
-
48
-
49
-
50
-
51
-
52
-
53
-
54
-
55
-
56
-
57
-
58
-
59
-
60
-
 61
61 -
 62
62 -
 63
63 -
 64
64 -
 65
65 -
 66
66 -
 67
67 -
 68
68 -
 69
69 -
 70
70 -
 71
71 -
72
-
73
-
74
-
75
-
76
-
77
-
78
-
79
-
80
-
81
-
82
-
83
-
84
-
85
-
86
-
87
-
88
-
89
-
90
-
91
-
92
-
93
-
94
-
95
-
96
-
97
-
98
-
99
-
100
-
101
-
102
-
103
-
104
-
105
-
106
-
107
-
108
-
109
-
110
-
111
-
112
-
113
-
114
-
115
-
116
-
117
-
118
-
119
-
120
-
121
-
122
-
123
-
124
-
125
-
126
-
127
-
128
-
129
-
130
-
131
-
132
-
133
-
134
-
135
-
136
-
137
-
138
-
139
-
140
-
141
-
142
-
143
-
144
-
145
-
146
-
147
-
148
-
149
-
150
-
151
-
152
-
153
-
154
-
155
-
156
-
157
-
158
-
159
-
160
-
161
-
162
-
163
-
164
-
165
-
166
-
167
-
168
-
169
-
170
-
171
-
172
-
173
-
174
-
175
-
176
-
177
-
178
-
179
-
180
-
181
-
182
-
183
-
184
-
185
-
186
-
187
-
188
-
189
-
190
-
191
-
192
-
193
-
194
-
195
-
196
-
197
-
198
-
199
-
200
-
201
-
202
-
203
-
204
-
205
-
206
-
207
-
208
-
209
-
210
-
211
-
212
-
213
-
214
-
215
-
216
-
217
-
218
-
219
-
220
-
221
-
222
-
223
-
224
-
225
-
226
-
227
-
228
-
229
-
230
-
231
-
232
-
233
-
234
-
235
-
236
-
237
-
238
-
239
-
240
-
241
-
242
-
243
-
244
-
245
-
246
-
247
-
248
-
249
-
250
-
251
-
252
-
253
-
254
-
255
-
256
-
257
-
258
-
259
-
260
-
261
-
262
-
263
-
264
-
265
-
266
-
267
-
268
-
269
-
270
-
271
-
272
-
273
-
274
-
275
-
276
-
277
-
278
-
279
-
280
-
281
-
282
-
283
-
284
-
285
-
286
-
287
-
288
-
289
-
290
 |
 |