Lexmark C520 Service Manual - Page 139
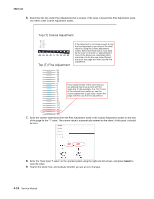
top edge print alignment marks.
 |
View all Lexmark C520 manuals
Add to My Manuals
Save this manual to your list of manuals |
Page 139 highlights
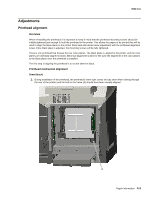
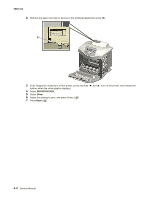
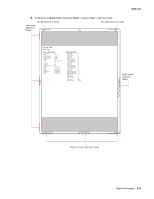
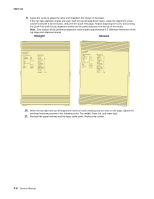
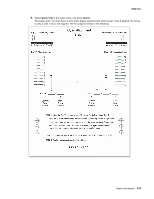
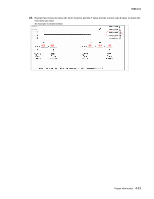
5022-xxx 9. Adjust the screw to adjust the skew and straighten the image on the paper. If the top right alignment marks are lower than the top left alignment marks, rotate the alignment screw counterclockwise a full revolution, and print the Quick Test page. Repeat adjusting the screw and printing the Quick Test until the top alignment marks are the same distance from the top of the media. Note: One rotation of the printhead alignment screw equals approximately 0.5 millimeter movement of the top edge print alignment marks. Straight Skewed Lexmark C52X Quick Test Printer Inofrmation Page Count xx PSAC xx Installed Memory xxx MB Processor Speed xxxMHz Serial Number xxxxxxx CalStat xxxx CalSet x.xx x.xx x.xx x.xx x.xx Engine ID xx FSpeed xxx Printer Rev isi on Lev els Loader xx.xx.xxxx-x Kernel xxx.xx.xxxx-x Base xx.xx.xxxx-x Network xxx.xx.xxxxx-x Network Drvr xx.xx.xxxx-x Engine xx.xx.xxxx-x Font x.xxxxx-xx.x Margin Settings Top Margin =x Bottom Margin =x Left Margin =x Right Margin =x Skew =x Cyan Top Margin = x Cyan Left Margin = xx Cyan Right Margin = x Cyan Skew =x Cyan Bow =x Yellow Top Margin = x Yellow Left Margin = x Yellow Right Margin = x Yellow Skew =x Yellow Bow =x Magenta Top Margin = x Magenta Left Margin = x Magenta Right Margin = x Magent Skew =x magenta Bow =x Dup Top Margin =x Paper Source Formatted Size = Tray 1 = xxxxxx LexmarkC52X Quick Test Printer Information Page Count xx PSAC xx Installed Memory Processor Speed Serial Number CalStat xxx MB xxxMHz xxxxxxx xxxx CalSet x.xx x.xx x.xx Engine ID x.xx x.xx xx FSpeed xxx Pri nter Revisi on Leve ls Loader Kernel Base Network Network Drvr Engine Font xx.xx.xxxx-x xxx.xx.xxxx-x xx.xx.xxxx-x xxx.xx.xxxxx-x xx.xx.xxxx-x xx.xx.xxxx-x x.xxxxx-xx.x Margin Settings Top Margin =x Bottom Margin =x Left Margin =x Right Margin =x Skew =x Cyan Top Margin = x Cyan Left Margin = xx Cyan Right Margin = x Cyan Skew =x Cyan Bow =x Yellow Top Margin = x Yellow Left Margin = x Yellow Right Margin = x Yellow Skew =x Yellow Bow =x Magenta Top Margin = x Magenta Left Margin = x Magenta Right Margin = x Magent Skew =x magenta Bow =x Dup Top Margin =x Paper Source Formatted Size = Tray 1 = xxxxxx 10. When the top right and top left alignment marks are both showing and are even on the page, tighten the printhead mounting screws in the following order: Top middle, lower left, and lower right. 11. Reinstall the paper exit tray and the fuser cable cover. Replace the covers. 4-6 Service Manual
-
 1
1 -
2
-
3
-
4
-
5
-
6
-
7
-
8
-
9
-
10
-
11
-
12
-
13
-
14
-
15
-
16
-
17
-
18
-
19
-
20
-
21
-
22
-
23
-
24
-
25
-
26
-
27
-
28
-
29
-
30
-
31
-
32
-
33
-
34
-
35
-
36
-
37
-
38
-
39
-
40
-
41
-
42
-
43
-
44
-
45
-
46
-
47
-
48
-
49
-
50
-
51
-
52
-
53
-
54
-
55
-
56
-
57
-
58
-
59
-
60
-
61
-
62
-
63
-
64
-
65
-
66
-
67
-
68
-
69
-
70
-
71
-
72
-
73
-
74
-
75
-
76
-
77
-
78
-
79
-
80
-
81
-
82
-
83
-
84
-
85
-
86
-
87
-
88
-
89
-
90
-
91
-
92
-
93
-
94
-
95
-
96
-
97
-
98
-
99
-
100
-
101
-
102
-
103
-
104
-
105
-
106
-
107
-
108
-
109
-
110
-
111
-
112
-
113
-
114
-
115
-
116
-
117
-
118
-
119
-
120
-
121
-
122
-
123
-
124
-
125
-
126
-
127
-
128
-
129
-
130
-
131
-
132
-
133
-
 134
134 -
 135
135 -
 136
136 -
 137
137 -
 138
138 -
 139
139 -
 140
140 -
 141
141 -
 142
142 -
 143
143 -
 144
144 -
145
-
146
-
147
-
148
-
149
-
150
-
151
-
152
-
153
-
154
-
155
-
156
-
157
-
158
-
159
-
160
-
161
-
162
-
163
-
164
-
165
-
166
-
167
-
168
-
169
-
170
-
171
-
172
-
173
-
174
-
175
-
176
-
177
-
178
-
179
-
180
-
181
-
182
-
183
-
184
-
185
-
186
-
187
-
188
-
189
-
190
-
191
-
192
-
193
-
194
-
195
-
196
-
197
-
198
-
199
-
200
-
201
-
202
-
203
-
204
-
205
-
206
-
207
-
208
-
209
-
210
-
211
-
212
-
213
-
214
-
215
-
216
-
217
-
218
-
219
-
220
-
221
-
222
-
223
-
224
-
225
-
226
-
227
-
228
-
229
-
230
-
231
-
232
-
233
-
234
-
235
-
236
-
237
-
238
-
239
-
240
-
241
-
242
-
243
-
244
-
245
-
246
-
247
-
248
-
249
-
250
-
251
-
252
-
253
-
254
-
255
-
256
-
257
-
258
-
259
-
260
-
261
-
262
-
263
-
264
-
265
-
266
-
267
-
268
-
269
-
270
-
271
-
272
-
273
-
274
-
275
-
276
-
277
-
278
-
279
-
280
-
281
-
282
-
283
-
284
-
285
-
286
-
287
-
288
-
289
-
290
-
291
-
292
-
293
-
294
-
295
-
296
-
297
-
298
-
299
-
300
-
301
-
302
-
303
-
304
-
305
-
306
-
307
-
308
-
309
-
310
-
311
-
312
-
313
-
314
-
315
-
316
-
317
-
318
-
319
-
320
-
321
-
322
-
323
-
324
-
325
-
326
-
327
-
328
-
329
-
330
-
331
-
332
-
333
-
334
-
335
-
336
-
337
-
338
-
339
-
340
-
341
-
342
-
343
-
344
-
345
-
346
-
347
-
348
-
349
-
350
-
351
-
352
-
353
-
354
-
355
-
356
-
357
-
358
-
359
-
360
-
361
-
362
-
363
-
364
-
365
-
366
-
367
-
368
-
369
-
370
-
371
-
372
-
373
-
374
-
375
-
376
-
377
-
378
-
379
 |
 |
