Lexmark C520 Service Manual - Page 84
Alignment
 |
View all Lexmark C520 manuals
Add to My Manuals
Save this manual to your list of manuals |
Page 84 highlights
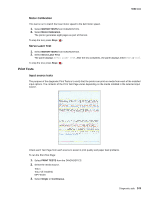
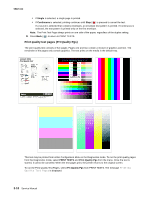
5022-xxx Alignment Alignment is part of the process of adjusting the printhead and the color planes to the black plane and to each other. Before you start, perform the black alignment (Registration). See "Registration" on page 3-4. If you are replacing a new printhead, perform the entire printhead alignment. See "Printhead alignment" on page 4-3. To perform alignment: 1. Select ALIGNMENT from DIAGNOSTICS. Scroll until you reach the color that you desire to align. Go to each submenu, press Select and use the right and left arrow keys to zero out all settings. Press Select after you zero out each setting. Note: It is important to zero out all settings to make the adjustment easier. 2. Scroll to Quick Test in the same color menu. Press Select; two pages print. 3. On the pages, make sure all the Current Values are set to zero. If not, go back two steps and repeat. 4. Look at the coarse and fine adjustments on the top left of the page, and enter the best number for the top adjustment in the T space. Transfer this number over to the computation area for Z. 5. On the operator panel, use and to locate Top Margin. Press Select, and then use or to enter the setting computed for T. Press Select to save. 6. Repeat this process for skew (Z). Add the T value and the current Z value to obtain the new skew (Z) value. 7. Reprint the Quick Test page, and observe the results. Make additional adjustments if necessary before proceeding on to Quick Test step two page. 8. Obtain left (L), right (R), and Bow (P) value using the same method as obtaining T from Quick Test Step 1. Reprint the Quick Test to ensure the settings are correct. Make additional adjustments as required. 9. Press Back ( ) to return to ALIGNMENT. See "Printhead mechanical alignment" on page 4-3 for printout samples and additional information. Diagnostic aids 3-7
-
 1
1 -
2
-
3
-
4
-
5
-
6
-
7
-
8
-
9
-
10
-
11
-
12
-
13
-
14
-
15
-
16
-
17
-
18
-
19
-
20
-
21
-
22
-
23
-
24
-
25
-
26
-
27
-
28
-
29
-
30
-
31
-
32
-
33
-
34
-
35
-
36
-
37
-
38
-
39
-
40
-
41
-
42
-
43
-
44
-
45
-
46
-
47
-
48
-
49
-
50
-
51
-
52
-
53
-
54
-
55
-
56
-
57
-
58
-
59
-
60
-
61
-
62
-
63
-
64
-
65
-
66
-
67
-
68
-
69
-
70
-
71
-
72
-
73
-
74
-
75
-
76
-
77
-
78
-
 79
79 -
 80
80 -
 81
81 -
 82
82 -
 83
83 -
 84
84 -
 85
85 -
 86
86 -
 87
87 -
 88
88 -
 89
89 -
90
-
91
-
92
-
93
-
94
-
95
-
96
-
97
-
98
-
99
-
100
-
101
-
102
-
103
-
104
-
105
-
106
-
107
-
108
-
109
-
110
-
111
-
112
-
113
-
114
-
115
-
116
-
117
-
118
-
119
-
120
-
121
-
122
-
123
-
124
-
125
-
126
-
127
-
128
-
129
-
130
-
131
-
132
-
133
-
134
-
135
-
136
-
137
-
138
-
139
-
140
-
141
-
142
-
143
-
144
-
145
-
146
-
147
-
148
-
149
-
150
-
151
-
152
-
153
-
154
-
155
-
156
-
157
-
158
-
159
-
160
-
161
-
162
-
163
-
164
-
165
-
166
-
167
-
168
-
169
-
170
-
171
-
172
-
173
-
174
-
175
-
176
-
177
-
178
-
179
-
180
-
181
-
182
-
183
-
184
-
185
-
186
-
187
-
188
-
189
-
190
-
191
-
192
-
193
-
194
-
195
-
196
-
197
-
198
-
199
-
200
-
201
-
202
-
203
-
204
-
205
-
206
-
207
-
208
-
209
-
210
-
211
-
212
-
213
-
214
-
215
-
216
-
217
-
218
-
219
-
220
-
221
-
222
-
223
-
224
-
225
-
226
-
227
-
228
-
229
-
230
-
231
-
232
-
233
-
234
-
235
-
236
-
237
-
238
-
239
-
240
-
241
-
242
-
243
-
244
-
245
-
246
-
247
-
248
-
249
-
250
-
251
-
252
-
253
-
254
-
255
-
256
-
257
-
258
-
259
-
260
-
261
-
262
-
263
-
264
-
265
-
266
-
267
-
268
-
269
-
270
-
271
-
272
-
273
-
274
-
275
-
276
-
277
-
278
-
279
-
280
-
281
-
282
-
283
-
284
-
285
-
286
-
287
-
288
-
289
-
290
-
291
-
292
-
293
-
294
-
295
-
296
-
297
-
298
-
299
-
300
-
301
-
302
-
303
-
304
-
305
-
306
-
307
-
308
-
309
-
310
-
311
-
312
-
313
-
314
-
315
-
316
-
317
-
318
-
319
-
320
-
321
-
322
-
323
-
324
-
325
-
326
-
327
-
328
-
329
-
330
-
331
-
332
-
333
-
334
-
335
-
336
-
337
-
338
-
339
-
340
-
341
-
342
-
343
-
344
-
345
-
346
-
347
-
348
-
349
-
350
-
351
-
352
-
353
-
354
-
355
-
356
-
357
-
358
-
359
-
360
-
361
-
362
-
363
-
364
-
365
-
366
-
367
-
368
-
369
-
370
-
371
-
372
-
373
-
374
-
375
-
376
-
377
-
378
-
379
 |
 |
