Lexmark C520 Service Manual - Page 69
Operator panel display blank, five, LED on, Operator panel display all diamonds, no, Operator panel
 |
View all Lexmark C520 manuals
Add to My Manuals
Save this manual to your list of manuals |
Page 69 highlights
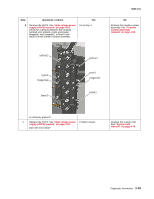
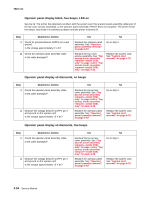
5022-xxx Operator panel display blank, five beeps, LED on Service tip: The printer has detected a problem with the system card, the operator panel assembly cable (part of the top cover access assembly), or the operator panel assembly if POST does not complete. The printer emits five beeps, and sticks in a continuous pattern until the printer is turned off. Step Questions / actions 1 Check for ground between JOPP1 pin 4 and ground. Is the voltage approximately 0 V dc? 2 Check the operator panel assembly cable. Is the cable damaged? Yes No Replace the operator panel assembly. See "Operator panel assembly removal" on page 4-23. Replace the top cover access assembly. See "Top access cover assembly removal-model C52x only" on page 4-28 or "Top access cover assembly removal-model C53x only" on page 4-32. Go to step 2. Replace the system card. See "System card removal" on page 4-79. Operator panel display all diamonds, no beeps Step Questions / actions 1 Check the operator panel assembly cable. Is the cable damaged? 2 Measure the voltage between JOPP1 pin 2 and ground on the system card. Is the voltage approximately +5 V dc? Yes No Replace the top access cover assembly. See "Top access cover assembly removal-model C52x only" on page 4-28 or "Top access cover assembly removal-model C53x only" on page 4-32. Replace the operator panel assembly. See "Operator panel assembly removal" on page 4-23. Go to step 2. Replace the system card. See "System card removal" on page 4-79. Operator panel display all diamonds, five beeps Step Questions / actions 1 Check the operator panel assembly cable. Is the cable damaged? 2 Measure the voltage between JOPP1 pin 2 and ground on the system card. Is the voltage approximately +5 V dc? Yes No Replace the top access cover assembly. See "Top access cover assembly removal-model C52x only" on page 4-28 or "Top access cover assembly removal-model C53x only" on page 4-32. Go to step 2. Replace the operator panel assembly. See "Operator panel assembly removal" on page 4-23. Replace the system card. See "System card removal" on page 4-79. 2-54 Service Manual
-
 1
1 -
2
-
3
-
4
-
5
-
6
-
7
-
8
-
9
-
10
-
11
-
12
-
13
-
14
-
15
-
16
-
17
-
18
-
19
-
20
-
21
-
22
-
23
-
24
-
25
-
26
-
27
-
28
-
29
-
30
-
31
-
32
-
33
-
34
-
35
-
36
-
37
-
38
-
39
-
40
-
41
-
42
-
43
-
44
-
45
-
46
-
47
-
48
-
49
-
50
-
51
-
52
-
53
-
54
-
55
-
56
-
57
-
58
-
59
-
60
-
61
-
62
-
63
-
 64
64 -
 65
65 -
 66
66 -
 67
67 -
 68
68 -
 69
69 -
 70
70 -
 71
71 -
 72
72 -
 73
73 -
 74
74 -
75
-
76
-
77
-
78
-
79
-
80
-
81
-
82
-
83
-
84
-
85
-
86
-
87
-
88
-
89
-
90
-
91
-
92
-
93
-
94
-
95
-
96
-
97
-
98
-
99
-
100
-
101
-
102
-
103
-
104
-
105
-
106
-
107
-
108
-
109
-
110
-
111
-
112
-
113
-
114
-
115
-
116
-
117
-
118
-
119
-
120
-
121
-
122
-
123
-
124
-
125
-
126
-
127
-
128
-
129
-
130
-
131
-
132
-
133
-
134
-
135
-
136
-
137
-
138
-
139
-
140
-
141
-
142
-
143
-
144
-
145
-
146
-
147
-
148
-
149
-
150
-
151
-
152
-
153
-
154
-
155
-
156
-
157
-
158
-
159
-
160
-
161
-
162
-
163
-
164
-
165
-
166
-
167
-
168
-
169
-
170
-
171
-
172
-
173
-
174
-
175
-
176
-
177
-
178
-
179
-
180
-
181
-
182
-
183
-
184
-
185
-
186
-
187
-
188
-
189
-
190
-
191
-
192
-
193
-
194
-
195
-
196
-
197
-
198
-
199
-
200
-
201
-
202
-
203
-
204
-
205
-
206
-
207
-
208
-
209
-
210
-
211
-
212
-
213
-
214
-
215
-
216
-
217
-
218
-
219
-
220
-
221
-
222
-
223
-
224
-
225
-
226
-
227
-
228
-
229
-
230
-
231
-
232
-
233
-
234
-
235
-
236
-
237
-
238
-
239
-
240
-
241
-
242
-
243
-
244
-
245
-
246
-
247
-
248
-
249
-
250
-
251
-
252
-
253
-
254
-
255
-
256
-
257
-
258
-
259
-
260
-
261
-
262
-
263
-
264
-
265
-
266
-
267
-
268
-
269
-
270
-
271
-
272
-
273
-
274
-
275
-
276
-
277
-
278
-
279
-
280
-
281
-
282
-
283
-
284
-
285
-
286
-
287
-
288
-
289
-
290
-
291
-
292
-
293
-
294
-
295
-
296
-
297
-
298
-
299
-
300
-
301
-
302
-
303
-
304
-
305
-
306
-
307
-
308
-
309
-
310
-
311
-
312
-
313
-
314
-
315
-
316
-
317
-
318
-
319
-
320
-
321
-
322
-
323
-
324
-
325
-
326
-
327
-
328
-
329
-
330
-
331
-
332
-
333
-
334
-
335
-
336
-
337
-
338
-
339
-
340
-
341
-
342
-
343
-
344
-
345
-
346
-
347
-
348
-
349
-
350
-
351
-
352
-
353
-
354
-
355
-
356
-
357
-
358
-
359
-
360
-
361
-
362
-
363
-
364
-
365
-
366
-
367
-
368
-
369
-
370
-
371
-
372
-
373
-
374
-
375
-
376
-
377
-
378
-
379
 |
 |
