Lexmark C520 Service Manual - Page 92
Base Sensor Test
 |
View all Lexmark C520 manuals
Add to My Manuals
Save this manual to your list of manuals |
Page 92 highlights
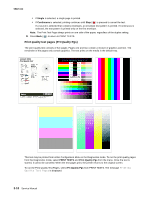
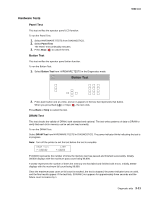
5022-xxx Base Sensor Test Bin Full Test This test is used to determine if the bin full sensor is operating correctly. This test is only applicable to network printers. To run the Bin Full Test: 1. Select BASE SENSOR TEST from DIAGNOSTICS. 2. Select Bin Full Test. The display shows Bin Full and the current state of this sensor, either Closed or Open. Move the bin full sensor flag (located on the fuser) up and down to toggle the sensor state. Sensor Test This test is used to determine if specific sensors are working correctly. If you need to know where a sensor is located, refer to "Sensors" on page 5-8. To run the Sensor Test: 1. Select BASE SENSOR TEST from DIAGNOSTICS. 2. Select Sensor Test. The display shows each one of the sensors, one line at a time, and the current state of the sensor. Use the down arrow to locate the sensor in question. Use the following table to toggle the sensor. Sensor Possible values Sensor activation Fuser Exit (paper Open/Closed exit) Inner Door (front Open/Closed access door) Input Open/Closed Narrow Media (transparency) Open/Closed TPS Toner C Toner K Toner M Toner Y Top Door (top access cover assembly) Waste Toner Open/Closed Open/Closed Open/Closed Open/Closed Open/Closed Open/Closed OK/Full Open the top access cover. Activate the fuser exit flag. The sensor should change state. Open the front access door. The sensor should change state. Remove the paper tray 1. Activate the input sensor flag. The sensor should change state. Test the manual feed slot by pulling out the tray. The sensor should change state. Test the MFP tray by inserting a sheet of paper, and pushing up to sensor. The sensor should change state. Open the front access door. Slip a piece of paper between the TPS and the transfer belt. The sensor should change state. Remove the cyan toner cartridge. Shine a flashlight on the toner level sensor. The sensor should change state. Remove the black toner cartridge. Shine a flashlight on the toner level sensor. The sensor should change state. Remove the magenta toner cartridge. Shine a flashlight on the toner level sensor. The sensor should change state. Remove the yellow toner cartridge. Shine a flashlight on the toner level sensor. The sensor should change state. Open the top access cover assembly. The sensor should change state. Remove the waste toner box before entering the sensor test. The actual test runs when the menu is entered. Replace the waste toner box, leave the menu, and re-enter the menu. The state should be OK. Press Back ( ) or Stop ( ) to exit the test. Diagnostic aids 3-15
-
 1
1 -
2
-
3
-
4
-
5
-
6
-
7
-
8
-
9
-
10
-
11
-
12
-
13
-
14
-
15
-
16
-
17
-
18
-
19
-
20
-
21
-
22
-
23
-
24
-
25
-
26
-
27
-
28
-
29
-
30
-
31
-
32
-
33
-
34
-
35
-
36
-
37
-
38
-
39
-
40
-
41
-
42
-
43
-
44
-
45
-
46
-
47
-
48
-
49
-
50
-
51
-
52
-
53
-
54
-
55
-
56
-
57
-
58
-
59
-
60
-
61
-
62
-
63
-
64
-
65
-
66
-
67
-
68
-
69
-
70
-
71
-
72
-
73
-
74
-
75
-
76
-
77
-
78
-
79
-
80
-
81
-
82
-
83
-
84
-
85
-
86
-
 87
87 -
 88
88 -
 89
89 -
 90
90 -
 91
91 -
 92
92 -
 93
93 -
 94
94 -
 95
95 -
 96
96 -
 97
97 -
98
-
99
-
100
-
101
-
102
-
103
-
104
-
105
-
106
-
107
-
108
-
109
-
110
-
111
-
112
-
113
-
114
-
115
-
116
-
117
-
118
-
119
-
120
-
121
-
122
-
123
-
124
-
125
-
126
-
127
-
128
-
129
-
130
-
131
-
132
-
133
-
134
-
135
-
136
-
137
-
138
-
139
-
140
-
141
-
142
-
143
-
144
-
145
-
146
-
147
-
148
-
149
-
150
-
151
-
152
-
153
-
154
-
155
-
156
-
157
-
158
-
159
-
160
-
161
-
162
-
163
-
164
-
165
-
166
-
167
-
168
-
169
-
170
-
171
-
172
-
173
-
174
-
175
-
176
-
177
-
178
-
179
-
180
-
181
-
182
-
183
-
184
-
185
-
186
-
187
-
188
-
189
-
190
-
191
-
192
-
193
-
194
-
195
-
196
-
197
-
198
-
199
-
200
-
201
-
202
-
203
-
204
-
205
-
206
-
207
-
208
-
209
-
210
-
211
-
212
-
213
-
214
-
215
-
216
-
217
-
218
-
219
-
220
-
221
-
222
-
223
-
224
-
225
-
226
-
227
-
228
-
229
-
230
-
231
-
232
-
233
-
234
-
235
-
236
-
237
-
238
-
239
-
240
-
241
-
242
-
243
-
244
-
245
-
246
-
247
-
248
-
249
-
250
-
251
-
252
-
253
-
254
-
255
-
256
-
257
-
258
-
259
-
260
-
261
-
262
-
263
-
264
-
265
-
266
-
267
-
268
-
269
-
270
-
271
-
272
-
273
-
274
-
275
-
276
-
277
-
278
-
279
-
280
-
281
-
282
-
283
-
284
-
285
-
286
-
287
-
288
-
289
-
290
-
291
-
292
-
293
-
294
-
295
-
296
-
297
-
298
-
299
-
300
-
301
-
302
-
303
-
304
-
305
-
306
-
307
-
308
-
309
-
310
-
311
-
312
-
313
-
314
-
315
-
316
-
317
-
318
-
319
-
320
-
321
-
322
-
323
-
324
-
325
-
326
-
327
-
328
-
329
-
330
-
331
-
332
-
333
-
334
-
335
-
336
-
337
-
338
-
339
-
340
-
341
-
342
-
343
-
344
-
345
-
346
-
347
-
348
-
349
-
350
-
351
-
352
-
353
-
354
-
355
-
356
-
357
-
358
-
359
-
360
-
361
-
362
-
363
-
364
-
365
-
366
-
367
-
368
-
369
-
370
-
371
-
372
-
373
-
374
-
375
-
376
-
377
-
378
-
379
 |
 |
