Lexmark C520 Service Manual - Page 56
-12-POST power on self test error service check
 |
View all Lexmark C520 manuals
Add to My Manuals
Save this manual to your list of manuals |
Page 56 highlights
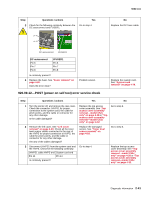
5022-xxx Step Questions / actions 3 Check for the following continuity between the DC autoconnect and FUSER1. Yes Go to step 4. pin 6 pin 1 pin 10 pin 8 13579 Pin 2 4 6 8 10 configuration No Replace the DC fuser cable. DC autoconnect JFUSER1 DC autoconnect Pin 6 Pin 7 Pin 8 JFUSER1 Pin 6 Pin 7 Pin 8 Is continuity present? 4 Replace the fuser. See "Fuser removal" on page 4-60. Does the error clear? Problem solved. 920.09-12-POST (power on self test) error service check Replace the system card. See "System card removal" on page 4-79. Step Questions / actions Yes No 1 Turn the printer off, and remove the rear cover. Check the connector JHVPS1 for proper connection to the system card, the cable for pinch points, and the cable or connector for any other damage. Is the cable damaged? Replace the top access cover assembly. See "Top access cover assembly removal-model C52x only" on page 4-28 or "Top access cover assembly removal-model C53x only" on page 4-32. Go to step 2. 2 Remove the left cover. See "Left cover removal" on page 4-20. Check all the toner level sensor cables connected to the rear of the HVPS for proper connection to HVPS, the cable for pinch points, and the cable or connector for any other damage. Are any of the cables damaged? 3 Disconnect JHVPS1 from the system card and the HVPS. Check for the following continuity. JHVPS1 cable HVPS end System card end Pin 14 Pin 14 Is continuity present? Replace the damaged sensor. See "Toner level sensor removal" on page 4-83. Go to step 4. Go to step 3. Replace the top access cover assembly. See "Top access cover assembly removal-model C52x only" on page 4-28 or "Top access cover assembly removal-model C53x only" on page 4-32. Diagnostic information 2-41
-
 1
1 -
2
-
3
-
4
-
5
-
6
-
7
-
8
-
9
-
10
-
11
-
12
-
13
-
14
-
15
-
16
-
17
-
18
-
19
-
20
-
21
-
22
-
23
-
24
-
25
-
26
-
27
-
28
-
29
-
30
-
31
-
32
-
33
-
34
-
35
-
36
-
37
-
38
-
39
-
40
-
41
-
42
-
43
-
44
-
45
-
46
-
47
-
48
-
49
-
50
-
 51
51 -
 52
52 -
 53
53 -
 54
54 -
 55
55 -
 56
56 -
 57
57 -
 58
58 -
 59
59 -
 60
60 -
 61
61 -
62
-
63
-
64
-
65
-
66
-
67
-
68
-
69
-
70
-
71
-
72
-
73
-
74
-
75
-
76
-
77
-
78
-
79
-
80
-
81
-
82
-
83
-
84
-
85
-
86
-
87
-
88
-
89
-
90
-
91
-
92
-
93
-
94
-
95
-
96
-
97
-
98
-
99
-
100
-
101
-
102
-
103
-
104
-
105
-
106
-
107
-
108
-
109
-
110
-
111
-
112
-
113
-
114
-
115
-
116
-
117
-
118
-
119
-
120
-
121
-
122
-
123
-
124
-
125
-
126
-
127
-
128
-
129
-
130
-
131
-
132
-
133
-
134
-
135
-
136
-
137
-
138
-
139
-
140
-
141
-
142
-
143
-
144
-
145
-
146
-
147
-
148
-
149
-
150
-
151
-
152
-
153
-
154
-
155
-
156
-
157
-
158
-
159
-
160
-
161
-
162
-
163
-
164
-
165
-
166
-
167
-
168
-
169
-
170
-
171
-
172
-
173
-
174
-
175
-
176
-
177
-
178
-
179
-
180
-
181
-
182
-
183
-
184
-
185
-
186
-
187
-
188
-
189
-
190
-
191
-
192
-
193
-
194
-
195
-
196
-
197
-
198
-
199
-
200
-
201
-
202
-
203
-
204
-
205
-
206
-
207
-
208
-
209
-
210
-
211
-
212
-
213
-
214
-
215
-
216
-
217
-
218
-
219
-
220
-
221
-
222
-
223
-
224
-
225
-
226
-
227
-
228
-
229
-
230
-
231
-
232
-
233
-
234
-
235
-
236
-
237
-
238
-
239
-
240
-
241
-
242
-
243
-
244
-
245
-
246
-
247
-
248
-
249
-
250
-
251
-
252
-
253
-
254
-
255
-
256
-
257
-
258
-
259
-
260
-
261
-
262
-
263
-
264
-
265
-
266
-
267
-
268
-
269
-
270
-
271
-
272
-
273
-
274
-
275
-
276
-
277
-
278
-
279
-
280
-
281
-
282
-
283
-
284
-
285
-
286
-
287
-
288
-
289
-
290
-
291
-
292
-
293
-
294
-
295
-
296
-
297
-
298
-
299
-
300
-
301
-
302
-
303
-
304
-
305
-
306
-
307
-
308
-
309
-
310
-
311
-
312
-
313
-
314
-
315
-
316
-
317
-
318
-
319
-
320
-
321
-
322
-
323
-
324
-
325
-
326
-
327
-
328
-
329
-
330
-
331
-
332
-
333
-
334
-
335
-
336
-
337
-
338
-
339
-
340
-
341
-
342
-
343
-
344
-
345
-
346
-
347
-
348
-
349
-
350
-
351
-
352
-
353
-
354
-
355
-
356
-
357
-
358
-
359
-
360
-
361
-
362
-
363
-
364
-
365
-
366
-
367
-
368
-
369
-
370
-
371
-
372
-
373
-
374
-
375
-
376
-
377
-
378
-
379
 |
 |
