Lexmark C520 Service Manual - Page 68
Operator panel service check
 |
View all Lexmark C520 manuals
Add to My Manuals
Save this manual to your list of manuals |
Page 68 highlights
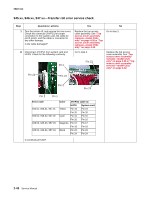
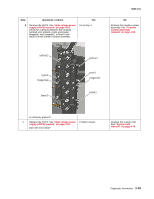
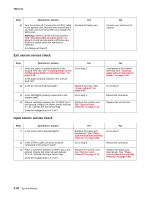
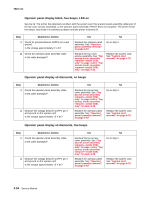
5022-xxx Operator panel service check Warning: When replacing any one of the following components: • Operator panel assembly • System card • Printhead assembly Only replace one component at a time. Replace the required component, and perform a POR before replacing a second component listed above. If this procedure is not followed, the printer will be rendered inoperable. Warning: Never install and remove components listed above as a method of troubleshooting components. Once a component has been installed in a printer, it cannot be used in another printer. It must be returned to the manufacturer. One or more operator panel buttons fail Step Questions / actions Yes No 1 Run the Button Test. See "Button Test" on page 3-11 in Diagnostics mode. Did any of the buttons fail the test? Replace the operator panel assembly. See "Operator panel assembly removal" on page 4-23. Go to step 2. 2 Disconnect the operator panel assembly cable from JOPP1 on the system card, and measure the voltage on pin 6 and ground. Does the voltage measure approximately +3.3 V dc? Replace the operator panel assembly. See "Operator panel assembly removal" on page 4-23. If this does not fix the problem, replace the top cover access assembly. See "Top access cover assembly removal- model C52x only" on page 4-28 or "Top access cover assembly removal- model C53x only" on page 4-32. Replace the system card. See "System card removal" on page 4-79. Operator panel display blank, five beeps, and LED off Service tip: The printer has detected a problem with the system card, the operator panel assembly cable (part of the top cover access assembly), or the operator panel assembly if POST does not complete. The printer emits five beeps, and sticks in a continuous pattern until the printer is turned off. Step Questions / actions 1 Is the operator panel assembly cable properly installed at system card JOPP1 and at the operator panel assembly? 2 Measure the voltage between JOPP1 pin 2 and ground on the system card. Is the voltage approximately +5 V dc? 3 Check continuity of the operator panel assembly cable. Is there continuity? Yes Go to step 2. Go to step 3. Replace the operator panel assembly. See "Operator panel assembly removal" on page 4-23. No Reinstall the cable. Replace the system card. See "System card removal" on page 4-79. Replace the top cover access assembly. See "Top access cover assembly removal-model C52x only" on page 4-28 or "Top access cover assembly removal-model C53x only" on page 4-32. Diagnostic information 2-53
-
 1
1 -
2
-
3
-
4
-
5
-
6
-
7
-
8
-
9
-
10
-
11
-
12
-
13
-
14
-
15
-
16
-
17
-
18
-
19
-
20
-
21
-
22
-
23
-
24
-
25
-
26
-
27
-
28
-
29
-
30
-
31
-
32
-
33
-
34
-
35
-
36
-
37
-
38
-
39
-
40
-
41
-
42
-
43
-
44
-
45
-
46
-
47
-
48
-
49
-
50
-
51
-
52
-
53
-
54
-
55
-
56
-
57
-
58
-
59
-
60
-
61
-
62
-
 63
63 -
 64
64 -
 65
65 -
 66
66 -
 67
67 -
 68
68 -
 69
69 -
 70
70 -
 71
71 -
 72
72 -
 73
73 -
74
-
75
-
76
-
77
-
78
-
79
-
80
-
81
-
82
-
83
-
84
-
85
-
86
-
87
-
88
-
89
-
90
-
91
-
92
-
93
-
94
-
95
-
96
-
97
-
98
-
99
-
100
-
101
-
102
-
103
-
104
-
105
-
106
-
107
-
108
-
109
-
110
-
111
-
112
-
113
-
114
-
115
-
116
-
117
-
118
-
119
-
120
-
121
-
122
-
123
-
124
-
125
-
126
-
127
-
128
-
129
-
130
-
131
-
132
-
133
-
134
-
135
-
136
-
137
-
138
-
139
-
140
-
141
-
142
-
143
-
144
-
145
-
146
-
147
-
148
-
149
-
150
-
151
-
152
-
153
-
154
-
155
-
156
-
157
-
158
-
159
-
160
-
161
-
162
-
163
-
164
-
165
-
166
-
167
-
168
-
169
-
170
-
171
-
172
-
173
-
174
-
175
-
176
-
177
-
178
-
179
-
180
-
181
-
182
-
183
-
184
-
185
-
186
-
187
-
188
-
189
-
190
-
191
-
192
-
193
-
194
-
195
-
196
-
197
-
198
-
199
-
200
-
201
-
202
-
203
-
204
-
205
-
206
-
207
-
208
-
209
-
210
-
211
-
212
-
213
-
214
-
215
-
216
-
217
-
218
-
219
-
220
-
221
-
222
-
223
-
224
-
225
-
226
-
227
-
228
-
229
-
230
-
231
-
232
-
233
-
234
-
235
-
236
-
237
-
238
-
239
-
240
-
241
-
242
-
243
-
244
-
245
-
246
-
247
-
248
-
249
-
250
-
251
-
252
-
253
-
254
-
255
-
256
-
257
-
258
-
259
-
260
-
261
-
262
-
263
-
264
-
265
-
266
-
267
-
268
-
269
-
270
-
271
-
272
-
273
-
274
-
275
-
276
-
277
-
278
-
279
-
280
-
281
-
282
-
283
-
284
-
285
-
286
-
287
-
288
-
289
-
290
-
291
-
292
-
293
-
294
-
295
-
296
-
297
-
298
-
299
-
300
-
301
-
302
-
303
-
304
-
305
-
306
-
307
-
308
-
309
-
310
-
311
-
312
-
313
-
314
-
315
-
316
-
317
-
318
-
319
-
320
-
321
-
322
-
323
-
324
-
325
-
326
-
327
-
328
-
329
-
330
-
331
-
332
-
333
-
334
-
335
-
336
-
337
-
338
-
339
-
340
-
341
-
342
-
343
-
344
-
345
-
346
-
347
-
348
-
349
-
350
-
351
-
352
-
353
-
354
-
355
-
356
-
357
-
358
-
359
-
360
-
361
-
362
-
363
-
364
-
365
-
366
-
367
-
368
-
369
-
370
-
371
-
372
-
373
-
374
-
375
-
376
-
377
-
378
-
379
 |
 |
