Nokia IP390 Installation Guide - Page 23
Installing the Nokia IP390 Appliance, Before You Begin, Rack Mounting the Appliance - console
 |
View all Nokia IP390 manuals
Add to My Manuals
Save this manual to your list of manuals |
Page 23 highlights
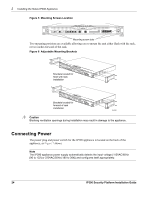
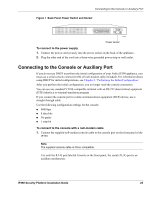
2 Installing the Nokia IP390 Appliance This chapter describes how to install the Nokia IP390 appliance. The following topics are covered: „ Before You Begin „ Rack Mounting the Appliance „ Connecting Power „ Connecting to the Console or Auxiliary Port „ Connecting to Network Interfaces Before You Begin To rack-mount the appliance, you need: „ Phillips-head screwdriver „ Grounding wrist strap „ Suitable, grounded work surface on which to place the chassis tray assembly Caution To help guard against electrostatic discharge damage, make sure you are properly grounded by using a grounding wrist strap and following the instructions provided with the wrist strap before you handle the components or open the appliance. Rack Mounting the Appliance The IP390 appliance mounts in a standard 19-inch rack with four mounting screws as Figure 5 shows. Note To avoid damaging your equipment, Nokia recommends that you use all four rack-mounting screws when you install your appliance on the rack. IP390 Security Platform Installation Guide 23
-
 1
1 -
2
-
3
-
4
-
5
-
6
-
7
-
8
-
9
-
10
-
11
-
12
-
13
-
14
-
15
-
16
-
17
-
 18
18 -
 19
19 -
 20
20 -
 21
21 -
 22
22 -
 23
23 -
 24
24 -
 25
25 -
 26
26 -
 27
27 -
 28
28 -
29
-
30
-
31
-
32
-
33
-
34
-
35
-
36
-
37
-
38
-
39
-
40
-
41
-
42
-
43
-
44
-
45
-
46
-
47
-
48
-
49
-
50
-
51
-
52
-
53
-
54
-
55
-
56
-
57
-
58
-
59
-
60
-
61
-
62
-
63
-
64
-
65
-
66
-
67
-
68
-
69
-
70
-
71
-
72
-
73
-
74
-
75
-
76
-
77
-
78
-
79
-
80
-
81
-
82
-
83
-
84
-
85
-
86
-
87
-
88
-
89
-
90
-
91
-
92
-
93
-
94
-
95
-
96
-
97
 |
 |