Nokia IP390 Installation Guide - Page 31
Performing the Initial Configuration, Using a Console Connection - manual
 |
View all Nokia IP390 manuals
Add to My Manuals
Save this manual to your list of manuals |
Page 31 highlights
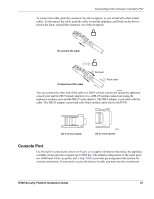
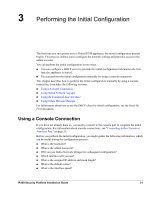
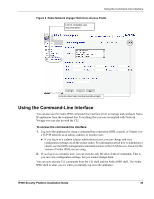
3 Performing the Initial Configuration The first time you turn power on to a Nokia IP390 appliance, the initial configuration process begins. This process enables you to configure the network settings and provides access to the admin account. You can perform the initial configuration in two ways. „ You can configure a DHCP server to provide the initial configuration information the first time the appliance is started. „ You can perform the initial configuration manually by using a console connection. This chapter describes how to perform the initial configuration manually by using a console connection. It includes the following sections: „ Using a Console Connection „ Using Nokia Network Voyager „ Using the Command-Line Interface „ Using Nokia Horizon Manager For information about how to use the DHCP client for initial configuration, see the Read Me First document. Using a Console Connection If you have not already done so, you need to connect to the console port to complete the initial configuration. For information about console connections, see "Connecting to the Console or Auxiliary Port" on page 25. Before you perform the initial configuration, you might gather the following information, which can be useful during the configuration process: „ What is the hostname? „ What is the admin password? „ Will you use Nokia Network Voyager for subsequent configuration? „ Which interface will you use? „ What is the assigned IP address and mask length? „ What is the default router? „ What is the interface speed? IP390 Security Platform Installation Guide 31
-
 1
1 -
2
-
3
-
4
-
5
-
6
-
7
-
8
-
9
-
10
-
11
-
12
-
13
-
14
-
15
-
16
-
17
-
18
-
19
-
20
-
21
-
22
-
23
-
24
-
25
-
 26
26 -
 27
27 -
 28
28 -
 29
29 -
 30
30 -
 31
31 -
 32
32 -
 33
33 -
 34
34 -
 35
35 -
 36
36 -
37
-
38
-
39
-
40
-
41
-
42
-
43
-
44
-
45
-
46
-
47
-
48
-
49
-
50
-
51
-
52
-
53
-
54
-
55
-
56
-
57
-
58
-
59
-
60
-
61
-
62
-
63
-
64
-
65
-
66
-
67
-
68
-
69
-
70
-
71
-
72
-
73
-
74
-
75
-
76
-
77
-
78
-
79
-
80
-
81
-
82
-
83
-
84
-
85
-
86
-
87
-
88
-
89
-
90
-
91
-
92
-
93
-
94
-
95
-
96
-
97
 |
 |