Nokia IP390 Installation Guide - Page 68
To add or replace DIMMs, System > Configuration > Reboot or Shutdown > Halt.
 |
View all Nokia IP390 manuals
Add to My Manuals
Save this manual to your list of manuals |
Page 68 highlights
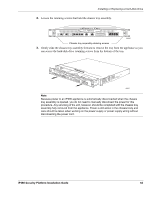
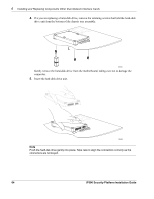
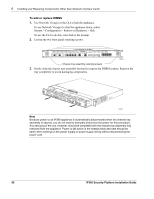
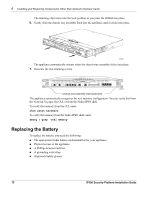
6 Installing and Replacing Components Other than Network Interface Cards To add or replace DIMMs 1. Use Network Voyager or the CLI to halt the appliance. To use Network Voyager to shut the appliance down, select System > Configuration > Reboot or Shutdown > Halt. To use the CLI to do this, enter halt at the prompt. 2. Loosen the two front panel retaining screws. IP390 00525 Chassis tray assembly retaining screws 3. Gently slide the chassis tray assembly forward to expose the DIMM sockets. Remove the tray completely to avoid damaging components. IP390 00537 Note Because power to an IP390 appliance is automatically disconnected when the chassis tray assembly is opened, you do not need to manually disconnect the power for this procedure. Any servicing of the unit, however, should be completed with the chassis tray assembly fully removed from the appliance. Power is still active in the chassis body and care should be taken when working on the power supply or power supply wiring without disconnecting the power cord. 68 IP390 Security Platform Installation Guide
-
 1
1 -
2
-
3
-
4
-
5
-
6
-
7
-
8
-
9
-
10
-
11
-
12
-
13
-
14
-
15
-
16
-
17
-
18
-
19
-
20
-
21
-
22
-
23
-
24
-
25
-
26
-
27
-
28
-
29
-
30
-
31
-
32
-
33
-
34
-
35
-
36
-
37
-
38
-
39
-
40
-
41
-
42
-
43
-
44
-
45
-
46
-
47
-
48
-
49
-
50
-
51
-
52
-
53
-
54
-
55
-
56
-
57
-
58
-
59
-
60
-
61
-
62
-
 63
63 -
 64
64 -
 65
65 -
 66
66 -
 67
67 -
 68
68 -
 69
69 -
 70
70 -
 71
71 -
 72
72 -
 73
73 -
74
-
75
-
76
-
77
-
78
-
79
-
80
-
81
-
82
-
83
-
84
-
85
-
86
-
87
-
88
-
89
-
90
-
91
-
92
-
93
-
94
-
95
-
96
-
97
 |
 |
