Oki B6300 B6200/6300 Technical Reference/User's Guide - Page 29
Printing on Custom Size Paper
 |
View all Oki B6300 manuals
Add to My Manuals
Save this manual to your list of manuals |
Page 29 highlights
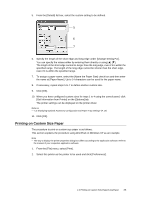
5. From the [Details] list box, select the custom setting to be defined. 5 6 7 6. Specify the length of the short edge and long edge under [Change Setting For]. You can specify the values either by entering them directly or using [ ] [ ]. The length of the short edge cannot be longer than the long edge, even if it is within the specified range. The length of the long edge cannot be shorter than the short edge, even if it is within the specified range. 7. To assign a paper name, select the [Name the Paper Size] check box and then enter the name at [Paper Name]. Up to 14 characters can be used for the paper name. 8. If necessary, repeat steps 5 to 7 to define another custom size. 9. Click [OK]. 10. When you have configured custom sizes for trays 1 to 4 using the control panel, click [Get Information from Printer] on the [Options] tab. The printer settings can be displayed on the printer driver. Refer to • "1.5 Displaying Optional Accessory Configuration and Paper Tray Settings" (P. 16) 11. Click [OK]. Printing on Custom Size Paper The procedure to print on custom size paper is as follows. This section explains the procedure using WordPad on Windows XP as an example. Note • The way to display the printer properties dialog box differs according to the application software. Refer to the manual of your respective application software. 1. From the [File] menu, select [Print]. 2. Select this printer as the printer to be used and click [Preferences]. 2.4 Printing on Custom Size Paper/Long Paper 25
-
 1
1 -
2
-
3
-
4
-
5
-
6
-
7
-
8
-
9
-
10
-
11
-
12
-
13
-
14
-
15
-
16
-
17
-
18
-
19
-
20
-
21
-
22
-
23
-
 24
24 -
 25
25 -
 26
26 -
 27
27 -
 28
28 -
 29
29 -
 30
30 -
 31
31 -
 32
32 -
 33
33 -
 34
34 -
35
-
36
-
37
-
38
-
39
-
40
-
41
-
42
-
43
-
44
-
45
-
46
-
47
-
48
-
49
-
50
-
51
-
52
-
53
-
54
-
55
-
56
-
57
-
58
-
59
-
60
-
61
-
62
-
63
-
64
-
65
-
66
-
67
-
68
-
69
-
70
-
71
-
72
-
73
-
74
-
75
-
76
-
77
-
78
-
79
-
80
-
81
-
82
-
83
-
84
-
85
-
86
-
87
-
88
-
89
-
90
-
91
-
92
-
93
-
94
-
95
-
96
-
97
-
98
-
99
-
100
-
101
-
102
-
103
-
104
-
105
-
106
-
107
-
108
-
109
-
110
-
111
-
112
-
113
-
114
-
115
-
116
-
117
-
118
-
119
-
120
-
121
-
122
-
123
-
124
-
125
-
126
-
127
-
128
-
129
-
130
-
131
-
132
-
133
-
134
-
135
-
136
-
137
-
138
-
139
-
140
-
141
-
142
-
143
-
144
-
145
-
146
-
147
-
148
-
149
-
150
-
151
-
152
-
153
-
154
-
155
-
156
-
157
-
158
-
159
-
160
-
161
-
162
-
163
 |
 |
