Onkyo TX-SV636 Owner Manual - Page 4
Setting, voltage, selector, tuning
 |
View all Onkyo TX-SV636 manuals
Add to My Manuals
Save this manual to your list of manuals |
Page 4 highlights
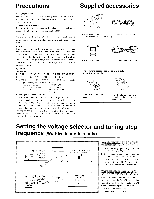
Precautions Supplied accessories I. Warranty Card The serial number is v, ritten on the rear panel of this unit. Copy the serial number and model number onto your warranty card and keep it in a safe place. 2. Recording Copyright Recording of copyrighted material for other than personal use is illegal without permission of the copyright holder. 3. AC Fuse The fuse is located inside the chassis and is not user-serviceable. If power does not come on, contact your Onkyo authorized service station. 4. Care From time to time you should wipe the front and rear panels and the cabinet with a soft cloth. For heavier dirt, dampen a soft cloth in a weak solution of mild detergent and water, wring it out dry, and wipe off the dirt. Following this, dry immediately with a clean cloth. Do not use rough material, thinners, alcohol or other chemical solvents or cloths since these could damage the finish or remove the panel lettering. 5. Power WARNING BEFORE PLUGGING IN THE UNIT FOR THE FIRST TIME. READ THE FOLLOWING SECTION CAREFULLY. • Some models are designed for use only with the power supply voltage of the region where they are sold. European and Australian models: L.S.A. and Canadian models: World, ids model AC 230V. 50H/ AC 120V, 60Hz AC 220-230V/120V switchable, 50/60Hz • Voltage Selector (Rear Panel) Worldwide models are equipped with a voltage selector to con- form to local power supplies. Be sure to set this switch to match the voltage of the power supply in your area before plugging in the unit. Models without a voltage selector can only be used in areas where the power supple is the same as that of the unit. Turning off the power switch does not shut off the power com- pletely. So the power cord should he reinmed from AC outlet when not in use for a prolonged time. 1 Remote controller 1 Remote control cable 2 Batteries (size AA, R6, or UM-3) 1 AM loop antenna 1 T-shaped FM antenna The following accessories are only available for worldwide models. 1 75/300 ohm antenna adaptor 1 CV plug (Shape may vary according to the area where purchased.) Setting the voltage selector and tuning step frequency (Worldwide models only) O© ©6,' . 0 .' e otwo pie we w VOLTAGE SELECTOR 220-230V, 120V Voltage selector 1. Determine the proper voltage for your area: 220-230V or I20V. 1. If the preset voltage is not correct for your area, insert a screwdriver into the groove in the switch. Slide the switch all the way to the right ( I 20V) or to the left (220-230V), whichever is appropriate. 4-& 4- .0 We el eoloowewewewleeeeWo -©© coi ,2070k--..-,- 0 0 4 AM FREQ. STEP 9kHz 10kHz ■ AM tuning step frequency Worldwide models are equipped with a switch that controls the AM band tuning steps. Please set this switch to match the AM band tuning step frequency in your area. U.S.A. and Canada : 10kHz Other areas : 9kHz
-
 1
1 -
 2
2 -
 3
3 -
 4
4 -
 5
5 -
 6
6 -
 7
7 -
 8
8 -
 9
9 -
 10
10 -
11
-
12
-
13
-
14
-
15
-
16
-
17
-
18
-
19
-
20
-
21
-
22
-
23
-
24
-
25
-
26
-
27
-
28
-
29
-
30
-
31
-
32
-
33
-
34
-
35
-
36
-
37
-
38
-
39
-
40
-
41
-
42
-
43
-
44
-
45
-
46
 |
 |
