Pioneer AVH-P8400BH Owner's Manual - Page 11
Head unit, s what - navigation
 |
View all Pioneer AVH-P8400BH manuals
Add to My Manuals
Save this manual to your list of manuals |
Page 11 highlights
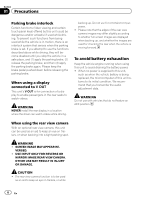
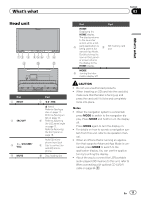
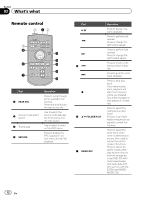
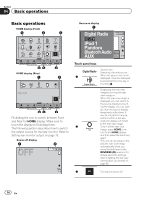
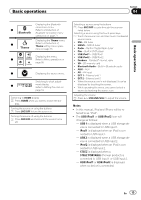
What's what Section 03 What's what Head unit 12 3 45 6 7 8 9 a b Part 1 RESET 2 SRC/OFF 3 +/- (VOLUME/ VOL) 4 MUTE Part 7 c/d (TRK) h (eject) Refer to Ejecting a disc on page 17. Refer to Ejecting an SD on page 18. 8 Refer to Adjusting the LCD panel angle on page 17. Refer to Removing the front panel on page 18. Auto EQ microphone input jack 9 Use to connect an auto EQ microphone. a Disc loading slot Part Part HOME Displaying the HOME display. The display returns to the Launcher screen while a 3rd- 5 party application is being used in Ad- b SD memory card slot vanced App Mode. Doubleclicking the icon on the Launch- er screen returns the display to the HOME display. MODE 6 Turning the infor- mation display off. CAUTION ! Do not use unauthorized products. ! When inserting an SD card into the card slot, make sure that the label is facing up and press the card until it clicks and completely locks into place. Notes ! When the navigation system is connected, press MODE to switch to the navigation display. Press MODE and hold to turn the display off. Press MODE again to turn the display on. ! For details on how to operate a navigation system from this unit, refer to its operation manual. ! When an iPhone that is running an application that supports Advanced App Mode is connected, press MODE to switch to the application display. You can use the application by touching the display. ! About the way to connect the USB portable audio player/USB memory to this unit, refer to When connecting with optional CD-IU201V cable on page 84. En 11
-
 1
1 -
2
-
3
-
4
-
5
-
 6
6 -
 7
7 -
 8
8 -
 9
9 -
 10
10 -
 11
11 -
 12
12 -
 13
13 -
 14
14 -
 15
15 -
 16
16 -
17
-
18
-
19
-
20
-
21
-
22
-
23
-
24
-
25
-
26
-
27
-
28
-
29
-
30
-
31
-
32
-
33
-
34
-
35
-
36
-
37
-
38
-
39
-
40
-
41
-
42
-
43
-
44
-
45
-
46
-
47
-
48
-
49
-
50
-
51
-
52
-
53
-
54
-
55
-
56
-
57
-
58
-
59
-
60
-
61
-
62
-
63
-
64
-
65
-
66
-
67
-
68
-
69
-
70
-
71
-
72
-
73
-
74
-
75
-
76
-
77
-
78
-
79
-
80
-
81
-
82
-
83
-
84
-
85
-
86
-
87
-
88
-
89
-
90
-
91
-
92
-
93
-
94
-
95
-
96
-
97
-
98
-
99
-
100
-
101
-
102
-
103
-
104
-
105
-
106
-
107
-
108
-
109
-
110
-
111
-
112
-
113
-
114
-
115
-
116
 |
 |