Pioneer VSX-1021-K Owner's Manual - Page 14
Speaker System menu. - wireless adapter
 |
UPC - 884938132978
View all Pioneer VSX-1021-K manuals
Add to My Manuals
Save this manual to your list of manuals |
Page 14 highlights
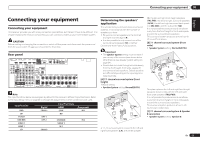
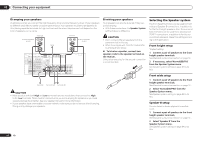
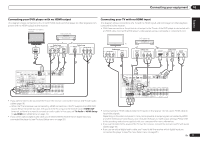
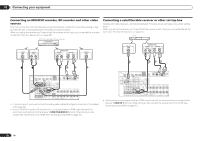
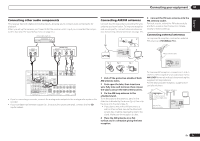
03 Connecting your equipment Bi-amping your speakers Bi-amping is when you connect the high frequency driver and low frequency driver of your speakers to different amplifiers for better crossover performance. Your speakers must be bi-ampable to do this (having separate terminals for high and low) and the sound improvement will depend on the kind of speakers you're using. Front right Bi-amp compatible speaker High Low Center Front left High Bi-amp compatible speaker Low HDMI IN 1 ASSIGNABLE 1 VIDEO 1 IN BD IN DVD IN DVR/BDR IN OUT DC OUTPUT for WIRELESS LAN LAN (10/100) COAXIAL IN 1 ASSIGNABLE IN 2 IN 1 IN 2 OPTICAL ASSIGNABLE CONTROL IN OUT IR IN VIDEO ZONE 2 AUDIO DVR/BDR CD-R/TAPE ZONE 2 (OUTPUT 5 V 0.6 A MAX) OUT MONITOR OUT TV/SAT VIDEO 1 IN IN OUT L ADAPTER PORT (OUTPUT 5 V OUT 0.1 A MAX) R ANTENNA (DVD) (CD) (TV/SAT) (DVR/BDR) OUT DVR/ BDR OUT IN 1 (DVD) ASSIGN ABLE IN 2 (DVR/ BDR) IN DVD IN IN IN CD FM UNBAL L 75 AM LOOP IN SIRIUS A R FRONT R L IN L IN CENTER SURROUND R L SURROUND BACK / ZONE 2 R L(Single) FRONT HEIGHT / WIDE / R L B MONITOR OUT Y PB PR COMPONENT VIDEO R TV/SAT VIDEO 1 DVD SUBWOOFER CAUTION: ATTENTION: PRE OUT SPEAKER IMPEDANCE ENCEINTE D'IMPEDANCE DE 6 -16 . 6 -16 . SPEAKERS SELECTABLE SEE INSTRUCTION MANUAL Class 2Wiring SELECTABLE VOIR LE MODE D'EMPLOI Subwoofer Surround right Surround left CAUTION ! Most speakers with both High and Low terminals have two metal plates that connect the High to the Low terminals. These must be removed when you are bi-amping the speakers or you could severely damage the amplifier. See your speaker manual for more information. ! If your speakers have a removable crossover network, make sure you do not remove it for bi-amping. Doing so may damage your speakers. Bi-wiring your speakers Your speakers can also be bi-wired if they support bi-amping. ! With these connections, the Speaker System setting makes no difference. CAUTION ! Don't connect different speakers from the same terminal in this way. ! When bi-wiring as well, heed the cautions for bi-amping shown above. % To bi-wire a speaker, connect two speaker cords to the speaker terminal on the receiver. Using a banana plug for the second connection is recommended. Selecting the Speaker system The front height terminals can be used for front wide and Speaker B connections, in addition to for the front height speakers. Also, the surround back terminals can be used for bi-amping and ZONE 2 connections, in addition to for the surround back speakers. Make this setting according to the application. Front height setup *Default setting 1 Connect a pair of speakers to the front height speaker terminals. See Standard surround connection on page 13 . 2 If necessary, select 'Normal(SB/FH)' from the Speaker System menu. See Speaker system setting on page 64 to do this. Front wide setup 1 Connect a pair of speakers to the front height speaker terminals. See Standard surround connection on page 13 . 2 Select 'Normal(SB/FW)' from the Speaker System menu. See Speaker system setting on page 64 to do this. Speaker B setup You can listen to stereo playback in another room. 1 Connect a pair of speakers to the front height speaker terminals. See Standard surround connection on page 13 . 2 Select 'Speaker B' from the Speaker System menu. See Speaker system setting on page 64 to do this. 14 En
-
 1
1 -
2
-
3
-
4
-
5
-
6
-
7
-
8
-
 9
9 -
 10
10 -
 11
11 -
 12
12 -
 13
13 -
 14
14 -
 15
15 -
 16
16 -
 17
17 -
 18
18 -
 19
19 -
20
-
21
-
22
-
23
-
24
-
25
-
26
-
27
-
28
-
29
-
30
-
31
-
32
-
33
-
34
-
35
-
36
-
37
-
38
-
39
-
40
-
41
-
42
-
43
-
44
-
45
-
46
-
47
-
48
-
49
-
50
-
51
-
52
-
53
-
54
-
55
-
56
-
57
-
58
-
59
-
60
-
61
-
62
-
63
-
64
-
65
-
66
-
67
-
68
-
69
-
70
-
71
-
72
-
73
-
74
-
75
-
76
-
77
-
78
-
79
-
80
-
81
-
82
-
83
-
84
-
85
-
86
-
87
-
88
-
89
-
90
-
91
-
92
-
93
-
94
-
95
-
96
-
97
-
98
-
99
-
100
-
101
-
102
-
103
-
104
-
105
-
106
-
107
-
108
-
109
-
110
-
111
-
112
-
113
-
114
-
115
-
116
-
117
-
118
-
119
-
120
-
121
-
122
-
123
-
124
-
125
-
126
-
127
-
128
-
129
-
130
-
131
-
132
-
133
-
134
-
135
-
136
-
137
-
138
-
139
-
140
-
141
-
142
-
143
-
144
-
145
-
146
-
147
-
148
-
149
-
150
-
151
-
152
-
153
-
154
-
155
-
156
-
157
-
158
-
159
-
160
-
161
-
162
-
163
-
164
-
165
-
166
-
167
-
168
-
169
-
170
-
171
-
172
-
173
-
174
-
175
-
176
-
177
-
178
-
179
-
180
-
181
-
182
-
183
-
184
 |
 |
