Samsung SCD303 User Manual (user Manual) (English, French) - Page 20
parez votre cam, scope, Preparation - battery
 |
View all Samsung SCD303 manuals
Add to My Manuals
Save this manual to your list of manuals |
Page 20 highlights
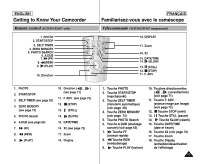
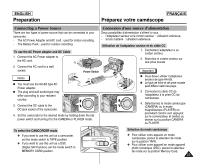
ENGLISH Preparation How to use the Remote Control (SCD305/D307 only) Battery Installation for the Remote Control ✤ You need to insert or replace the lithium battery when : - You purchase the camcorder. - The remote control doesn't work. ✤ Ensure that you insert the lithium battery correctly, following the + and - markings. ✤ Be careful not to reverse the polarity of the battery. FRANÇAIS Préparez votre caméscope Utilisation de la télécommande (SCD305/D307 uniquement) Installation de la batterie de la télécommande ✤ Vous devez insérer ou remplacer la batterie au lithium : - lors de l'achat du caméscope, - quand la télécommande ne fonctionne pas. ✤ Insérez la batterie au lithium (CR2025) en respectant la polarité + et -. ✤ Veillez à ne pas inverser la polarité de la batterie. Self Record using the Remote Control When you use the Self Timer function on the remote control, the recording begins automatically in 10 seconds. 1. Set the camcorder to CAMERA mode. 2. Press the SELF TIMER button until the appropriate indicator is displayed in the LCD. Self Timer 3. Press the START/STOP button to start the timer. - Self Timer starts counting down from 10 with a beep sound. - In the last one second of the countdown, the beep sound gets faster, then recording starts automatically. - If you want to cancel the Self Timer function before recording, press the SELF TIMER button. 4. Press START/STOP again when you wish to stop recording. START/ STOP PHOTO DISPLAY SELF ZERO DATE/ TIMER MEMORY TIME PHOTO SEARCH A.DUB SLOW X2 F.ADV Enregistrement automatique avec la télécommande La fonction de minuterie automatique sur la télécommande vous permet de démarrer automatiquement l'enregistrement au bout de 10 secondes. 1. Réglez le caméscope sur CAMERA (mode caméscope). 2. Appuyez sur la touche SELF TIMER jusqu'à ce que l'indication souhaitée s'affiche dans le viseur. 3. Appuyez sur la touche START/STOP pour démarrer la minuterie. - La minuterie automatique entame un décompte de 10 secondes en émettant un bip. - À la dernière seconde du décompte, le bip s'accélère, puis l'enregistrement démarre automatiquement. - Pour désactiver la fonction de minuterie automatique avant l'enregistrement, appuyez sur la touche SELF TIMER. 4. Appuyez de nouveau sur START/STOP pour arrêter l'enregistrement. 20
-
 1
1 -
2
-
3
-
4
-
5
-
6
-
7
-
8
-
9
-
10
-
11
-
12
-
13
-
14
-
 15
15 -
 16
16 -
 17
17 -
 18
18 -
 19
19 -
 20
20 -
 21
21 -
 22
22 -
 23
23 -
 24
24 -
 25
25 -
26
-
27
-
28
-
29
-
30
-
31
-
32
-
33
-
34
-
35
-
36
-
37
-
38
-
39
-
40
-
41
-
42
-
43
-
44
-
45
-
46
-
47
-
48
-
49
-
50
-
51
-
52
-
53
-
54
-
55
-
56
-
57
-
58
-
59
-
60
-
61
-
62
-
63
-
64
-
65
-
66
-
67
-
68
-
69
-
70
-
71
-
72
-
73
-
74
-
75
-
76
-
77
-
78
-
79
-
80
-
81
-
82
-
83
-
84
-
85
-
86
-
87
-
88
-
89
-
90
-
91
-
92
-
93
-
94
-
95
-
96
-
97
-
98
-
99
-
100
-
101
-
102
-
103
-
104
-
105
-
106
-
107
 |
 |
