Samsung SCD303 User Manual (user Manual) (English, French) - Page 27
Inserting and Ejecting a Cassette, Insertion et éjection d'une cassette
 |
View all Samsung SCD303 manuals
Add to My Manuals
Save this manual to your list of manuals |
Page 27 highlights
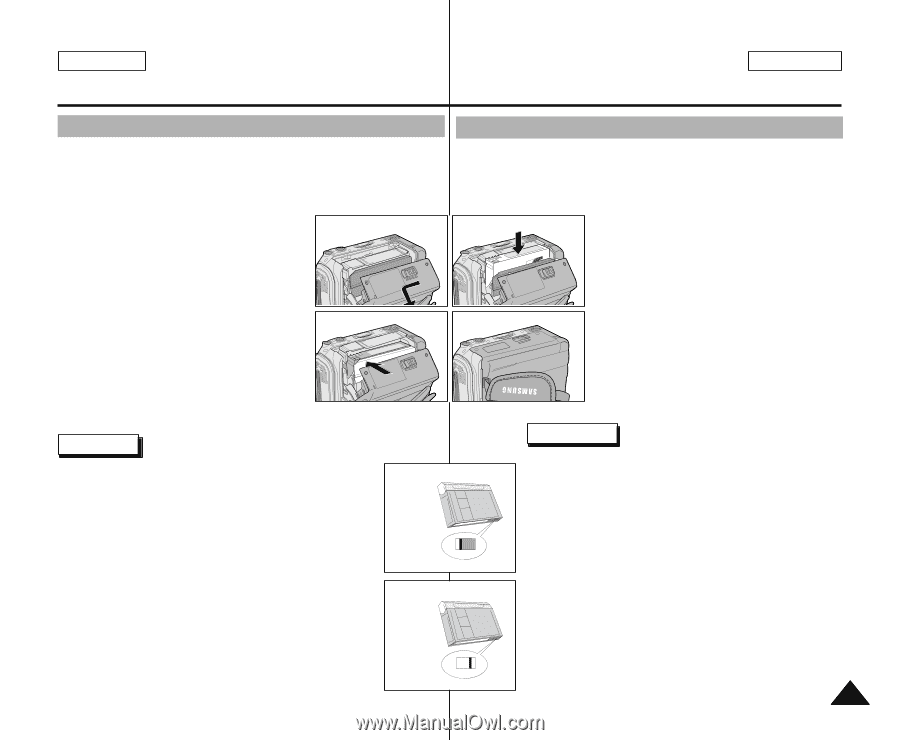
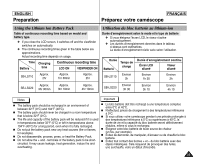
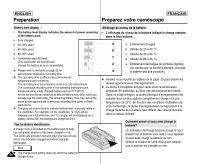
ENGLISH Preparation FRANÇAIS Préparez votre caméscope Inserting and Ejecting a Cassette ✤ When inserting a tape or closing a cassette holder, do not apply excessive force. This may cause a malfunction. ✤ Do not use any tapes other than Mini DV cassettes. 1. Connect a power source and slide the TAPE EJECT switch and open the 1 cassette door. - The cassette holding mechanism rises automatically. 2. Insert a tape into the cassette holder with the tape window facing outward and the protection tab bottom. 3 3. Press the area marked PUSH on the cassette holding mechanism until it clicks into place. - The cassette is loaded automatically. push 4. Close the cassette door. - Close the door completely until you hear a "click". Note When you have recorded something that you wish to keep, a. SAVE you can protect it so that it will not be accidentally erased. a. Protecting a tape : Push the safety tab on the cassette so that the hole is uncovered. b. Removing the tape protection : If you no longer wish to keep the recording on the cassette, push the safety tab back so that it covers the hole. b. REC • How to store a tape a. Avoid places with magnets or magnetic interference. b. Avoid humidity and dust prone places. c. Keep the tape in an upright position and avoid storing it in direct sunlight. d. Avoid dropping or knocking your tapes. Insertion et éjection d'une cassette ✤ Ne forcez pas pour insérer une bande ou refermer le compartiment à cassette. Vous risqueriez de provoquer un dysfonctionnement. ✤ N'utilisez pas d'autres types de bandes que les Mini DV. 2 1. Faites glisser la touche TAPE EJECT vers l'avant et soulevez légèrement le couvercle du compartiment à cassette. - Le compartiment s'ouvre automatiquement. 2. Insérez une cassette dans le compartiment, face transparente tournée 4 vers l'extérieur et languette de protection vers le bas. 3. Appliquez une légère pression à l'endroit marqué PUSH jusqu'à ce qu'un déclic se produise. 4. Refermez le couvercle du compartiment jusqu'à ce que vous entendiez un "clic". Important Lorsque vous avez enregistré une cassette que vous souhaitez garder, vous pouvez la protéger contre un effacement accidentel. a. Enregistrement impossible (protection): Faites glisser la languette de protection vers la position SAVE de façon à découvrir l'ouverture. b. Enregistrement possible: Pour réenregistrer sur une cassette, repoussez la languette de protection de façon à recouvrir l'ouverture (position REC). • Rangement des bandes a. Ne placez pas les bandes à proximité d'aimants ou d'interférences magnétiques. b. Évitez les endroits humides et poussiéreux. c. Rangez-les en position verticale, à l'abri du soleil. d. Ne faites pas tomber les bandes et ne les cognez pas. 27
-
 1
1 -
2
-
3
-
4
-
5
-
6
-
7
-
8
-
9
-
10
-
11
-
12
-
13
-
14
-
15
-
16
-
17
-
18
-
19
-
20
-
21
-
 22
22 -
 23
23 -
 24
24 -
 25
25 -
 26
26 -
 27
27 -
 28
28 -
 29
29 -
 30
30 -
 31
31 -
 32
32 -
33
-
34
-
35
-
36
-
37
-
38
-
39
-
40
-
41
-
42
-
43
-
44
-
45
-
46
-
47
-
48
-
49
-
50
-
51
-
52
-
53
-
54
-
55
-
56
-
57
-
58
-
59
-
60
-
61
-
62
-
63
-
64
-
65
-
66
-
67
-
68
-
69
-
70
-
71
-
72
-
73
-
74
-
75
-
76
-
77
-
78
-
79
-
80
-
81
-
82
-
83
-
84
-
85
-
86
-
87
-
88
-
89
-
90
-
91
-
92
-
93
-
94
-
95
-
96
-
97
-
98
-
99
-
100
-
101
-
102
-
103
-
104
-
105
-
106
-
107
 |
 |