Samsung SGH-T139 User Manual (user Manual) (ver.f6) (English) - Page 37
Storing a Number in the SIM Card - how it works
 |
View all Samsung SGH-T139 manuals
Add to My Manuals
Save this manual to your list of manuals |
Page 37 highlights
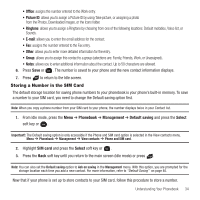
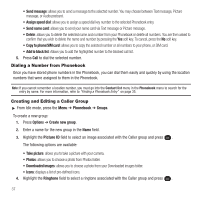
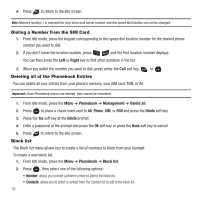
• Office: assigns the number entered to the Work entry. • Picture ID: allows you to assign a Picture ID by using Take picture, or assigning a photo from the Photos, Downloaded images, or the Icons folder. • Ringtone: allows you to assign a Ringtone by choosing from one of the following locations: Default melodies, Voice list, or Sounds. • E-mail: allows you to enter the email address for the contact. • Fax: assigns the number entered to the Fax entry. • Other: allows you to enter more detailed information for the entry. • Group: allows you to assign this contact to a group (selections are: Family, Friends, Work, or Unassigned). • Notes: allows you to enter additional information about the contact. Up to 50 characters are allowed. 6. Press Save or . The number is saved to your phone and the new contact information displays. 7. Press to return to the Idle screen. Storing a Number in the SIM Card The default storage location for saving phone numbers to your phonebook is your phone's built-in memory. To save a number to your SIM card, you need to change the Default saving option first. Note: When you copy a phone number from your SIM card to your phone, the number displays twice in your Contact list. 1. From Idle mode, press the Menu ➔ Phonebook ➔ Management ➔ Default saving and press the Select soft key or . Important!: The Default saving option is only accessible if the Phone and SIM card option is selected in the View contacts menu. Menu ➔ Phonebook ➔ Management ➔ View contacts ➔ Phone and SIM card. 2. Highlight SIM card and press the Select soft key or . 3. Press the Back soft key until you return to the main screen (Idle mode) or press . Note: You can also set the Default saving option to Ask on saving in the Management menu. With this option, you are prompted for the storage location each time you add a new contact. For more information, refer to "Default Saving" on page 40. Now that if your phone is set up to store contacts to your SIM card, follow this procedure to store a number. Understanding Your Phonebook 34
-
 1
1 -
2
-
3
-
4
-
5
-
6
-
7
-
8
-
9
-
10
-
11
-
12
-
13
-
14
-
15
-
16
-
17
-
18
-
19
-
20
-
21
-
22
-
23
-
24
-
25
-
26
-
27
-
28
-
29
-
30
-
31
-
 32
32 -
 33
33 -
 34
34 -
 35
35 -
 36
36 -
 37
37 -
 38
38 -
 39
39 -
 40
40 -
 41
41 -
 42
42 -
43
-
44
-
45
-
46
-
47
-
48
-
49
-
50
-
51
-
52
-
53
-
54
-
55
-
56
-
57
-
58
-
59
-
60
-
61
-
62
-
63
-
64
-
65
-
66
-
67
-
68
-
69
-
70
-
71
-
72
-
73
-
74
-
75
-
76
-
77
-
78
-
79
-
80
-
81
-
82
-
83
-
84
-
85
-
86
-
87
-
88
-
89
-
90
-
91
-
92
-
93
-
94
-
95
-
96
-
97
-
98
-
99
-
100
-
101
-
102
-
103
-
104
-
105
-
106
-
107
-
108
-
109
-
110
-
111
-
112
-
113
-
114
-
115
-
116
-
117
-
118
-
119
-
120
-
121
-
122
-
123
-
124
-
125
-
126
-
127
-
128
-
129
 |
 |