Samsung SM-G730A User Manual At&t Wireless Sm-g730a Galaxy S3 Mini Jb Engl - Page 62
Address Book Options, Options in Address Book
 |
View all Samsung SM-G730A manuals
Add to My Manuals
Save this manual to your list of manuals |
Page 62 highlights
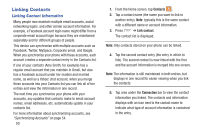
4. At the Sync settings screen, tap the options that you would like to synchronize for that account. 5. Tap Sync now to synchronize the account. The account is synchronized. 6. Press to return to the Contacts list. Note: You can also synchronize your accounts using the Settings menu. For more information, refer to "Synchronizing Accounts" on page 124. Address Book Options You can access Address Book options while at the main Address Book page or while in the details page for a specific entry. Options in Address Book 1. From the Home screen, tap Contacts . then press 2. The following options are displayed: • Delete: allows you to delete 1 or more of your contacts. • SIM Management: allows you to copy contacts from your phone to your SIM card or from your SIM card to your phone. You can also delete contacts from your SIM. 55 • Import/Export: allows you to move contacts to or from your memory card or USB storage. You can also send a namecard via Bluetooth, Email, Gmail, Messaging, or Wi-Fi Direct. • Share namecard via: allows you to send the contact's information via Bluetooth, Email, Gmail, Messaging, or Wi-Fi Direct. • Speed dial setting: allows you to set up speed-dialing. For more information, refer to "Making a Call Using Speed Dial" on page 39. • Send message/email: allows you to send a text or message. • Contacts to display: You can choose to display all of your contacts or only display contacts on your Phone, SIM, or contacts stored to other accounts. You can also tap Customized list to change other options on how your contacts are displayed. • Settings: allows you to choose set the following options: - Only contacts with phones: allows you to only display contacts that have phone numbers. - List by: allows you to sort by First name or Last name. - Display contacts by: allows you to sort by First name or Last name first.
-
 1
1 -
2
-
3
-
4
-
5
-
6
-
7
-
8
-
9
-
10
-
11
-
12
-
13
-
14
-
15
-
16
-
17
-
18
-
19
-
20
-
21
-
22
-
23
-
24
-
25
-
26
-
27
-
28
-
29
-
30
-
31
-
32
-
33
-
34
-
35
-
36
-
37
-
38
-
39
-
40
-
41
-
42
-
43
-
44
-
45
-
46
-
47
-
48
-
49
-
50
-
51
-
52
-
53
-
54
-
55
-
56
-
 57
57 -
 58
58 -
 59
59 -
 60
60 -
 61
61 -
 62
62 -
 63
63 -
 64
64 -
 65
65 -
 66
66 -
 67
67 -
68
-
69
-
70
-
71
-
72
-
73
-
74
-
75
-
76
-
77
-
78
-
79
-
80
-
81
-
82
-
83
-
84
-
85
-
86
-
87
-
88
-
89
-
90
-
91
-
92
-
93
-
94
-
95
-
96
-
97
-
98
-
99
-
100
-
101
-
102
-
103
-
104
-
105
-
106
-
107
-
108
-
109
-
110
-
111
-
112
-
113
-
114
-
115
-
116
-
117
-
118
-
119
-
120
-
121
-
122
-
123
-
124
-
125
-
126
-
127
-
128
-
129
-
130
-
131
-
132
-
133
-
134
-
135
-
136
-
137
-
138
-
139
-
140
-
141
-
142
-
143
-
144
-
145
-
146
-
147
-
148
-
149
-
150
-
151
-
152
-
153
-
154
-
155
-
156
-
157
-
158
-
159
-
160
-
161
-
162
-
163
-
164
-
165
-
166
-
167
-
168
-
169
-
170
-
171
-
172
-
173
-
174
-
175
-
176
-
177
-
178
-
179
-
180
-
181
-
182
-
183
-
184
-
185
-
186
-
187
-
188
-
189
-
190
-
191
-
192
-
193
-
194
-
195
-
196
-
197
-
198
-
199
-
200
-
201
-
202
-
203
-
204
-
205
-
206
-
207
-
208
-
209
-
210
-
211
-
212
-
213
-
214
-
215
-
216
-
217
-
218
-
219
-
220
-
221
-
222
 |
 |
