Sharp AR-M205 AR-M160 AR-M205 Operation Manual - Page 25
Manual Ratio Selection
 |
View all Sharp AR-M205 manuals
Add to My Manuals
Save this manual to your list of manuals |
Page 25 highlights
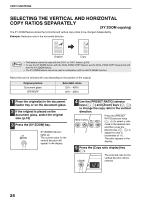
COPY FUNCTIONS 4 Press the [AUTO IMAGE] key. AUTO IMAGE The AUTO IMAGE indicator lights up and the appropriate ratio for the original size and paper size is selected. (The indicator of the selected ratio will light up.) 5 Set the number of copies and other copy settings, and then press the [START] key ( ). The copy will be delivered to the paper output tray. Note To cancel automatic ratio selection, press the [AUTO IMAGE] key again. • If the ORIGINAL SIZE indicator blinks, Note change the orientation of the placed original. • If the copy is made when a PRESET RATIO selector indicator is blinking, the copied image may run off the page. 2 MANUAL RATIO SELECTION Copies can be reduced down to 25% or enlarged up to 400%. The [PRESET RATIO] selector keys ( , ) can be pressed to quickly select a ratio from among eight preset ratios. In addition, the [Zoom] keys ( , ) can be pressed to select the ratio in increments of 1%. 1 Place the original in the document feeder tray or on the document glass. 2 If the original is placed on the document glass, select the original size. (p.18) 3 Use the [PRESET RATIO] selector keys ( , ) and [Zoom] keys ( , ) to select the desired copy ratio. PRESET RATIO 200% 141 129 121 100% 95 77 64 50% Selecting a preset ratio Press the [PRESET RATIO] selector key ( ) to move up through the preset ratios. Press the [PRESET RATIO] selector key ( ) to move down through the preset ratios. ZOOM 25 400% Fine adjustment of the ratio Any ratio from 25% to 400% can be set in increments of 1%. Note • To verify a zoom setting without changing the zoom ratio, Hold down the [Copy ratio display] key ( ). When the key is released, the display will return to the number of copies display. • If the copy is made when a PRESET RATIO selector indicator or the ZOOM indicator is blinking, the copied image may run off the page. To ensure that the image fits on the page, lower the copy ratio until the indicator stops blinking and lights steadily. • If the PAPER SIZE indicator is not lit, there is no appropriate paper. Load appropriate paper in a paper tray (p. 14). 4 Set the number of copies and other copy settings, and then press the [START] key ( ). The copy will be delivered to the paper output tray. To return the ratio to 100%, press the Note [PRESET RATIO] selector key ( or ) until the 100% indicator lights up. Press a [PRESET RATIO] selector key ( or ) to set the approximate ratio, then press the [Zoom] keys ( or ) to increase or decrease the ratio. To decrease or increase the zoom ratio rapidly, hold down the [Zoom] keys ( or ). When a [Zoom] key ( or ) is pressed, the ZOOM indicator will light up and the zoom ratio will appear in the display for about two seconds. 23
-
 1
1 -
2
-
3
-
4
-
5
-
6
-
7
-
8
-
9
-
10
-
11
-
12
-
13
-
14
-
15
-
16
-
17
-
18
-
19
-
 20
20 -
 21
21 -
 22
22 -
 23
23 -
 24
24 -
 25
25 -
 26
26 -
 27
27 -
 28
28 -
 29
29 -
 30
30 -
31
-
32
-
33
-
34
-
35
-
36
-
37
-
38
-
39
-
40
-
41
-
42
-
43
-
44
-
45
-
46
-
47
-
48
-
49
-
50
-
51
-
52
-
53
-
54
-
55
-
56
-
57
-
58
-
59
-
60
-
61
-
62
-
63
-
64
-
65
-
66
-
67
-
68
-
69
-
70
-
71
-
72
-
73
-
74
-
75
-
76
-
77
-
78
-
79
-
80
-
81
-
82
-
83
-
84
-
85
-
86
-
87
-
88
-
89
-
90
-
91
-
92
-
93
-
94
-
95
-
96
 |
 |
