Sharp AR-M205 AR-M160 AR-M205 Operation Manual - Page 43
Operation In Copy, Printer, And Scanner Modes - driver for windows 7
 |
View all Sharp AR-M205 manuals
Add to My Manuals
Save this manual to your list of manuals |
Page 43 highlights
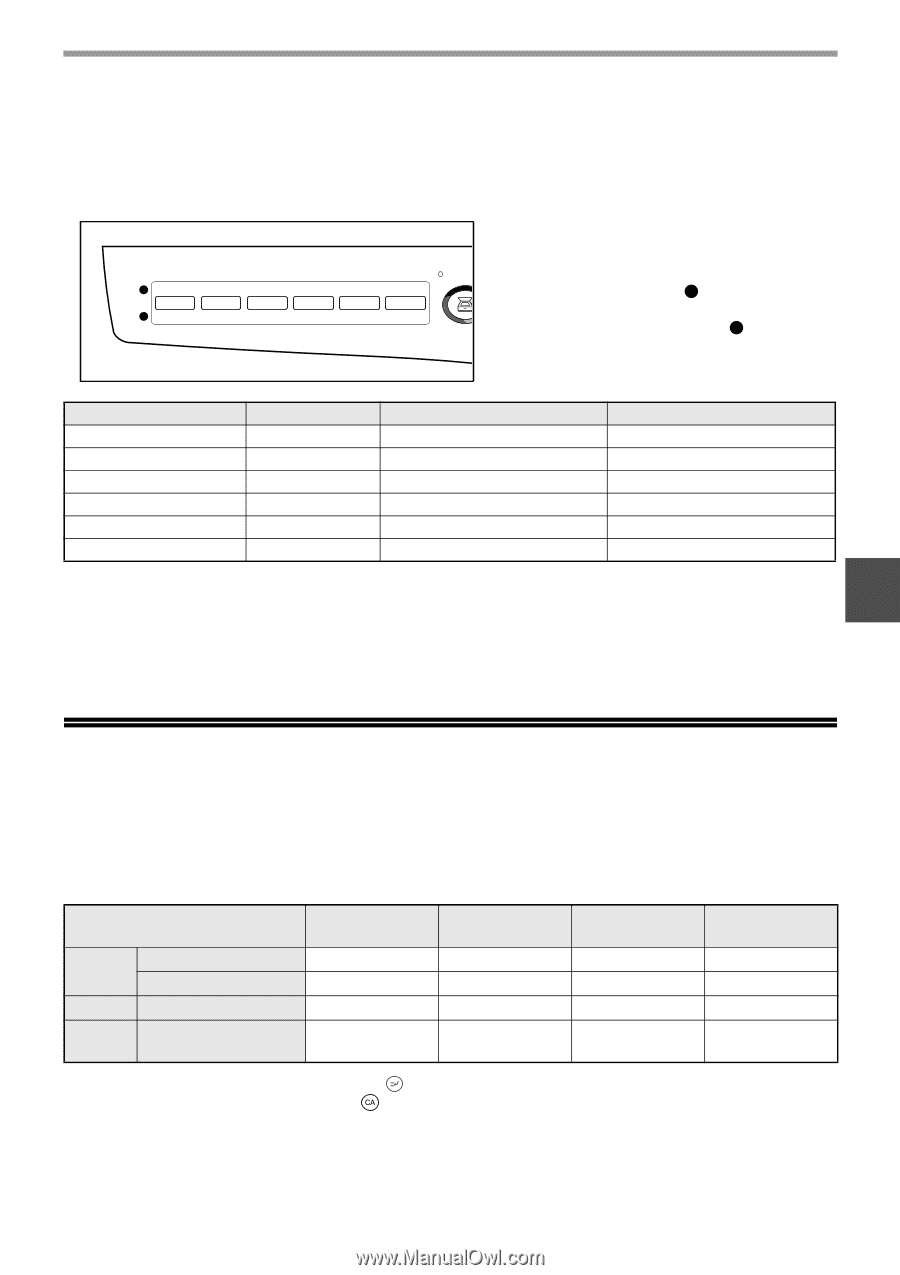
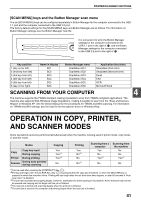
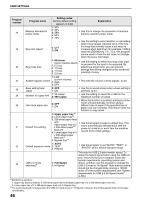
PRINTER/SCANNER FUNCTIONS [SCAN MENU] keys and the Button Manager scan menu The six [SCAN MENU] keys can be configured separately in Button Manager for the computer connected to the USB 1.1 port and the computer connected to the USB 2.0 port. The factory default settings for the [SCAN MENU] keys and Button Manager are as follows. For information on Button Manager settings, see the Button Manager help file. 11 2 2 3 4 5 6 It is convenient to write the Button Manager SCAN settings for the computer connected to the USB 1.1 port to the right of 1 , and the Button Manager settings for the computer connected to the USB 2.0 port to the right of 2 . Key position 1 (key on far left) 2 (2nd key from left) 3 (3rd key from left) 4 (4th key from left) 5 (5th key from left) 6 (key on far right) Name in display SC1 SC2 SC3 SC4 SC5 SC6 Button Manager menu ScanMenu SC1 ScanMenu SC2 ScanMenu SC3 ScanMenu SC4 ScanMenu SC5 ScanMenu SC6 Application that starts Sharpdesk (Full color) Sharpdesk (Monochrome) Email FAX OCR Microsoft Word SCANNING FROM YOUR COMPUTER 4 The machine supports the TWAIN standard, making it possible to scan from TWAIN-compliant applications. The machine also supports WIA (Windows Image Acquisition), making it possible to scan from the "Scan and Camera Wizard" in Windows XP. See the Online Manual for the procedures for TWAIN and WIA scanning. For information on TWAIN and WIA settings, see the help file for the scanner driver or Windows Help. OPERATION IN COPY, PRINTER, AND SCANNER MODES Some operations cannot be performed simultaneously when the machine is being used in printer mode, copy mode, or scanner mode. Modes Copy Copy key input During copying Printer During printing Scanner During scan preview/ during scanning Copying Yes Yes*1 Yes*3 No Printing Yes No*2 No No*5 Scanning from a computer Yes No Yes*4 Scanning from the machine No No Yes*4 No No *1Can be used after pressing the [INTERRUPT] key ( ). *2Printing will begin when the [CLEAR ALL] key ( ) is pressed after the copy job is finished, or when the [ON LINE] key is pressed to switch the machine online. Printing will also begin after the set auto clear time elapses, or after 60 seconds if "Auto clear timer" is disabled. *3The print job is paused and copying begins. However, automatic two-sided copying is not possible. A two-sided print job will not be paused and copying will not begin until the job is finished. *4The scan job is stored and scanning begins when the print job is finished. *5The print job is stored in the computer and printing begins when the scan job is finished. 41
-
 1
1 -
2
-
3
-
4
-
5
-
6
-
7
-
8
-
9
-
10
-
11
-
12
-
13
-
14
-
15
-
16
-
17
-
18
-
19
-
20
-
21
-
22
-
23
-
24
-
25
-
26
-
27
-
28
-
29
-
30
-
31
-
32
-
33
-
34
-
35
-
36
-
37
-
 38
38 -
 39
39 -
 40
40 -
 41
41 -
 42
42 -
 43
43 -
 44
44 -
 45
45 -
 46
46 -
 47
47 -
 48
48 -
49
-
50
-
51
-
52
-
53
-
54
-
55
-
56
-
57
-
58
-
59
-
60
-
61
-
62
-
63
-
64
-
65
-
66
-
67
-
68
-
69
-
70
-
71
-
72
-
73
-
74
-
75
-
76
-
77
-
78
-
79
-
80
-
81
-
82
-
83
-
84
-
85
-
86
-
87
-
88
-
89
-
90
-
91
-
92
-
93
-
94
-
95
-
96
 |
 |