Singer SINGER I Professional Instruction Manual - Page 34
Singer SINGER I Professional Manual
 |
View all Singer SINGER I Professional manuals
Add to My Manuals
Save this manual to your list of manuals |
Page 34 highlights
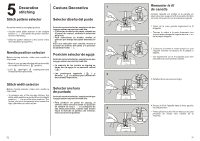
Threading the machine 1. Place spool on spool pin. Use the correct spool pin holder to hold spool 2 firmly in place. 2. Lift the presser foot, and turn the hand wheel towards you until the take-up lever reaches its highest position. 6 1 3. Lead thread passing it first under the thread guide. Next through the upper slot, leading the thread to the right and around (illustration 1). 4. Pass the thread through the second thread guide by inserting it under, and then up from the left and over the top (illustration 2). 5. Pass the thread around the tension, so that it slips between the tension disks (illustration 3). 3 6. With your right hand holding the spool of thread, pull the thread coming up the left side of the tension up towards the top of the machine, allowing the thread to slide inside the hook. You will hear a clicking sound.(illustration 5). 4 7. Pass the thread through the take-up lever as shown in illustration 6. 4 5 32 Point zig-zag Ce point peut être utilisé pour surfiler, appliquer, broder des monogrammes et autres décorations. Réglages recommandés Sélection de point: Point zig-zag (B) Position d'aiguille: Largeur de point: 12 3 4 5 Longueur de point: 1 à 5 Pied presseur: Universelle (B) Plaque à aiguille: Universelle (A) Finitions des coutures Pour éviter que le bord des coutures ne s'effiloche, utilisez le point de zig-zag. • Piquez les coutures. Recoupez-les régulièrement et repassez les coutures ouvertes. • Placez la valeur de la couture sous le pied. • Surfilez le bord de façon que le point de zig-zag se trouve à cheval sur le bord. Point de bourdon Réglages recommandés Sélection de point: Point zig-zag (B) Position d'aiguille: Largeur de point: 12 3 4 5 Longueur de point: 1 à 2 Pied presseur: Spécial (J) Plaque à aiguille: Universelle (A) Le point de bourdon est une série de points de zig-zag rapprochés. Ce point permet les applications, les finitions d'ourlets et la broderie de monogrammes. • Faites un essai pour choisir l'apparence désirée. Monogrammes • Sur l'endroit du tissu, tracez légèrement le dessin des lettres. • Présentez ce tracé sous l'aiguille. • Brodez en recouvrant le tracé; pour tourner le travail, laissez l'aiguille dans le tissu. • Tirez les fils sur l'envers du travail, nouez-les et coupez-les. 57
-
 1
1 -
2
-
3
-
4
-
5
-
6
-
7
-
8
-
9
-
10
-
11
-
12
-
13
-
14
-
15
-
16
-
17
-
18
-
19
-
20
-
21
-
22
-
23
-
24
-
25
-
26
-
27
-
28
-
 29
29 -
 30
30 -
 31
31 -
 32
32 -
 33
33 -
 34
34 -
 35
35 -
 36
36 -
 37
37 -
 38
38 -
 39
39 -
40
-
41
-
42
-
43
-
44
-
45
-
46
 |
 |
