Singer SINGER I Professional Instruction Manual - Page 46
Singer SINGER I Professional Manual
 |
View all Singer SINGER I Professional manuals
Add to My Manuals
Save this manual to your list of manuals |
Page 46 highlights
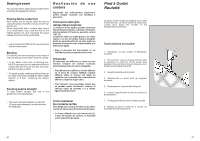
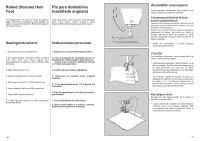
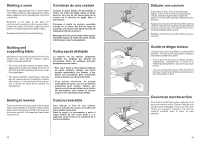
Starting a seam Place fabric under presser foot ½" (12mm) from rear of fabric. Align the right edge with one of the seam guidelines on the needle plate. Lower the presser foot. Backstitch to the edge of the fabric for reinforcement by pushing in the reverse button, located the center of the stitch length dial. Hold button in until stitching reaches edge of fabric. Release push button for forward stitching. Comienzo de una costura Coloque el tejido debajo del prensatelas a 12mm. del fondo del tejido. Alínee el borde derecho con una de las líneas-guías de la costura de la plancha de aguja. Baje el prensatelas. Pulsando el botón de costura reversible situado en el centro del dial de largo de puntadas, cosa hacia atrás hasta el fondo del tejido para reforzar la costura. Mantenga el botón presionado hasta que las puntadas lleguen al fondo del tejido. Suelte el botón para coser hacia adelante. Guiding and supporting fabric Most fabrics need only to be guided in front of the presser foot. Some fabrics, however, require support while being stitched. • For tricot, and other similar synthetic knits, apply gentle tension by holding the fabric at the front and back of presser foot as you sew. Do not pull fabric. • For elasticized fabric, stretch lace, and knits with an unusual amount of elasticity, hold the fabric firmily in front and back of the presser foot to stretch the seam as the stitches are being placed. Guía y ayuda del tejido La mayoría de los tejidos sólamente necesitan ser dirigidos por delante del prensatelas. Otros, sin embargo, precisan ayuda mientras se cosen. • Para coser tricot y otros tejidos similares de punto sintético, aplique una ligera tensión agarrándolo por delante y por detrás del prensatelas para mantenerlo tenso mientras cose. No tire del tejido. • Para tejidos elásticos, de encaje extensible y de punto, con una cantidad de elasticidad poco común, aplique una tensión más firme por delante y por detrás del prensatelas, para estirar la costura según se van aplicando las puntadas. Sewing in reverse To secure the end of a seam, push in the reverse button and backstitch 3-4 stitches. Raise needle and presser foot and remove fabric by drawing it to the back and left. Cut thread on thread cutter on presser bar. Costura reversible Para reforzar el final de una costura, presione el botón de costura reversible y de 3-4 puntadas hacia atrás. Eleve la aguja y el prensatelas y quite el tejido tirando de este hacia atrás y a la izquierda. Corte el hilo en el cortahilos de la barra prensatelas. 44 Débuter une couture Positionnez le tissu sous le pied presseur. Alignez le bord droit le long de la ligne-guide choisie, baissez l'aiguille dans la ligne de piqûre à 1cm du bord supérieur. Baissez le pied presseur. Appuyez sur le bouton de marche arrière situé au centre du sélecteur de longueur de point. Piquez jusqu'au bord du tissu en marche arrière pour renforcer le départ de la couture. Relâchez le bouton de marche arrière et piquez en avant. Guider et diriger le tissu La plupart des tissus se guident à l'avant du pied presseur. Certains tissus nécessitent quelques précautions pendant la couture. • Pour le tricot et des tissus similares, jerseys, synthétiques, maintenez-les à l'avant et à l'arrière du pied presseur sans tirer ni pousser le tissu. • Les tissus extensibles doivent être fermement tendus à l'avant et à l'arrière du pied presseur pour détendre la couture. Couture en marche arrière Pour renforcer la fin de la couture, appuyez sur le bouton de marche arrière. Relevez l'aiguille et le pied presseur et dégagez le tissu en le tirant vers l'arrière sur la gauche. Coupez le fil à l'aide du coupe-fil encastré dans la barre du pied presseur. 45
-
 1
1 -
2
-
3
-
4
-
5
-
6
-
7
-
8
-
9
-
10
-
11
-
12
-
13
-
14
-
15
-
16
-
17
-
18
-
19
-
20
-
21
-
22
-
23
-
24
-
25
-
26
-
27
-
28
-
29
-
30
-
31
-
32
-
33
-
34
-
35
-
36
-
37
-
38
-
39
-
40
-
 41
41 -
 42
42 -
 43
43 -
 44
44 -
 45
45 -
 46
46
 |
 |
