Singer SINGER I Professional Instruction Manual - Page 7
Singer SINGER I Professional Manual
 |
View all Singer SINGER I Professional manuals
Add to My Manuals
Save this manual to your list of manuals |
Page 7 highlights
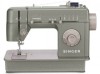
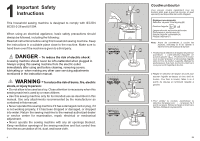
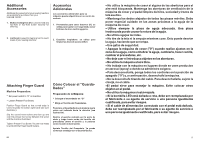
Attaching a button Flat buttons can be sewn on quickly and easily using the plain zig-zag stitch. A special button sewing foot (H), may be purchased from your retailer. Recommended settings Stitch Selection: Zig-zag stitch (B) Needle Position : Stitch Width: To suit Button Foot: Button Sewing (H) Needle Plate : General Purpose (A) Attach Feed Cover (F) Pegado de botones Los botones planos pueden coserse con rapidez y facilidad, utilizando el punto de zigzag plano. El prensatelas especial para coser botones (H) puede adquirirlo en su centro de costura. Posiciones recomendadas Selección punto: Punto zig-zag (B) Posición aguja: Anchura punto: Apropiada al botón Prensatelas: Para coser botones (H) Plancha aguja: Uso general (A) Colocar Plancha Cubre Arrastre (F) Note: Before you can attach a button, the bobbin thread must be brought up through the hole in the feed cover. 1.Set stitch width at ( ), and needle position selector at ( ). Position button under foot and lower the needle into the center of the left hole. Lower the foot. Turn hand wheel toward you until needle rises out of button and is above the foot. Nota: Antes de pegar un botón, el hilo de la bobina debe sacarse por el agujero de la plancha cubre arrastre. 1. Coloque el ancho del punto en ( ) y el selector de posición de aguja en ( ). Colocar el botón debajo del prensatelas y bajar la aguja dentro del centro del agujero izquierdo. Bajar el prensatelas. Gire el volante hacia Vd. hasta que la aguja salga del botón y esté por encima del prensatelas. 2.Move stitch width selector until needle is over the other hole in the button. Then, when you begin to stitch, the needle should enter into the right hole of the button. Take six or more zigzag stitches to attach button and finish with the needle on the left side. 2. Mueva el selector de anchura hasta que la aguja esté sobre el otro agujero del botón. Entonces, cuando empiece a coser, la aguja debería entrar dentro del agujero derecho del botón. De seis o más puntos en zig-zag para pegar el botón y acabe con la aguja en el lado izquierdo. Keep fingers away from all moving parts. Special care is required around the sewing machine needle. Always use the proper needle plate. The wrong plate can cause the needle to break. Do not use bent needles. Do not pull or push fabric while stitching. It may deflect the needle causing it to break. Wear safety glasses. Switch the sewing machine off ("0") when making any adjustment in the needle area, such as threading needle, changing needle, threading bobbin, or changing presser foot, etc. Never drop or insert any object into any opening. Do not use outdoors. Do not operate where aerosol (spray) products are being used or where oxygen is being administrated. To disconnect, turn all controls to the off ("0") position, then remove plug from outlet. Do not unplug by pulling on cord. To unplug, grasp the plug, not the cord. The foot control is used to operate the machine. Avoid placing other objects on the foot control. Do not use the machine if it is wet. If the LED lamp is damaged or broken, it must be replaced by the manufacturer or its service agent or a similarly qualified person, in order to avoid a hazard. If the supply cord connected with the foot control is damaged, it must be replaced by the manufacturer or its service agent or a similarly qualified person, in order to avoid a hazard. 3.To secure stitching, adjust width to ( ) and take three or four stitches. Remove work, draw threads to underside, tie and trim. 3. Para assegurar el punto, ajuste la anchura a ( ), y de tres o cuatro puntadas. Quite la labor, lleve los hilos hacia la parte posterior, anúdelos y corte. 84 5
-
 1
1 -
 2
2 -
 3
3 -
 4
4 -
 5
5 -
 6
6 -
 7
7 -
 8
8 -
 9
9 -
 10
10 -
 11
11 -
 12
12 -
13
-
14
-
15
-
16
-
17
-
18
-
19
-
20
-
21
-
22
-
23
-
24
-
25
-
26
-
27
-
28
-
29
-
30
-
31
-
32
-
33
-
34
-
35
-
36
-
37
-
38
-
39
-
40
-
41
-
42
-
43
-
44
-
45
-
46
 |
 |
