Sony DSR 11 Operating Instructions - Page 12
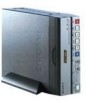
OUTPUT jacks, NTSC/PAL select switch, RESET button, CONTROL S jack - power supply
 |
View all Sony DSR 11 manuals
Add to My Manuals
Save this manual to your list of manuals |
Page 12 highlights
Chapter 1 Overview Location and Function of Parts 6 OUTPUT jacks Used to output analog video and audio signals. To connect a VCR equipped with S-video input, use the S VIDEO connector on the unit. Notes • Various text data are superimposed and output from the VIDEO jack or the S VIDEO connector on the OUTPUT jacks. If you want to output video signals without text data, carry out the following operations. - Set TITLE DISP and LABEL DISP on the CM SET menu to OFF. - Depending on the displayed items, press the MENU, DATA CODE, DISPLAY or SEARCH SELECT button on the Remote Commander to clear the text data on the monitor screen. For details on text data, see "Displaying data recorded on a tape" on page 25 (GB) and "Displaying various data" on page 26 (GB). For details on the CM SET menu, see "CM SET menu" on page 46 (GB). • When the unit is in the EE mode (when the input signal is output as an analog signal), the subcarrier of the color signal is not synchronized with the horizontal sync signal. The color of the picture or the horizontal sync signal may be distorted depending on the type of monitor connected to the unit. 7 NTSC/PAL select switch Used to switch the color system of signals that will be recorded on the unit when you use analog input. To change the switch setting, turn off the power of the unit first, then use the tip of a ball-point pen or similar tool to slide this switch. Before inputting NTSC or PAL formatted analog video signals, set this switch to appropriate position according to the color system of it. Notes • If the color system of the input signals is different from that of the switch setting, both picture and sound will be muted. • When inputting signals to the DV IN/OUT connector or during playback, this switch setting is invalid. The unit detects the color system of the signals automatically. • When the switch is set to PAL, the unit works as a PAL model. Therefore the time code generated by the unit while recording in the DVCAM format turns to the non-drop frame mode. Even if an NTSC formatted signal is input from the DV IN/OUT connector, the time code generated by the unit is nondrop frame mode as long as the switch is set to PAL, regardless of the TC FORMAT setting on the OTHERS menu. If you intend to set the unit to generate the time code in the drop frame mode, set the switch to NTSC. • The color system of the signals output from the unit is the one recorded on the tape being played back. The unit cannot convert the color system of signals of one system into that of the other. (For example: converting NTSC formatted signals into PAL formatted signals is not possible) Therefore, to view or record the signal output from the unit, you need a device compatible with the color system of the signals output from the unit. • When the color system of playback signals is different from the one last used on the unit, playback picture and sound will be distorted and time code will be discontinuous for a short time at the beginning of the playback. • If you play back a tape with both NTSC and PAL color system recordings, the following limitations apply. - At the point where the recorded signals format changes, the picture may be distorted or the audio noise may be output. - The tape transport control buttons may be disabled until the tape running is stabilized. • Do not change the switch setting during recording. 8 RESET button Press this button to initialize the internal clock and all menu items. Press this button with the tip of a ballpoint pen or similar tool. 9 CONTROL S jack Connects to a remote control unit (DSRM-20, not supplied) for controlling this unit. Note When using a CONTROL S-device, set the REMOTE CONTROL switch on the front panel to CONTROL S. Otherwise, you cannot operate the unit with CONTROL S-devices. 12 (GB) Chapter 1 Overview
-
 1
1 -
2
-
3
-
4
-
5
-
6
-
 7
7 -
 8
8 -
 9
9 -
 10
10 -
 11
11 -
 12
12 -
 13
13 -
 14
14 -
 15
15 -
 16
16 -
 17
17 -
18
-
19
-
20
-
21
-
22
-
23
-
24
-
25
-
26
-
27
-
28
-
29
-
30
-
31
-
32
-
33
-
34
-
35
-
36
-
37
-
38
-
39
-
40
-
41
-
42
-
43
-
44
-
45
-
46
-
47
-
48
-
49
-
50
-
51
-
52
-
53
-
54
-
55
-
56
-
57
-
58
-
59
-
60
-
61
-
62
-
63
-
64
-
65
-
66
-
67
-
68
-
69
-
70
-
71
-
72
-
73
-
74
-
75
-
76
-
77
-
78
-
79
-
80
-
81
-
82
-
83
-
84
-
85
-
86
-
87
-
88
-
89
-
90
-
91
-
92
-
93
-
94
-
95
-
96
-
97
-
98
-
99
-
100
-
101
-
102
-
103
-
104
-
105
-
106
-
107
-
108
-
109
-
110
-
111
-
112
-
113
-
114
-
115
-
116
-
117
-
118
-
119
-
120
-
121
-
122
-
123
-
124
 |
 |
