Sony DVP-CX995V Operating Instructions - Page 20
Step 4: Connecting the Audio Cords, Select a connection - cannot read
 |
UPC - 027242668591
View all Sony DVP-CX995V manuals
Add to My Manuals
Save this manual to your list of manuals |
Page 20 highlights
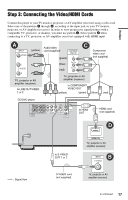
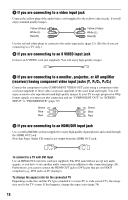
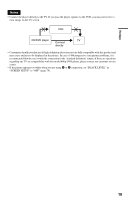
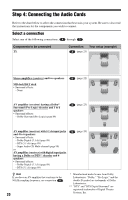
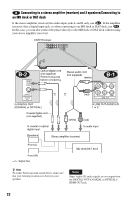
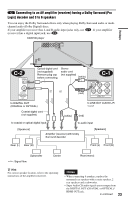
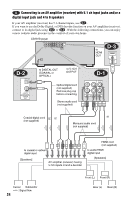
Step 4: Connecting the Audio Cords Refer to the chart below to select the connection that best suits your system. Be sure to also read the instructions for the components you wish to connect. Select a connection Select one of the following connections, A through D . Components to be connected TV Connection Your setup (example) A (page 21) Stereo amplifier (receiver) and two speakers MD deck/DAT deck • Surround effects: - None B (page 22) AV amplifier (receiver) having a Dolby* Surround (Pro Logic) decoder and 3 to 6 speakers • Surround effects: - Dolby Surround (Pro Logic) (page 89) C (page 23) AV amplifier (receiver) with 5.1 ch input jacks and 4 to 6 speakers • Surround effects: - Dolby Digital (5.1 ch) (page 89) - DTS (5.1 ch) (page 89) - Super Audio CD Multi channel (page 90) or AV amplifier (receiver) with digital input jacks having a Dolby or DTS** decoder and 6 speakers • Surround effects: - Dolby Digital (5.1 ch) (page 89) - DTS (5.1 ch) (page 89) D (page 24) z Hint If you have an AV amplifier that conforms to the 96 kHz sampling frequency, use connection D . 20 * Manufactured under license from Dolby Laboratories. "Dolby," "Pro Logic," and the double-D symbol are trademarks of Dolby Laboratories. ** "DTS" and "DTS Digital Surround" are registered trademarks of Digital Theater Systems, Inc.
-
 1
1 -
2
-
3
-
4
-
5
-
6
-
7
-
8
-
9
-
10
-
11
-
12
-
13
-
14
-
 15
15 -
 16
16 -
 17
17 -
 18
18 -
 19
19 -
 20
20 -
 21
21 -
 22
22 -
 23
23 -
 24
24 -
 25
25 -
26
-
27
-
28
-
29
-
30
-
31
-
32
-
33
-
34
-
35
-
36
-
37
-
38
-
39
-
40
-
41
-
42
-
43
-
44
-
45
-
46
-
47
-
48
-
49
-
50
-
51
-
52
-
53
-
54
-
55
-
56
-
57
-
58
-
59
-
60
-
61
-
62
-
63
-
64
-
65
-
66
-
67
-
68
-
69
-
70
-
71
-
72
-
73
-
74
-
75
-
76
-
77
-
78
-
79
-
80
-
81
-
82
-
83
-
84
-
85
-
86
-
87
-
88
-
89
-
90
-
91
-
92
-
93
-
94
-
95
-
96
 |
 |